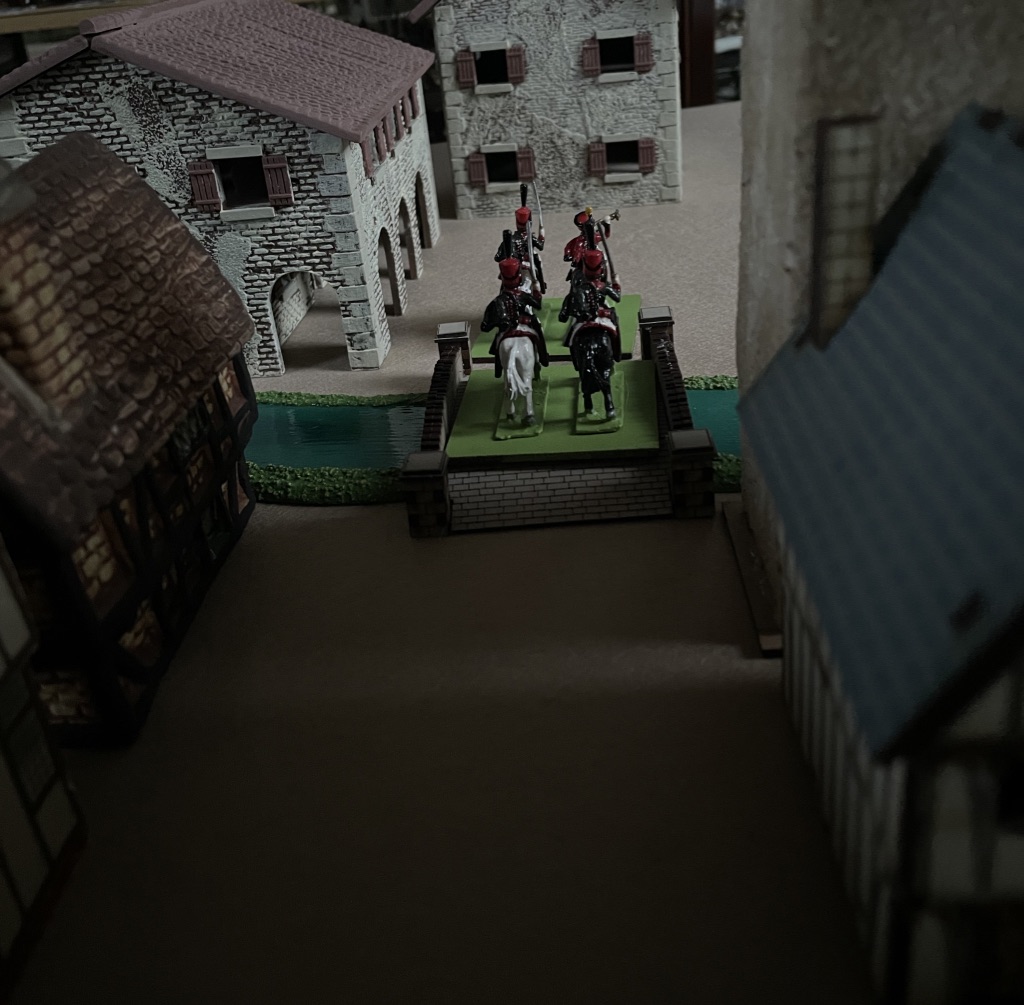
Lieutenant Osteen’s voice crackled over the airwaves.”……the ruskies – their rushing us…..”/ Captain Parker cut in “kill them Lieutenant, take them out – thats an order” / Lt. Osteen “……but sir their not even trying to fight their just crazy running at us…….”/ Cpt. Parker “it is a Ruskie rooze……..take ’em out – over and out!”.
“Damn it, Barnes what the hell is up with Osteen?”. Sergeant Barnes groaned, Osteen as usual had to complicate matters – shoot first ask questions later was the Barnes approach – it had kept him alive after all…..
Capt. Parker stomped out of the command tent.
Lieutenant Osteen’s voice cackled again on the radio, “Lt. Osteen reporting – russian troops have surrendered to us, repeat russian troops have surrendered to us…….”. “What the……” Sgt.Barnes began before Lt Osteen again “We are under attack – who the hell are these Yashin……..” the line fell dead but not before Yashin could be heard by Barnes responding………….. “Captain, Captain, Captaiiiiiiiinnnn Parker” – Barnes raced out the tent.
Meanwhile on the front line………
What is going on? Its only a painting pedestal after all……….
I thought about posting on the most influential blogs I have encountered in my gaming. It sort of sounded pompous. And when I thought about it the number is simply incredible anyway.
So I have settled for “Blog Influences”. In a time when “Influencers” are continuously big news it is quite strange to think that a few decades ago we had as much influencing going on but more through dominant communication organisations – the most obvious being newspapers and tv channels not to mention the ever present advertisers of the pre internet age. In a way we have always had influencers, they have simply changed shape, of course methods and their sheer numbers are now off the page.
My first influence then, which to choose? When I thought about it the big influence has been the one which set me off on my own blogging journey.
Blog Influence No1 is ironically the Battlegames Printed Magazine published by Henry Hyde and specifically an article by Greg Horne concerning a beginners guide to blogging (published around 2006) and referencing his “Duchy of Alzheim” blog. At the time I read the article and looked at the blog and thought ok – interesting, very interesting, but right now I just want to paint and game……..this blogging lark would be a distraction and consume precious hobby time.
Battlegames was eventually subsumed into Miniature Wargames Magazine and ultimately Henry went on to running his own successful Digital Platform.
Battlegames Magazine itself took me back into wargames fully by 2009, after over a decade tinkering with solo 15mm DBA campaigns. Not long after taking Battlegames regularly – around 2011 – I descended back into the land of 1/72 plastics which of course is another story. Low cost wargaming seemed appropriate at that time. Although you could say I was expanding from 600mm square 15mm figures at 12 elements a side gaming, towards bigger tables and potentially bigger armies! It is true I had acquired more space for my gaming.
I also remember back then encountering a wargamer at a show saying they were ditching 15mm for larger scales because of their failing eyesight. Maybe that thought stuck? Anyway I think 15mm always felt too much like a compromise. And I have not been drawn into 28mm which would be logical if eyesight were my sole issue concerning size/scale.
It took me another 13 years to actually blog myself but “hey-ho” better late than never. In the meantime blogging bit me as a consumer and my gaming has never been the same since. And it has been more fulfilling as a result.
So there you go – No1 of possibly a new post series.
The tanks in use were the usual suspects, however the C19th game included several units which were converted – head swops or using different paint jobs.
Here are some of the units that were in play.
For 1859 Piedmontese I basically used these Hat ACW Infantry Firing, a paint job adaption. Crucially the kepi gradually replaced the tapered stove pipe in Piedmont/Sardinian Armies between 1848 and 1870 so ACW sets are a good source for these forces and require little adaption. And at a squint can cover Danish troops in their German wars 1848-1864, but thats another story.Hat Napoleonic Russian Militia were simply painted as Milan Civil Guard. A couple of figures had flat hats created to replace their busby like hats. The Flag is a home made effort using artists acrylic pens on dried out glasses cleaner material. Yep some “value” glasses cleaner wipes don’t have a long shelf life – and I have packets of them! However oddly they are a bit like tough crepe paper so of course ended up in the hobby spares box.
The biggest conversion on show was my 1849 Piedmontese or Sardinians – rapidly expanded infantry were sent into battle with simple frockcoats and larger red tapered shakoes. (the regulars had double breasted frockcoats and smaller tapered stove pipe hats). I used Hat marching ACW union troops and took the Shakoes and back packs from Hat Dutch Napoleonic Infantry. These lancers are circa early 1970’s Minifigs – conversion is in my “minds eye” to some Piedmont Lancers who of course did not wear green! or had combs on the helmets, red on their pennants……oh well its amazing what you can forgive.
These figures are Strelets 1877 Russian Artillery posing as french artillery circa 1850. The “piece” is I think a Zvezda item from their Great Northern Wars rangeThese trusty Hussars date from the 1970’s and are French Napoleonic. They regularly turn up as Austrian Hussars in my games.The river is from S&A Scenics and the bridge is a laser wood cut kit from 4ground
My last unit on show is the 1860 British Legion – that sailed to Sicily with Garibaldi’s Mediterranean Invasion Army. The figures are Strelets Russian Turkish war of 1877 Russians in summer uniform.
Even in these days of a truly massive games market the more obscure historical events being modelled benefit from some conversion and adaption in order to capture the flavour of uniforms.
Well David Stones’ challenge finally got this piece of scenery done. Credit really goes to john@justneedsvarnish who alerted me to this challenge plus Frank tank rants who suggested that posting about fabulous pro-cycling scenery ought to translate into building some stuff!
Either way I finally completed this 2021 model. Better late than never as the saying goes.
Final touches were a ochre (rowney acrylic tube) whitened (MP Paints) dry brush to suggest some sun bleaching plus a bit of black (MP Paints) in the mix to dry brush the base area suggesting dirt.
Then some gamers grass (2mm summer green tufts) and an ancient pot of games workshop grit to finish the base.
Of course the unbelievably extravagant archway and door are round the back!
Thanks to John, Frank and Dave, I now have a new piece of terrain to use and enjoy.
out of the archive for john just needs varnish, looks like knife work and maybe not cutting before stripping outer card layers.
For those who made it this far…………….
Leaning tower of Parma! For scale here are some 1/72 miniatures – new kids on the block 1848 German Confederacy no less……….which can also double as Rifleman from Duchy of Parma 1851.
You can guess whats next on the Painting Table.
Finally, the question is, whether this will now lead to some more scenery making on my part?
A combination of Frank tank rats and john just add varnish have propelled me finally to do some scenery.
A 2021 lockdown tower knocked up in a day and then nothing…….
This subject was started back in April 2021 – I was motivated by john just add varnish and his excellent scratch builds.
It’s all card/plain and corrugated, uhu and some judicious glue gun work finished with some fine silver sand and pva. The ubiquitous laser cut bases came in useful
And just for the hell of it I registered this week to join scenery season challenge……
It’s still a work in progress…….
Just need some more dry brush on walls and maybe roof. Then some groundwork oh and door – it’s endless work in progress 😀
In the third battle of Oeversee – a Neil Thomas scenario, the same forces were deployed but slightly differently. Would these minor changes have an impact? The Danes were only very slightly forward and the Austrians attacked in multiple columns.
9th Hussars taking hits while the Artillery has an immediate impact on the Bell shako regimentThe 9th Hussars are dispersed by the blue kepi regiment while the artillery continue to dismay the Bell Shako regimentThe Elite Jaeger charged home suffer terrible lossesin the melee they lost more men and brokeThe Danish Artillery deployed on the road with Regular Austrian Battalions green and red/orange taking hitsThree battalions charge home – the Austrians adopted charge home tactics after 1859 war with France.The kepi Regiment are driven backThe Artillery are overrun – things are collapsing for the DanishOnly the rump of the Bell Shako Regiment survivesThe Red Shako Regiment are able to dispatch the red infantry battalion before Austrian the artillery shatter them.The Austrian battalions pursue the Blue Kepi Regiment destroying themNow just the rear Danish line remains – sky blue kepi regiment and the dark blue kepi regimentAlas the Elite Skirmishers have again worked their way round to take take these forces in the rear.The Austrians charge home and sweep away the sky blue kepi regimentNext the Orange Battalion takes on the Dark Blue Kepi RegimentThey are soon dispatched Game over within the time limit – the Austrians have met the objective and no Danes are left on the road. Soon the Imperial Forces will resume their march towards Jutland.
This was a quicker game and the Austrians were not delayed so much as in the previous two games. Crucially the Austrians attacked in force early.
I do think the three games show there is some subtlety in Neil Thomas’ rules and they repay attention to his design thinking which is comprehensive in achieving such brevity in the mechanisms.
My only issue is that for my bases the “4 in column” for a column look wrong so I may well switch to 2×2 although for the small scenarios like this one might need tweaking.
What are 28mm figures good for? Well if your a 1/72 figure follower then they are fantastic to paint!
Or rather in my case to experiment with. Recently Wargames Illustrated ran a contrast paints article while Wargames Soldiers and Strategy dealt with slap chop.
I have been edging towards these products simply because I bought a load on impulse. This is normal behaviour for an Erratic: A solution looking for a problem.
The problem has been I could not bring myself to use them in anger on my 1/72, 20-25mm figures without knowing their possibilities for me including my failures. Clearly they have been a great success for others.
And then there was the Wargames Illustrated article on “what a cowboy”, next minute I dug out some Dixon and Blue Moon figures from the dim and distant past, gathering dust in the great figure vault.
And then “ping” what if I experimented with these new paints and methods (new for me) on these figures?
They were definitely bought at Triples in Sheffield but around 2011!!! I think that means they were on the back burner……..
Anyway this is as far as I got and maybe I might not get much further – back on the painting table……
Big turf out and a surprising number of figures – they were already based and undercoated white. I sloshed cheap burnt sienna over them….I realised some were prohibition era gangsters while I also found a couple of freebies – Rasputin and Karl Marx. I primed these black. I then did some slap chop white dusting – at least I used a stolen make up brush on the gangsters……it worked quite nicely. Need to buy some.And then I simply ignored all the video and magazine advice I had gathered recently and got paint on the figures! Which was very pleasing. Note the appalling slap chop white work on Mr red hats arm – never mind.
Well this Tangent may develop or simply become another Icarus episode in the world of the wargaming erratic.
Wargames in Print has been on a rocky road – I was a subscriber to Battlegames (BG) not long after I found it by chance on a WHSmith railway station stall back in 2008. I abandoned that journey when it really disappeared into Miniature Wargames (MW). MW had always been a mixed blessing for me while Wargames Illustrated (WI) had been a favorite before leaving the hobby.
Henry Hyde and BG brought me back into the hobby. And I returned to the Wargames Publication world transformed by the Internet with Blogging/Being online all the rage.
I started reading blogs about 2011 and the print market now seemed terminal although BG helped sustain my interest. WSS I luckily discovered at another WHSmith when that shops footfall was in serious decline.
Today I am fully erratic! If I buy at all, it is mainly WSS but occasionally WI and MW.
The WSS focus was Hundred Years War and although at the wrong end of the war for my latest interest I decided to take a punt. I enjoyed it and I liked the range of scenarios/actions.
The Slap Chop/Grisaille method painting article was a bonus. I have read quite a few online articles on this subject yet some printed paper words and pictures were still enticing. That is the “print preference” still in me. I could contrast it (sorry) with the Speedpaint article in WI425, but I won’t, it was another very effective print article on a subject I have read round on the internet.
Now MW484. The last word was by Brenden Wheatley who talked about the importance of the Solo Wargamers Association and solo wargaming that sustained his hobby which he now pursues in both Budapest (see some hussars and music at the end of this post in Budapest) and Brecon!
Mid 19th Century warfare was a topic in WI425 – Perry French Franco Prussian War (FPW) plastics painting class while MW484 led with the Schlieswig Holstein Question.
Dave Tuck gave an excellent taster for the two wars – 1st and 2nd (1848 and 1864 respectively). Given MW style and content he did the subject justice and I would definitely recommend it to anyone wanting a clear straighforward way into the subject.
FREE RULES – Dave Tuck offers his ruleset via a link on the MW web page. FREE WARGAME RULES
Interestingly Dave Tuck started his journey before the FPW range from Perrys appeared and after the Helion range had ceased production. He had also used the North Star range. For coverage of the second war (1864) the one he opted to develop, he also resorted to conversions.
And I do think you should not be put off by the lack of a “go to” range. in 28mm 1864 can draw on Perrys FPW and any number of ACW ranges as well as other mid century wars in the Americas as well as the Crimean war of 1854.
If you are a uniform purist then that lack of exact replicas will probably drive you mad!
For the 1st war in 28mm, if you want to literally start at the beginning you can steal lots of Napoleonic era forces. 1815 to 1848 saw new uniform ideas but a lot of conservatism while weapons technology appeared to have stalled. A few months into the 1849/50 war and its all changing with kepis and pickelhaubes gathering pace alongside frockcoats, breechloaders, rifling and even the very early machine gun. Given quartermasters stores and regulations were never up to the minute, you can have lots of leeway in my view. You can borrow both back, forward and sideways for these wars!
I have grown to like the 1st Schlieswig Holstein war period simply because I get the best of both worlds – with the early versions of FPW uniforms and weapons still mixed up with Napoleonics. You have tailcoats, frockcoats, all types of shako, kepis, pickelhaubes, flat caps, smoothbores and rifled weapons in the mix plus of course emerging railways and telegraph.
If I was doing 28mm I would follow Dave Tucks approach and start with 1864 (the 2nd War) using FPW/ACW resources.
If your more Napoleonic in outlook opt for the 1848 or slightly earlier uniforms – the Danes are clearly still Napoleonic as are many German Confederation troops which just leaves the Prussians and Bavarians in their iconic pickelhaubes and combed helmets to be sourced from ACW/FPW era. And you don’t need fancy rifled/breechloading artillery yet – smooth bores will still work. You can also consider Crimea War for 1850’s era uniforms.
I would look at Ed M’s Wargames Meanderings for further inspiration if Dave Tuck’s article does not convince you.
I wanted as, with many of my projects, a low cost option. 1/72 plastics used to be low cost. Now they are no longer so cheap. Yet you can still pick up around 50 figures for £10. The key issue is sculpting quality, figure poses and paintability. You have to love the sculpts, I have grown to like their roughness in an age of 3D marketed perfection. To get the repetitous poses you may want you have to buy multiple boxes. My advice then is that if multiple poses is a problem go with 25/28mm sector metals. Finally paintability – the internet provides an astonishing window into the art of those who wash, prime and then successfully paint bendy plastics. My favorite site for inspiration is Pauls Bods – he can even make venerable airfix ranges look compelling. Also Philotep is worth a look. And you can always look at weather like Crimea, being winter wars there is a greatcoats crossover which can hide a multitude of things. Tumbling Dice Miniatures do ranges of 1/72 sculpts which are excellent – cast in pewter. I prefer the figures in summer gear with greatcoats packed away and blankets rolled. So Crimea ranges might also help here for those who want correct season clothing. Also Jacklex relaunched a few years ago in 20mm.
I opted for 20/25mm and have accepted a complete mash up of ranges both plastic and metal and the inevitable conversions.
20/25mm or 1/72 is small enough to hide the imperfections at 3 feet yet not so small that you can’t enjoy each figure in its own right. The scale remains my perfect compromise for the “table top” game.
WW1 Austrians repainted to 1850’s Danish in transition (Irregular Miniatures Metals)
Hat – Prussians from Zulu War British and ACW mash ups while WW1 Germans just get a repaint to become German Confederation troops. Nassau troops become well Nassauers for 1848 and offer also another take on Danish Bell Shako infantry.
Strelets – 1877 Russian dragoons become Danish Sharpshooters, 1806 Prussian Hussars become 1848 Prussian Hussars with a repaint
Airfix – WW1 British flat caps join ACW frock coats from strelets/hat to become Danish Riflemen in 1848
My latest addition is B&B Miniatures SH Rebel Dragoons and SH Rebel Artillery (in Prussian gear)
All this 20/25mm focus spun out of my Italian Wars of Independence 1848/1859 project (Italian wars of independence) when again I baulked at 28mm metal costs as the project was only meant to be a minor detour…….
Danish Line Infantry 1849 (Irregular Metals from their Colonial Range)
Alas the sheer variety of infantry types has overun my imagination and SHQ remains a questionable (sorry again) project with slow yet very enjoyable progress! Most units and figures are stuck on the paint table because I keep being distracted by mechanised warfare, medievals, Sci-Fi and yes even some FPW french figures daliance – Emhar – You can’t keep a good kepi down.
Which brings me back to WSS125 again and the 100YW. I have succumbed to yet more diversity in my painting – digging out my various unpainted medieval figures. My aim had always been Italy for this period, but it seems alighting on the battle of Shrewsbury 1403 while reading a biography of Henry IV caused me to re-examine an english force.
Who can avoid Hotspur…..thin end of a new wedge?
It remains to be seen what progress I make. And of course the next butterfly moment armed with a chance magazine purchase is probably just round the corner………
The Second battle using my “Buildings Blast” set up saw a mid 19th century action with Austrians and Piedmontese in play. It was a solo play this time.
I used the rules published by John Curry and the “history of wargaming project” with some adaption for solo play.
Using Neil Thomas grading of troops I adjusted the firing and melee rules.
I also used the Roster system unaltered. Infantry got 4 circles and a cross while Artillery got just 2 circles in this game. Essentially in the basic game a hit meant a unit (= 1 base) was destroyed. Roster rules gave units/bases lives in the form of circles and crosses on the roster which you ticked off as they were lost.
The Scenario was that the Austrians were retreating and the force here was ordered to hold the bridge in the town. The crossing was one of only a few that allowed artillery and logistics easy crossing of the river. The Piedmontese advancing from the north west had orders to seize the bridge as quickly as possible.
Forces were randomly assigned using playing card allocations along with a portion of blank entriesUnits deployed in contact and units were recognised as such at about 6 inches – the card only turned on a 2-6 D6. Here the right hand Piedmontese were certain nothing was in front of them – a heart was a dummy card while the left hand unit was not so sure so hesitated (on a d1) with no card turn. The right hand units poured forward towards the “old millhouse” spotting some real Austrian defendersThe lefthand Piedmontese units were suddenly exposed to Austrian infantry fire from a slightly sunken roadon the east side of the main road two piedmontese artillery batteries dropped into action again to be surprised by enemy troops in a slightly sunken and walled road. These were riflemen and on good form – one battery was quickly silencedHowever infantry units (white coated British Legion 1860) quickly drove them awayfierce fire was exchanged between the Bersaglieri and Austrians in the sunken road while Garibaldeans stormed the defended houses at the entrance to the townOn the east side 1859 Piedmontese infantry stormed the defended housesElsewhere Piedmontese forces had pushed on meeting little resistance (= dummy cards) to their front. A lone Austrian Artillery battery on the west side of town faces artillery and some more Bersaglieri Stubborn resistance at the Old Millhouse Finally the sunken road defenders are driven offAnd the west side Austrian defenders give up rather too quicklyexchange of fire results in another Austrian lossEven as west side Austrian defenders gather but………The Piedmontese quickly move towards their target – the river crossing. Another Artillery Battery blocks their wayOn the west side the Austrian defenders put up a good defence and with support nearby………The defended houses at the north end of town finally are overrunThe mill house and its defenders are abandoned by the Austrians who can retreatAustrian artillerists put up a stern defenceCrunch time at the town square as the Austrians are hemmed inThe Bersaglieri try to rush the ArtilleryThe Town centre defence collapses The Bersaglieri inexplicably turned tail on the west side while Lancers arrive to their rear. The British Legion finish off the town centre defenders on the left pictureThe Artillery of Piedmont watch as the last Austrian defenders in the town square are defeatedThe defended westside town square buildings are assaultedin a last desparate throw Austrian Hussars ride up the main street to halt the Piedmontese tide.The Hussars beat off the Lancers but to their rear the Artillerists are finally beaten while the East side is alive with Piedmontese. Everywhere Austrian defenders have melted away into the fields or across the bridge.The Hussars beat a retreat across the bridge bringing to an end the defence of the bridgePiedmontese Lancers cautiously follow.
The defended buildings were randomly determined and contained one unit each – no other benefits were given the building defenders. So they simply were a delaying factor assisting the mobile defenders fighting outside.
The scenario I played used a 25 step countdown and 1xd6 reduction per turn. The Austrians had to retire at countdown 16 from the edge of town, 7 – the town square and at 0 abandon the north river bank. Victory to Piedmont required they took the bridge before the countdown reached 0.
The game turns 1 to 3 were spent on the edge of town, then turns 4, 5 and 6 fighting over the town square. Turn 7 forced the Austrians back to the north bank but here ended the action as the Austrians actually ran out of defenders.
So the victorious Piedmontese captured the bridge intact and within the timescale set. There were no Austrian Engineers with a lit fuse to spoil their day! Anyway the Austrians would be back soon enough they thought…. Do I hear a Radetzky March in the distance?
For a very old ruleset Joe Morschauser’s rules played easy as I guess you would expect. With the tweaks to aid solo play they actually played very well.
I had bought the rule book for the Grid rules both the originals and Bob Cordery’s modernised version – Bob co edited the book with John Curry.
So this was a pleasant surprise to find a very playable set of “measurement based” rules into the bargain.
I have slowly started to look at some grid gaming set ups. My starting point has been that they would aid campaigns and to that end allow quicker solo games. I opted for two 3’x2′ boards which could then give me a 4’x3′ table which also figures in Neil Thomas rulesets.
ideas still in play – how to represent rivers and buildings? hills are simply another gridded block shape to suit.
As a bit of a test I used a Neil Thomas scenario from the C19th European Wars book (NT19e) – the Cristinos v Carlists, in my case Piedmont squared up to Austria.
I use 40mm square bases for my 19th century games and I have chosen a 50mm grid – i.e. no perfect fit of base to grid square. And for this test I used essentially formations from Neil Thomas NT19e. The exception being that my square 40×40 basing really distorts the column or line option choice.
Garibaldeans march in my attack column option – I reserve a single base wide column of 4 bases for marching only. Firing lines are 4 bases side by side and don’t advance or retreat, but can wheel.I have Artillery men both on one large base and also individually as shown hereAbstraction – these Neapolitan Riflemen in a built up area may still simply be on a block of a different colour or with buildings/features!I quite like Neil Thomas unit conditions – Fire and Fury and other rulesets in mid 19th century warfare also seem to opt for this type gradationI did not find the grid a problem and it did the job of of having a tape measure on the board at all times everywhere. Also manoeuvring is hard work once you move to multi based units. NT19e allows turning (spinning)on the unit centre (abstraction again) so fits nicely with a grid approach.The undersizing of base to grid feels right for me.Neil Thomas rules do not feature command bases but other rules I like do – so I plan to use single grid base for lowest discrete command with next up having two grids covered and the top man having three of even four bases covered. The bigger the command base the further back from the action is better for them – having no attack or defence values if contacted.Bare bones – right now it feels like I am heading in the right direction.