That however, seemed to reinforce summer as a break.
So if this is now to be the start of my wargames season what’s on the cards for the next twelve months?
Well firstly probably the plan will fail! With that out of the way what might be done if it succeeds?
Painting wise I feel it will be more mid 19th century forces.
Some more obscure units are likely – Jutland sharpshooters 1848
Also nearly mechanised feels like it will get an outing.
My pontoon bridge but John at just needs varnish provided the armour!
Brief summer spells of interest in ancient and renaissance plus Wild West periods have fizzled out in 2024 and I can’t see that changing into 2025.
I guess one wild card could be sci fi which has gained some traction in recent years.
The painting table is more likely to see guns rather than spears it would seem.
Gaming wise I think it will revolve around campaigns and again currently mid 19th century wins out along with nearly mechanised.
Nothing like a map to get the campaign spirit moving
I hope to go to the Other Partizan which I missed last year especially as I missed Partizan this year. Oh and I should manage two out of Battleground, Fiasco and Recon.
One more year…..
Recon will be the last at Pudsey civic hall as the property is being sold off.
And just maybe online painting/modelling challenges will figure given both AHPC14 and season of scenery have seen my output of painting and making increase and diversify.
The 2023/24 ahpc14 haul Testing out a quick build Italian hilltop town for grid gaming during season of scenery challenge
Purchases wise the war chest has been thin of late more because I have what I need so it follows the figure mountain and scenery pit are full.
Books wise purchases have trailed off since 2023. Although 2034 gave me a surprise. But that’s another post.
If I do buy it is more likely targeted. For example I would like some more Irregular Miniatures bell shako infantry as well as some garibaldi men.
Well that seems like the bones of a plan. We will see……
Corrugated cardboard was the trigger material for my solution
Just like John at just add varnish I have joined the season of scenery community challenge and started with an Italian theme.
This piece is still unfinished but has made it from idea to concept in only about five years – so that’s about four and half years procrastination plus various false starts in materials and a bit of design. And finally some tv viewing and Dave Stone’s scenery season challenge.
Eventually the material choice helped drive the form
Grid gaming by Mike Smith is a great rule set and early on in my Italian independence wars project I thought a couple of hilltop towns would be ideal for the grid.
Then the procrastination started – which materials and what style?
I use a 50mm grid with 40mm based units all square. The toy soldier abstract had resulted in these block buildings a couple of years ago.
Initially I was absolutely into the idea of wood and it would be modular and come apart. Then when I started to think about details wood felt wrong. The framing of the town was to be the city walls and slim, this was leading to fret saw country and simplicity of the idea was waning.
A long delay ensued.
Style wise I was looking for the abstract and Joe morschauser scenery pictures – more grid games – drew me towards something that could still accommodate units as a garrison.
I came up with the cruciform of two bisecting streets with four quarters to the town – in Mike smiths grid game the towns are 3×3 grids
In the end watching the giro this year suddenly prompted a “just do it moment” and as it happened cardboard kept coming into my head as a possible material and multiple postal deliveries reminded me of this free material.
But it needed to have some structure. What to do?
Then I remembered the flat scenery that are found in paper boys armies booklets. These have interconnecting cutouts that give strength to the arrangement.
These interconnecting card pieces now became walls and the corrugations gave me another idea.
Plus other things on this long journey fell into place.
The whole idea of abstracted block buildings came in part from kids toys like this one – just add imagination….In another direction this flat pack helped the idea that 3d solids is not the only way to create a 3d effect.
Maybe I could use these simple cut outs approach?
I did and I quickly developed some solutions to get the elevations I wanted to see.
The buildings had been done a few years ago during the wood era.
I added the church in card with a removable front. The tower is a work in progress.The corrugations prompted cypress trees again in corrugated cardboard and cocktail sticks In the end even the wall overlaps suggest buttressing
Well that’s it and it remains a work in progress but I think I have found my modular abstract Italian hill town.
I had previously encountered Bob’s grid rules in the History of Wargaming publication of Joe Morschausers early 1960’s book on wargames. Although a contemporary of Donald Featherstone, Joe’s rules better resonate with 21st century rulesets in my view.
This purchase collided with my stop-start diversion into “pound store warriors” and ultimately a bit of sci fi gaming. Man of Tin had been instrumental in starting me to look at these figures that did not even look like green army men. It is a measure of my lack of progress (the figures arrived during lockdown……) that my recent first game only fielded half a “sci-fi” set up. Some WW2 Russians and Americans filled in as opponents and neatly delivered the unexpected scenario and indeed a back story into the bargain.
Captain Parker of the US 21st Army held the edge of Exetown along the river Exe. In the town were the Russian 33rd Army forces led by Senior Lieutenant Yashin.
The front such that it was involved nothing so much as a watching brief. There had been “no action” when the two forces had closed up to each other – just looking and with even the odd conversation exchanged across the river.
When the Russians were surprised by the Aliens in Exetown all that changed, Yashins troops just ran hell for leather at the Americans who fortunately hesitated to fire long enough to spot the new enemy beyond. Somehow the Americans could sense that the Russians were not trying on a surprise attack – they were genuinely running for their lives.
So the scenario made itself – The renewed Allies have to fight off the Aliens and at least hold the river line. The Aliens have to drive the humanoids off the table.
Rules
Rules used were The Portable Wargame by Bob Cordery. I used the solo option.
Only rule change of note was to assign the “alien blasters” 5 dice per firing round. So they were like super heavy machine guns in effect. But they had only a grid range of 2 instead of 3.
I also permitted some unit size differences. The Aliens had fewer units but 4 or more figures per unit. The Allies were basically 3 man units.
In the event the Allies had a higher break point for exhaustion yet got there quicker as their units were destroyed more easily.
I had just played a game so had the table set up plus some figures that in turn fed the scenario and storyline. My grid was 8 long x 12 wide, using 6 inch (150mm) grids. Not very portable!
Opposing Forces
Allies (Exhaustion Point is at 6 units left)
American (First Lieutenant Osteen)
CO unit 3 figures
rifle squad 3 figures each
rifle squad
rifle squad
rifle squad
rifle squad
Russian (Senior Lieutenant Yashin)
CO unit 2 figures
Machine gun unit 2 figures
machine gun unit 2 figures
rifle squad
assault squad
rifle squad
Aliens (Exhaustion Point is at 3 units left)
Blue Troop (Colonel Blue)
Colonel Blue and Heavy Machine Gun 2 figures
Blaster unit A1 3 figures (one figure armed with what looks like a bazooka)
Blaster unit A2 3 figures (one figure armed with what looks like a bazooka)
Yellow Troop (Colonel Yellow)
Colonel Yellow unit
Attack unit A3
Attack unit A4
What happened?
First up – the Allies (US/Russian) threw high in the first 6 moves for “first to move”. The Aliens took heavier losses as they advanced, then at close range they began to wear down the Allies. Exhausted the Allies had to hold their line and so my scenario backstory kicked in and the allies retired rather than simply continuing to hold under the rules.
So a new ruleset, some abandoned figures and also a new grid surface** combined with a storyline from nowhere, resulted in an excellent game.
The game played out in 12 moves and took half a day as I left it quite a few times to do some real life activity! So I guess maybe it took about 1 hour to 1h30m to play the 12 turns including set up and take down. Remember I already had the table set and in fact the US/Russian troops were from that game.
I suspect that this sort of game is easily a one hour set up, play and put away operation.
Biggest impact for me was the ease of play and how it simply connected with my rather mad scenario. So very high on the Enjoyment scale.
Here are some episodes from the game.
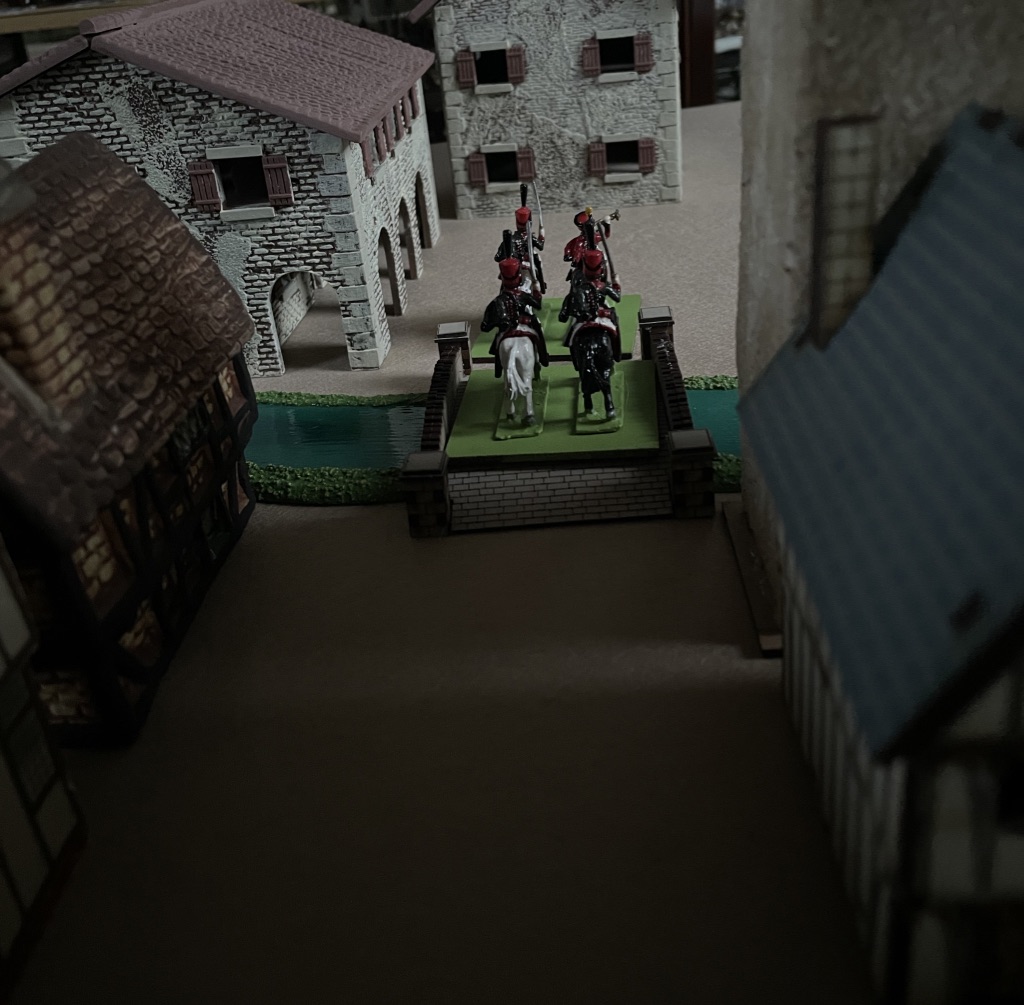
The Russians race across the bridge towards the stunned AmericansAs First Lieutenant Osteen gathered his men Senior Lieutenant Yashin called his men in and sent a squad to the sawmill.Lieutenant Yashin finally gets a sighting on what appear to be different types of enemy foot soldiersA brisk firefight at the edge of town as the Russians retreat across the unfordable river Exe by the main bridgeThe enemy pursue the russian squad to the sawmillOn the right flank the US troops, in the morning sun, began to get a sighting of their opponentsagain what seemed to be a mixture of enemy troops in their bright uniforms loomed into view
The brightly uniformed enemy had been easy targets and the allies gained an early advantage decimating the orange unit that tried to reach the main bridge first – the remnants retreated to the hedged half timbered house where they stayed for the remainder of the battle
The defenders in the sawmill got a shock as the blue unit and orange units combined fire felled many russiansIn the centre the firefight was heating up with one Lieutenant Osteens squad falling victim to the accurate enemy fire. On his right the remaining russian machine gun team continued to stop any enemy advance on the bridge.As Yashin crossed over to the now threatened right flank a US squad took aim at the enemyin the open the allies were decimated – Petrov and Lefebvre fell hereThings were going from bad to worse on the right flankAnd now on the left flank the orange unit stormed over the foot bridgein the centre it was still a stand offYashin managed a counter attack on the right which drove back the blue blaster unit and weakened the orange unit.but the enemy responded in turn and Yashin fellOn the left flank the footbridge looked lost as the US defenders were being overrunbut a heroic effort by the left and centre threw the enemy back, they even silenced one of those dreaded “blasters”only for the enemy to attack again – the last allied squad moving up to the footbridge at that momentThe uneven contest at the footbridge was short and the allies lost and with it their left flank as well
With both flanks destroyed Osteen, Kachalin and the remnants of both Russian and US combat teams retreated from the field.
The Aliens move on the main bridge over the River Exe as Osteen prepares to retreat.
* – tacfos or “the aliens came from outer space!”
**- for this game I used one of my new grid sheets. I have been experimenting with different surfaces when it comes to grid games. Like most Board games, the grid surface is integral to the game. So I have not yet settled on the best grid surface for any one game. Given I have quite a few cloths and boards for my “measured” table top games this should come as no surprise.
The empty field – the trees wonder what will happen next?
The Second battle using my “Buildings Blast” set up saw a mid 19th century action with Austrians and Piedmontese in play. It was a solo play this time.
I used the rules published by John Curry and the “history of wargaming project” with some adaption for solo play.
Using Neil Thomas grading of troops I adjusted the firing and melee rules.
I also used the Roster system unaltered. Infantry got 4 circles and a cross while Artillery got just 2 circles in this game. Essentially in the basic game a hit meant a unit (= 1 base) was destroyed. Roster rules gave units/bases lives in the form of circles and crosses on the roster which you ticked off as they were lost.
The Scenario was that the Austrians were retreating and the force here was ordered to hold the bridge in the town. The crossing was one of only a few that allowed artillery and logistics easy crossing of the river. The Piedmontese advancing from the north west had orders to seize the bridge as quickly as possible.
Forces were randomly assigned using playing card allocations along with a portion of blank entriesUnits deployed in contact and units were recognised as such at about 6 inches – the card only turned on a 2-6 D6. Here the right hand Piedmontese were certain nothing was in front of them – a heart was a dummy card while the left hand unit was not so sure so hesitated (on a d1) with no card turn. The right hand units poured forward towards the “old millhouse” spotting some real Austrian defendersThe lefthand Piedmontese units were suddenly exposed to Austrian infantry fire from a slightly sunken roadon the east side of the main road two piedmontese artillery batteries dropped into action again to be surprised by enemy troops in a slightly sunken and walled road. These were riflemen and on good form – one battery was quickly silencedHowever infantry units (white coated British Legion 1860) quickly drove them awayfierce fire was exchanged between the Bersaglieri and Austrians in the sunken road while Garibaldeans stormed the defended houses at the entrance to the townOn the east side 1859 Piedmontese infantry stormed the defended housesElsewhere Piedmontese forces had pushed on meeting little resistance (= dummy cards) to their front. A lone Austrian Artillery battery on the west side of town faces artillery and some more Bersaglieri Stubborn resistance at the Old Millhouse Finally the sunken road defenders are driven offAnd the west side Austrian defenders give up rather too quicklyexchange of fire results in another Austrian lossEven as west side Austrian defenders gather but………The Piedmontese quickly move towards their target – the river crossing. Another Artillery Battery blocks their wayOn the west side the Austrian defenders put up a good defence and with support nearby………The defended houses at the north end of town finally are overrunThe mill house and its defenders are abandoned by the Austrians who can retreatAustrian artillerists put up a stern defenceCrunch time at the town square as the Austrians are hemmed inThe Bersaglieri try to rush the ArtilleryThe Town centre defence collapses The Bersaglieri inexplicably turned tail on the west side while Lancers arrive to their rear. The British Legion finish off the town centre defenders on the left pictureThe Artillery of Piedmont watch as the last Austrian defenders in the town square are defeatedThe defended westside town square buildings are assaultedin a last desparate throw Austrian Hussars ride up the main street to halt the Piedmontese tide.The Hussars beat off the Lancers but to their rear the Artillerists are finally beaten while the East side is alive with Piedmontese. Everywhere Austrian defenders have melted away into the fields or across the bridge.The Hussars beat a retreat across the bridge bringing to an end the defence of the bridgePiedmontese Lancers cautiously follow.
The defended buildings were randomly determined and contained one unit each – no other benefits were given the building defenders. So they simply were a delaying factor assisting the mobile defenders fighting outside.
The scenario I played used a 25 step countdown and 1xd6 reduction per turn. The Austrians had to retire at countdown 16 from the edge of town, 7 – the town square and at 0 abandon the north river bank. Victory to Piedmont required they took the bridge before the countdown reached 0.
The game turns 1 to 3 were spent on the edge of town, then turns 4, 5 and 6 fighting over the town square. Turn 7 forced the Austrians back to the north bank but here ended the action as the Austrians actually ran out of defenders.
So the victorious Piedmontese captured the bridge intact and within the timescale set. There were no Austrian Engineers with a lit fuse to spoil their day! Anyway the Austrians would be back soon enough they thought…. Do I hear a Radetzky March in the distance?
For a very old ruleset Joe Morschauser’s rules played easy as I guess you would expect. With the tweaks to aid solo play they actually played very well.
I had bought the rule book for the Grid rules both the originals and Bob Cordery’s modernised version – Bob co edited the book with John Curry.
So this was a pleasant surprise to find a very playable set of “measurement based” rules into the bargain.
I have slowly started to look at some grid gaming set ups. My starting point has been that they would aid campaigns and to that end allow quicker solo games. I opted for two 3’x2′ boards which could then give me a 4’x3′ table which also figures in Neil Thomas rulesets.
ideas still in play – how to represent rivers and buildings? hills are simply another gridded block shape to suit.
As a bit of a test I used a Neil Thomas scenario from the C19th European Wars book (NT19e) – the Cristinos v Carlists, in my case Piedmont squared up to Austria.
I use 40mm square bases for my 19th century games and I have chosen a 50mm grid – i.e. no perfect fit of base to grid square. And for this test I used essentially formations from Neil Thomas NT19e. The exception being that my square 40×40 basing really distorts the column or line option choice.
Garibaldeans march in my attack column option – I reserve a single base wide column of 4 bases for marching only. Firing lines are 4 bases side by side and don’t advance or retreat, but can wheel.I have Artillery men both on one large base and also individually as shown hereAbstraction – these Neapolitan Riflemen in a built up area may still simply be on a block of a different colour or with buildings/features!I quite like Neil Thomas unit conditions – Fire and Fury and other rulesets in mid 19th century warfare also seem to opt for this type gradationI did not find the grid a problem and it did the job of of having a tape measure on the board at all times everywhere. Also manoeuvring is hard work once you move to multi based units. NT19e allows turning (spinning)on the unit centre (abstraction again) so fits nicely with a grid approach.The undersizing of base to grid feels right for me.Neil Thomas rules do not feature command bases but other rules I like do – so I plan to use single grid base for lowest discrete command with next up having two grids covered and the top man having three of even four bases covered. The bigger the command base the further back from the action is better for them – having no attack or defence values if contacted.Bare bones – right now it feels like I am heading in the right direction.
A constant theme of my interest in art is the variety of techniques on show.
My Weekend Open Studios visits prompted me to dig out some wooden offcuts I had minded to fashion into buildings.
The idea for “woodtown” was to provide my grid gaming with appropriately sized buildings. And they would be in keeping with the abstract nature of grid boards. In terms of the art they are definitely inclined towards Paul Nash. Ferens Art Gallery can be found in Kingston Upon Hull and an interesting painting by Paul Nash can be seen there.
Paul Nash – East Coast Portsome old bits of 2×1 with 45 degree cuts to create the roofline – at various heights to emphasise the randomness of old italian hill towns. The wood grain helps deflect thoughts that these are just bits of wood.The two clusters – the rough wood finish works on the red roof while the uneven whitewash fits the style
They make their first contribution in my recent Neil Thomas 1864 Minigame. Ironic that the game did not use grids…………
How do you compare rulesets? empathy or process – which factors give you a good ruleset?
My recent challenge has been to find a preferred ruleset for mid 19th century European warfare. And that provides the first criterion – what exactly is mid 19th century warfare? Maybe we should be saying post Napoleonic Warfare or Pre Franco Prussian Warfare? Or should we classify with technology – percussion cap, needle gun, sabre, rifling, telegraph, ironclad…..
The thing is that between 1815 and 1865 not a lot seemed to happen. Apparently things regressed as West Point Officers tried to emulate Napoleon in the early years of the Amercian Civil War despite their Mexican war experiences.
1865 to 1915 is the same timespan – would the ACW soldier have recognised the trenches of Europe – well sort of but not the aeroplanes surely.
In fact between 1815 and 1850 warfare was still largely smoothbore in weaponry and equipment and uniforms remained similar. Changes were afoot as more accurate muskets made their mark with percussion caps and more rifling. Uniforms saw frockcoats, trousers and kepis appear.
And between 1850 and 1870 breechloading rifling transformed infantry and artillery capabilities.
Quite a bit going on which means your chosen ruleset is either narrowly period, even campaign, specific or has to be clever and flexible.
My recent simple testing of a series of rulesets has caused me to reflect on what those Criteria for my gaming preferences might be.
I have ended up with 4 areas on interest. First of all I am assuming the choice of ruleset is not limited to an examination of mechanisms.
Production
Philosophy
Game Mechanics
Action Mechanisms
Production includes everything about the printed or e delivered publication. So images and print clarity matter as do the range of wargaming aspects covered.
Philosophy I suppose could be called game design and includes period choice, scale and game size as well as chosen outcomes.
Game Mechanics covers things like army lists, pre battle activity, player numbers and figures.
Finally Action Mechanisms are aimed squarely at movement, combat resolution, control and turn structure.
When I had finished my long list of criteria a massive 43 items had been generated. I did consider some rationalisation when I looked and saw a lot of similarities. And then I decided to leave my longlist intact for now.
I used it to score my rulesets and accepted the potential weighting due to duplicated criteria. Otherwise there is no other weighting in terms of importance of one criterion over another. Action mechanisms are not prioritised over Production Values for example.
In each case a criterion gets a single mark.
That mark is relative to my perceived ideal. The scores can be +1, 0, -1. positive values are favorable.
Lets look at Production first:
NT19e
BwMS
GW
F&F
FoB
TTB
PW
Relevant Images
0
0
+1
+1
+1
-1
0
Fair Wear & Tear
0
0
+1*
-1
-1
+1
+1
Logical clear layout
+1
0
+1
+1
-1
+1
+1
Plain text
0
+1
+1
+1
+1
+1
+1
Lots of Design Thinking
+1
+1
+1
+1
+1
-1
+1
Simple Rules
+1
+1
0
0
-1
+1
+1
Scenarios included
+1
0
+1
+1
+1
-1
+1
Campaigns included
0
0
0
+1
+1
+1
-1
Totals
+4
+3
+6
+5
+2
+2
+5
Table 1: Production Criteria
Not all softcover publications fail – Mike Smith Table Top Battles is stapled – crude but effective. Later Fire & Fury editions have gone to hardback meaning rulebook collapse is less likely.
So GW comes out top followed by F&F and PW. Before I list the rulesets in question the scoring is “relative” and not absolute. It is best thought of as indication of preferencing.
In my case these rules have all been through some sort of preselection in my decision to buy them in the first place. So they all score positively. It is how much more I value them against each other that is measured here.
When it comes to historical wargames rulesets today – in a 60 year old industry, we are talking about marginal gains. I think with fantasy/scifi etc. it is still possible to deliver up a “game changer”!
I have used the following abbreviations.
NT19e – Neil Thomas’s European Warfare in the Nineteenth Century – hardback edition published by Pen & Sword Military 2012
BwMS – Battles with Model Soldiers – hardback edition by Donald Featherstone published by David & Charles 1972
GW – Gentlemans War – “e” publication by Howard Whitehouse and Daniel Foley and published by Pulp Action Library 2018
Fire & Fury – 1st Edition in softback by Richard W Hasenauer 1990 published by Fire & Fury (2nd editions under Brigade and Regimental titles available)
Field of Battle – Piquet 1700-1900 by Brent Oman 2nd Edition published by Piquet Inc 2011
Table Top Battles – by Mike & Joyce Smith 1st Edition published by Mike Smith 2007 (2nd Edition 2018 available)
Practical Wargaming – hardback edition by Charles Wesencraft published by Elmfield Press/Shire Publications 1974
Is it fair to compare rulesets which are published decades apart written for vastly different audiences? I believe so. Despite visually apparent differences, there are some common threads in wargames.
On to Philosophy
NT19e
BwMS
GW
F&F
FoB
TTB
PW
Period – technology emphasis
+1
+1
+1
0
0
-1
+1
abstraction in scaling
+1
0
+1
0
+1
+1
-1
no figure/base removal
+1
0
-1
0
+1
+1
-1
cavalry ineffective
+1
+1
+1
+1
+1
0
+1
irritant skirmishers
+1
0
+1
0
+1
+1
+1
vunerable yet destructive artillery
+1
+1
+1
+1
+1
0
+1
column and line infantry formations
+1
+1
+1
+1
+1
-1
+1
attack defense objectives
+1
+1
+1
+1
+1
0
+1
morale dominant
+1
+1
-1
+1
+1
0
+1
battle narrative
0
0
+1
0
0
0
-1
Totals
9
6
6
5
8
1
4
Table 2: Design Philosophy
So NT19e along with FoB seem to have edged it on philosophy for me. I should say that by having a lot of scores to make, it may reduce my own unintentional bias (of course on the other hand wargames magazines are all about bias – “Buy me” bias).
Fire & Fury was very busy but brisk………..
Talking about bias – my requirement concerns European Warfare so I am effectively biased against other “continents” warfare considerations that are different.
Ok next up is Game Mechanics:
NT19e
BwMS
GW
F&F
FoB
TTB
PW
option to solo game
0
+1
0
+1
+1
+1
-1
measure not grid distance
+1
+1
+1
+1
+1
-1
+1
army selection/lists available
+1
0
+1
+1
+1
0
-1
pre battle actions available
+1
+1
+1
-1
+1
-1
-1
game time required (<2hrs)
+1
+1
0
-1
-1
+1
+1
units per side (6-12)
+1
+1
+1
-1
-1
+1
+1
unit ratings (varied)
+1
+1
+1
+1
+1
0
+1
table size (5’x4′)
+1
+1
+1
-1
-1
+1
+1
concealment/ambush/surprise
+1
+1
+1
-1
-1
0
-1
chance (situations/ cards etc.)
0
+1
+1
0
+1
0
0
figures per basic unit (12-20)
+1
+1
+1
+1
+1
+1
-1
support functions (engrs/ sappers) rules
0
0
+1
0
0
+1
-1
Totals
9
10
10
0
3
4
-1
Table 3: Game Mechanics
Earlier I asked is it fair to compare rulesets from different decades? Now the question might be should you compare battle rulesets with skirmish rulesets or measured games versus grid games. The answer is of course. Just be consistent in the criteria used for the scoring and try to avoid criteria that directly preference one solution. In my case grids games are not a requirement so do score badly on the requirement for a measured game that I chose to include – some personal bias there.
Battles with Model Soldiers and Gentlemans War seem preferable when it comes to Game Mechanics.
Battles with Model Soldiers gets you into action rapidly and is brutal……In Battles with Model Soldiers units were cast to the four winds in the first rounds of action
Finally we turn to Action Mechanisms:
NT19e
BwMS
GW
F&F
FoB
TTB
PW
alternate moves with opportunity
+1
+1
+1
+1
+1
+1
+1
initiative
+1
+1
+1
+1
+1
+1
+1
simple manoeuvre rules
+1
+1
0
0
+1
+1
+1
measure ranges
+1
-1
0
+1
+1
+1
+1
move and fire in a move
+1
0
+1
-1
+1
-1
+1
road movement restricted
+1
0
0
-1
+1
-1
-1
simple interpenetration
+1
+1
+1
+1
+1
+1
+1
saving throws
+1
+1
+1
-1
-1
-1
-1
leadership/pips/orders
0
+1
-1
+1
+1
+1
+1
written orders
0
+1
-1
-1
-1
-1
+1
cards for actions
0
0
+1
0
+1
0
-1
turn structure is fluid
0
0
+1
0
+1
0
0
simple combat resolution
0
-1
-1
+1
-1
+1
0
simple firing resolution
0
-1
-1
+1
-1
+1
0
8
4
3
3
6
4
5
Table 4: Action Mechanisms
Neil Thomas 19th century European rules come out preferred for Action Mechanisms along with Field of Battle.
Neil Thomas rules provide an excellent mix of production, design, game mechanics and action mechanisms making them hard to beat for all round use in mid nineteenth century gaming
In summary we have table 5
NT19e
BwMS
GW
F&F
FoB
TTB
PW
Production
4
3
6
5
2
2
5
Design Philosophy
9
6
6
5
8
1
4
Game Mechanics
9
10
10
0
3
4
-1
Action Mechanisms
8
4
3
3
6
4
5
Totals
30
23
25
13
19
11
13
Table 5: Summary
So there you go Neil Thomas rules are to be preferred in meeting my perceived gaming requirements. But……
I really like the liveliness of Fire & Fury while sometimes the grid games using Table Top Battles are just so easy and convenient. And then Gentlemans War offers a sense of detail which drives narrative – an essential requriement for the solo wargamer I would suggest.
Field of Battle uses the house theme of the card driven randomised turn structure of Piquet. I like it a lot but you need to invest your concentration in that ruleset even with the simpler FoB version. Like GW it offers narrative benefits.
My least liked set was actually BwMS even though Donald Featherstone has been the mainstay of my house rules over the years. This is because much of what he wrote was about design philosphy rather than pushing a particular ruleset. You could say nearly all his books were design handbooks for wargames rules writers.
Peter Pig (PP) have a history of promoting rules which are a little bit different in an engaging way. For the gamer there is an enrichment with pregame activity and this also helps the soloist. For those who like total control and the key variable simply to be them – the general’s actions, then these rules may seem too restricting.
Poor Bloody Infantry (PBI) is PP’s WW2 game. And I say game advisedly. Although PP makes clear that the rules have been well researched to enable necessary compromise for game play, the purpose is an enjoyable game between well matched forces.
The key differences I guess are the prebattle steps, then the use of large control grids (no tape measures please) and what once used to be novel – unit activation.
The success of PP over the decades has seen many other rules writers copy the pregame idea and certainly utilise the activation sequences. PP has a long history of rules development and making a real effort to “design in” their research while retaining game play.
I wanted to get my latest painted figures on the board again, so opted for a PBI game as it had been a few years since I played it. In fact I had to rebuy the ruleset as I had got rid of my original copy in a massive clear out of all wargame things post 1735! Silly me.
Narrative Background
The Vossackians had surprised the Azorians who had over extended their advance and were forced to retreat. The resulting chaos with only a single main route caused the Azorians many problems. The Vossackians failed though, to fully capitalise on the situation. As a result of being well forward, Senior Lieutenant Saray was ordered to advance on a road junction which appeared to be of value to the Azorians in their retreat.
As it happened Captain Turner had orders to secure the same road junction to protect other nearby routes of Azorian retreat.
Both commanders were advised that supporting troops would soon be provided.
As dark clouds gathered overhead the two forces unwittingly collided.
The Forces
Vossackia – Senior Lieutenant Saray had 3 platoons of rifleman, SMG’s and LMG’s. Junior Lieutenant Zhelezo and Junior Sergeant Stali led a platoon each. The platoons were slightly mixed up owing to allocation of replacements and issues with logistics.
Azoria – Captain Turner had Garand armed rifle platoons supported with BAR LMG’s. The Azorians had suffered in some previous actions so were not up to strength. Lieutenants Bacon and Bean led a platoon each.
A Map is to be found at the end of this post.
Lieutenant Bean and his platoon crept along the main road seeking what shelter they could. At least they had reached the road junction without incident.
Note the tough hedgerows! they make a grid harder to leave in PBI. Cover affects movement in an abstract but logical way.
Activation is about mobilising possibly reluctant movement by soldeirs under direct fire. As you will see lack of movement and even pinning the opposition is key to allowing your own freedom of movement.
Peter Pig use groups (figures assumed based together). Rifle figures are in 3’s and LMG’s are in pairs of figures. SMG’s are in 3’s while leader groups can be 2 or 3 strong.Lt Bean brought up the rear. He had good activation to get to the road junction.Hang on I can see movement beyond that building in the distance…………..SLt Saray calmly responded to the excited shout of Junior Sergeant Stali – enemy spotted…..to the south of the main road and east of the South Lane, Lt Bacon had occupied a position which looked defendable. Not a moment too soon as Junior Lieutenant Zhelezo pushed his men forwardA section of Vossackian rifles rushed a nearby group of buildingsSLt Saray had quickly directed fire on the exposed leading section of Lt Beans platoonfurther damage was inflicted on Beans platoon on the Main Road. JLt Zhelezo gathered his men and exhorted them to be brave and unafraid as they assaulted the Azorian strongpoint. Lt Bacon was confident.Lt Bean’s platoon meanwhile was taking a hammering up on the main roadhowever a rash attack on the road junction by SLt Saray ended in disaster for the VossackiansJLt Zhelezo and his men continued to soften up the Azorians in the strongpoint, always building their momentum for an assaultAlthough driven from nearby buildings the Vossackians had now built up some strength. Captain Turner had also responded by sending more of his men to support Lt Bacon.At the road junction Lt Bean with the remains of his platoon fought off ever increasing numbers of VossackiansAnother assault goes in at the road junction with further damage being done to Lt Beans exhausted platoonLt Beans platoon or what remained of it were isolated and surrounded – overrun……The Vossackians took the road junction and were presented with the whole flank of the Azorian position as the fight for the strongpoint had sucked in most of Captain Turners reserves. At the strongpoint the Azorians were suffering.shattered Lt Bean stayed in cover at the road junction. The Vossackians pressed further west. Now Captain Turner had begun to extract some men from the strongpoint but it looked too late.Captain Turner came under attack just west of the road junction in another strongpointThe fight at the East strongpoint was still being hotly contested, but finally Lt Bacon’s strongpoint position was overrun And then the Azorians got lucky – a minus 6!The heavens opened and it turned pitch black in an instant, the Azorian Captain Turner retreated while his two trusty Lt’s Bacon and Bean still actually held their positions – grilled and baked!
Game Over!
This battle narrative came from the actual game. It was most enjoyable seeing the encounter fluctuate before ending. PBI tells you that “ebb and flow” is part of the game design.
Some more PBI rules came into play during the game.
First was the arrivals of troops. In the pregame journey on the equivalent of a snakes and ladders board the Vossackians with the advantage failed to get a clear superiority in numbers and prevent the Azorians gathering sufficient forces for the action.
The Vossackians posture under the rules was agressive while the Azorians was only responsive.
I think the rules are good at covering troops on the board at game start and those being fed in. Another variable to add flavour.
Three objectives had to be taken by the Vossackians for game victory.
The East Strongpoint
the Road Junction
The West Strongpoint
The Map
A countdown tracker starting at 23, and reducing, using 1d6 per turn meant game length was unknown.
The battle started well for Vossackia as the Azorians advanced allowing early contact and then finding the dice rolling for them. The Azorians quickly lost any parity on forces.
But later the rules around activiation started to work against the Vossackians at the critical moment. Things also slowed at the wrong moment.
To cap it all the countdown dice rolled for the Azorians with too many 6’s including the last one when the tracker was at 5. So the game ended early.
Cue – mega thunderstorm.
The positives are you get a fairly quick game – no measuring movement or ranges helps.
The abstraction that allows close proximity of opposing forces requires a bit of getting used to. I used the 6″ grid for 15mm with 20/25mm or 1/72 size figures. Maybe an 8″ (for 28mm figure) grid would give a better look.
What looks like contact isn’t. Contact is a process called assault and requires a lot of momentum to achieve.
The abstraction includes the proximity of the figures who spend some time in adjacent grid squares waiting to build momentum for an assault or simply erode the enemy through fire. The latter requires a decent advantage in numbers but the former is risky without overwhelming force.
The Vossackians lacked any heavy weapons or support which kind of reflected the “encounter” nature of this Scenario. And probably meant the Azorian victory was the right outcome.
Verdict is I will play PBI again.
I use a 2006 edition of PBI – easily picked up at show bring and buys (when they return) and on ebay. Of course Peter Pig will sell you the latest edition with improvements from over a decade more of game play. And PP also offers a fantastic 15mm range of figures and vehicles which, if I was not hooked up to 1/72, would suit my needs.
Roll on the Vossackian advance in Fauxterre 1930+……
In the previous two posts I have set out the campaign and mechanics that brought the two forces to action at Baumdorf.
In the distance the Nuringians advance boldly upon Baumdorf as the Zarlanders attempt to seize the hill
The forces were
Zarland Eastern Army commanded by General Kratzen
IR 8th Adelburg CF5 (2)
IR 6th Nurtberg CF5 (1)
2nd Tuttingen Skirmishers CF2 (1)
Pioneer Regiment 2nd Eyachdorf CF5 (2)
5th Gellenstein Cavalry CF6 (2)
Artillery Regiment 12th Pinkenfels CF6 (2)
8th Filstad Skirmishers CF4 (1)
IR 4th Beckendorf CF6 (2)
The Nuringian Army commanded by General Paskievich comprised
IR Von Rechten CF3 (1)
IR Von Ryssel CF5 (1)
1st Sharpshooters CF5 (1)
CR Prince Clement Dragoons CF6 (2)
CR Polenz Lancers CF14 (3)
1st Field Artillery Battery CF4 (1)
2nd Field Artillery Battery CF5 (1)
1st Pioneer Regiment CF14 (3)
Both armies had a similar mix of forces and both had pioneer units which often fight in these small actions in the realms of Fauxterre…….. and are feared in the same way as Grenadiers.
Each unit shows its campaign condition or “CF factor” – a value that is training, experience, morale and fighting ability all in one. This was converted to the relevant Table Top Battles unit class – again an “all in one” fighting factor.
The battle was fought over three objectives – possession of the village and the hill and also driving off the enemy from the area of Baumdorf.
This encounter action after numerous skirmishes caught each force unawares and they both aimed to seize the village and hill.
In TTB you dice for initiative, important when using alternating movement rules – Zarland won the first two rounds as the forces closed on the village of Baumdorf and its hill.
The Zarlanders gained an early advantage
Both entered the village and commenced a firefight involving infantry and artillery (these were only allowed in the village on the road).
Meanwhile the Zarlander 8th Adelburg IR and 8th Filstad skirmishers took the hill.
The forces close for action
On Move 3 Paskievich (Nuringians) took the initiative and attacked all along the battle line. Around the village the Zarlander 2nd Eyachdorf Pioneers and 4th Beckendorf IR broke.
Looking towards the Zarland lines. Somewhat chastened – the sole Zarland Artillery 12th Pinkenfels on the village road watched as their infantry broke on either side of them
On the Nuringian right flank the Zarland 2nd Tuttlingen skirmishers retired before the measured advance of the Prinz Clement Dragoons.
The fight for the hill is in the balanceThe Zarland Gellenstein Cavalry simply follow the Prinz Clement Dragoons onto the hill while the Zarland infantry are losing the fight for the hill
On Move 4 the Nuringians again pushed on, with the artillery duel in Baumdorf reaching a crescendo. The hill is taken by the Von Rechten IR and the Prinz Clement Dragoons, despite the Zarland Gellenstein Cavalry trying to draw off the Dragoons.
Looking towards the Zarland lines. On the Nuringian left the brave Zarland Artillery are driven from the village while the Nuringian Polenz Lancers break the remains of the Zarland Right wing on the edge of the village
Finally the Zarland Artillery (12th Pinkenfels) withdraw from the village. Elsewhere the 8th Adelburg IR are driven fully off the hill while the 6th Nurtberg are broken by the gallant charge of the Nuringian Polenz Lancers.
Paskievich had taken both objectives and very soon would achieve the third objective of driving the enemy from the field. This meant earning maximum “Control Points” for this action which would add weight to any campaign negotiations.
The Zarlanders stream from the field, while the Nuringians secure Baumdorf
After this action the campaign then ended with a final skirmish to complete the 32 segments.
Zarland won that last skirmish but overall lost the campaign – winning just 2 skirmishes to Nuringia’s 6 who also won the Baumdorf action. Nuringia took all the control points available in the campaign while Zarland had 4 units break in action to none for Nuringia.
For each skirmish or action experience points acrue to each unit taking part, 4 experience points = 1 condition point. Those broken units lose 5 condition points reflecting the wider consequences of a units collapse on the field with soldiers missing, deserting and having been in close fighting – more wounded not to mention those killed. It also counts as a measure of morale of those still in the unit.
So each units takes time to build its condition yet can lose it a lot more easily.
This meant the following units dropped to the lowest condition factor (CF) of “green” as replacements diluted the remaining expertise of the unit.
8th Adelburg was seasoned and is now green
6th Nurtberg were green on CF5 and are now on CF0 still green
2nd Eyachdorf were green on CF5 and are now on CF0 still green
4th Beckendorf were seasoned on CF6 and are now on CF1 green
This will dent Zarland forces capability in the 1818 campaigns.
My Abstraction of conflicts with the use of segments of the years campaign, being both in parallel and in sequence, means a unit could be propelled into another campaign activity in the same year. So those Zarland losses could yet affect other 1817 campaign outcomes.
I am tempted to apply a similar condition factor in my approach for Generals experience/rating. I typically use -1,0,1 or 2 range as in poor, average, good and great. Currently I am thinking of converting these to ranges and applying positive and negative moves to a Generals condition – all experience is growth so it is the reaction to the experience that matters and of course I am moving away from simply an inherent – your either a good or bad general for all time.
For each General the following could apply
General Kratzen (rated +1 = good) now means veteran so has a CF of 16 prior to the campaign and after it is up 3 experience – not enough for +1 CF. He is -5 CF for the defeat. A bit brutal – he ends up seasoned on a CF of 11.
General Paskievich (rated 0 = average) now means seasoned so has a CF of 10 prior to the campaign and earns 2 CF’s for all his victories giving a CF of 12 and still seasoned.
A long serving general declining back to green means while the ranges work the name tags need adjusting.
This approach could prove a bit onerous though – we shall see.
Although war with VinAlba was inevitable, the Duke Constantius Regent of Zarland knew that Maximilian of Nuringia was likely to act in 1817. The Elector had marched to war in 1816 yet then suddenly withdrew his troops.
The Duke’s concerns about Nuringia were well founded. In spring 1817 the Elector of Nuringia, Grand Duke Maximilian resumed his attack on Greater Zarland.
In a series of skirmishes he engaged with Eastern Zarland forces now commanded by General Kratzen – who had been praised for his success at Kloster Arens the previous year while fighting the combined VinAlban/Davarian army.
Almost at every turn the Zarland forces found themselves outfought in these skirmishes. Eventually Maximilian’s General Paskievich manoeuvred the Zarlanders to battle.
In a small action General Kratzen attempted to hold the village of Baumdorf. The Nuringians needed something to show for their efforts beyond successful skirmishing. General Paskievich ordered his forces to take Baumdorf once he realised the Zarlanders were not retiring.
The resulting encounter saw the two forces fight for Baumdorf with its nearby hill also the focus of attention.
Sharp Action at Baumdorf. This battle was fought using Table Top Battles by Mike Smith using has “Grid” option.on land, on sea, even fantasy – these grid rules are in their second edition – my first edition is shown here