The Second battle using my “Buildings Blast” set up saw a mid 19th century action with Austrians and Piedmontese in play. It was a solo play this time.
I used the rules published by John Curry and the “history of wargaming project” with some adaption for solo play.
Using Neil Thomas grading of troops I adjusted the firing and melee rules.
I also used the Roster system unaltered. Infantry got 4 circles and a cross while Artillery got just 2 circles in this game. Essentially in the basic game a hit meant a unit (= 1 base) was destroyed. Roster rules gave units/bases lives in the form of circles and crosses on the roster which you ticked off as they were lost.
The Scenario was that the Austrians were retreating and the force here was ordered to hold the bridge in the town. The crossing was one of only a few that allowed artillery and logistics easy crossing of the river. The Piedmontese advancing from the north west had orders to seize the bridge as quickly as possible.
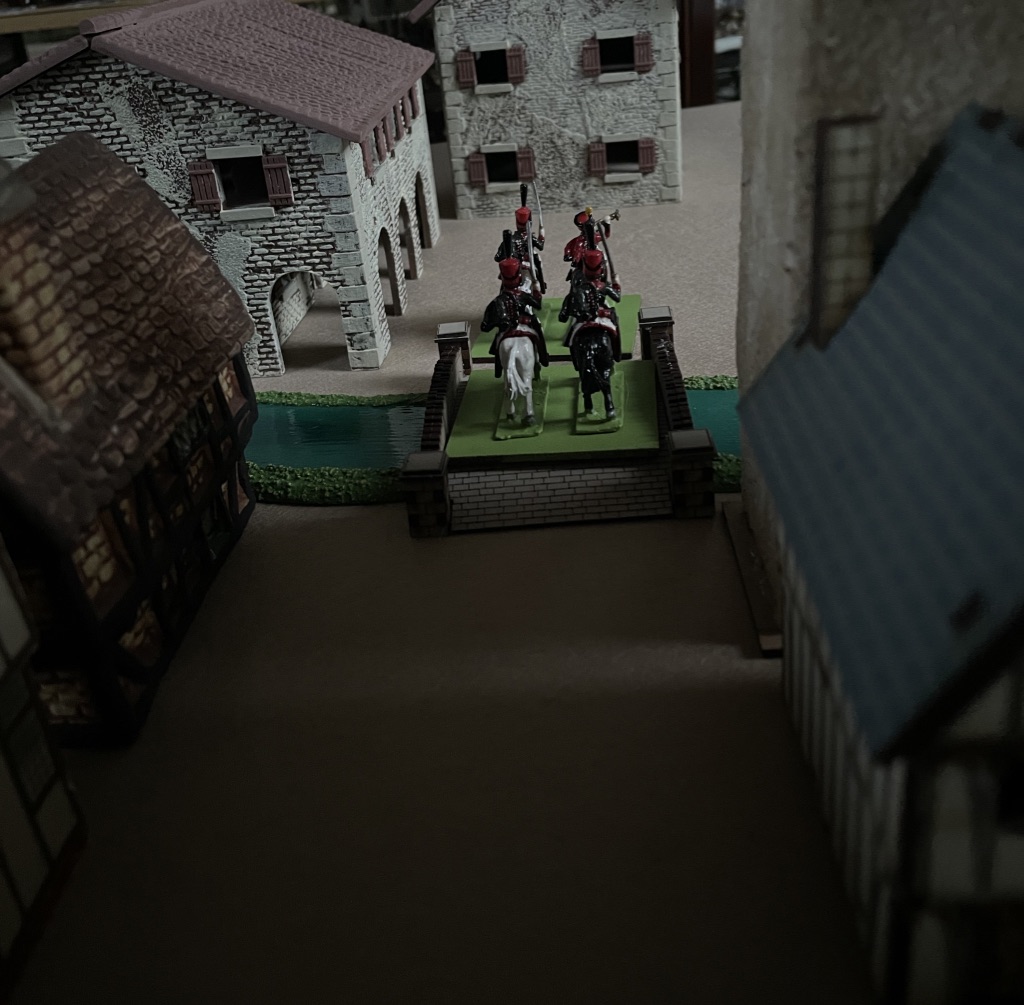
Forces were randomly assigned using playing card allocations along with a portion of blank entriesUnits deployed in contact and units were recognised as such at about 6 inches – the card only turned on a 2-6 D6. Here the right hand Piedmontese were certain nothing was in front of them – a heart was a dummy card while the left hand unit was not so sure so hesitated (on a d1) with no card turn. The right hand units poured forward towards the “old millhouse” spotting some real Austrian defendersThe lefthand Piedmontese units were suddenly exposed to Austrian infantry fire from a slightly sunken roadon the east side of the main road two piedmontese artillery batteries dropped into action again to be surprised by enemy troops in a slightly sunken and walled road. These were riflemen and on good form – one battery was quickly silencedHowever infantry units (white coated British Legion 1860) quickly drove them awayfierce fire was exchanged between the Bersaglieri and Austrians in the sunken road while Garibaldeans stormed the defended houses at the entrance to the townOn the east side 1859 Piedmontese infantry stormed the defended housesElsewhere Piedmontese forces had pushed on meeting little resistance (= dummy cards) to their front. A lone Austrian Artillery battery on the west side of town faces artillery and some more Bersaglieri Stubborn resistance at the Old Millhouse Finally the sunken road defenders are driven offAnd the west side Austrian defenders give up rather too quicklyexchange of fire results in another Austrian lossEven as west side Austrian defenders gather but………The Piedmontese quickly move towards their target – the river crossing. Another Artillery Battery blocks their wayOn the west side the Austrian defenders put up a good defence and with support nearby………The defended houses at the north end of town finally are overrunThe mill house and its defenders are abandoned by the Austrians who can retreatAustrian artillerists put up a stern defenceCrunch time at the town square as the Austrians are hemmed inThe Bersaglieri try to rush the ArtilleryThe Town centre defence collapses The Bersaglieri inexplicably turned tail on the west side while Lancers arrive to their rear. The British Legion finish off the town centre defenders on the left pictureThe Artillery of Piedmont watch as the last Austrian defenders in the town square are defeatedThe defended westside town square buildings are assaultedin a last desparate throw Austrian Hussars ride up the main street to halt the Piedmontese tide.The Hussars beat off the Lancers but to their rear the Artillerists are finally beaten while the East side is alive with Piedmontese. Everywhere Austrian defenders have melted away into the fields or across the bridge.The Hussars beat a retreat across the bridge bringing to an end the defence of the bridgePiedmontese Lancers cautiously follow.
The defended buildings were randomly determined and contained one unit each – no other benefits were given the building defenders. So they simply were a delaying factor assisting the mobile defenders fighting outside.
The scenario I played used a 25 step countdown and 1xd6 reduction per turn. The Austrians had to retire at countdown 16 from the edge of town, 7 – the town square and at 0 abandon the north river bank. Victory to Piedmont required they took the bridge before the countdown reached 0.
The game turns 1 to 3 were spent on the edge of town, then turns 4, 5 and 6 fighting over the town square. Turn 7 forced the Austrians back to the north bank but here ended the action as the Austrians actually ran out of defenders.
So the victorious Piedmontese captured the bridge intact and within the timescale set. There were no Austrian Engineers with a lit fuse to spoil their day! Anyway the Austrians would be back soon enough they thought…. Do I hear a Radetzky March in the distance?
For a very old ruleset Joe Morschauser’s rules played easy as I guess you would expect. With the tweaks to aid solo play they actually played very well.
I had bought the rule book for the Grid rules both the originals and Bob Cordery’s modernised version – Bob co edited the book with John Curry.
So this was a pleasant surprise to find a very playable set of “measurement based” rules into the bargain.
The hill of Moulet-Arles at the Gap of Moulet-Arles
Yep crease lines show up in pictures – at least I know the centre line of the battlefield though.
This battlefield is a take on a few where a road junction provides the focus of the action as forces collide due to poor scouting. I quickly drew a map looking to create a bottleneck to be fought over.
On this scrap of paper Moulet-Arles appears from nowhere. Maybe it will just as quickly be forgotten?
Narrative
Savelonia has been wracked by insurrection and revolution. Nothing new here as the region has been fraught with instability. Sabaudia and Savelonia occupy the western lands of the Empire which had seen better days.
Yet the Emperor Raymond has seen his fortunes improve in recent times and feels compelled to show some strength in the region.
Meanwhile King Nikola of Sabaudia sees opportunities to expand his kingdom and influence.
The provisional government of Savelonia had already appealed to King Nikola for assistance so it was easy to frame his response as coming to the assistance of downtrodden peoples still living under the hard boot of the Imperialists.
The Emperor ordered his forces to mobilise.
General Gutenstein marched south and west through the Crownlands of Pommardia and through some minor duchies before reaching the borderlands of Savelonia. It is a pity his majesty had not thought to build his very new fangled railways where the army needed to march, the General thought, as his forces struggled through the mud under grey and darkening skies.
He had sent ahead General Hartmann a promising young officer. General Hartmann had 2 battalions of riflemen along with 2 squadrons of light cavalry plus 2 horse guns.
His orders were to seize the road junctions around Moulet-Arles. Local guides informed him the area was known as the “Gap of Moulet-Arles” owing to a dense forest to the west and some high ground to the east. three roads came together at Moulet-Arles and just one road led south west into the Savelonian heartlands. Hartmann noted that his maps did not show these features as significant. He pushed his men on as the grey clouds dispersed a little.
To the South West General Forlan cursed the weather, the people, the roads and the Kings Logistics Corps or rather lack of one.
His forces had been late leaving their concentration points and then the revolutionaries in Savelonia had been creating havoc. At least he had corralled the rebellion to just the three major cities in the Grand Duchy. This had given the Provisional Government some order. It was little time in which to prepare for the inevitable response by the Empire.
Now he had word of Imperial forces gathering to the north east. He had sent General Ducrot forward to secure what looked like a key road junction at Moulet-Arles.
General Ducrot was your average time served officer of the Empire who had opted to make his later career with the kingdom and frankly this explosion of activity late in the year had not been to General Ducrots’ liking with his plans to enjoy the spa towns of the Drabzan Mountains now put on hold.
And the weather was turning bad it would seem.
General Ducrot considered his orders again. Take the two road junctions of Moulet-Arles driving off any enemy. His battalion of Chasseurs were key and were supported by 2 squadrons of light cavalry and 2 battalions of line infantry. His one horse gun left him vunerable but from what he had heard the Imperialists were only “demonstrating” – a bit of sabre rattling.
As he came within sight of Moulet-Arles the rain seemed to intensify, it certainly darkened despite it being late morning already.
Ducrot’s chasseurs deploy north of Moulet-Arles towards Petit Moulet-Arles. HIs light cavalry push west by the Forez en Moulet and to the west his other squadron climb the hill. The first line infantry battalion arrives in the village. Job done!Ducrot carelessly reconnoitres beyond his forces as an Empire cavalry force rides towards Petit Moulet-ArlesWith the Sabaudian forces almost all in position the Imperialists find their use of the road congestedThe light cavalry under their respective Generals face up to each otherFirst blood goes to the Imperialists as the Sabaudian Light Cavalry have the worst of itHeavy Rain slows all activity and the heat has gone out of the battle – literally
Heavy rain now sweeps across the battlefield and movement all but ceases. Both armies main forces are coming up but with the light fading fast General Hartmann concludes that his day is done. Leaving a battalion of riflemen in Petit Moulet-Arles he withdraws a little way away and seeks new orders.
Later that evening the Imperialists retire leaving General Ducrot and the Sabaudian forces to enjoy the dubious delights of Moulet-Arles on a very wet and sodden ground.
The Wargame
The narrative was built largely from the wargame outcomes with only the naming, origin of the war etc. being necessary additions.
Setting up the game
With my latest wargames fad being post Napoleonic warfare I just had to get some games in.
So there was a degree of improvisation necessary.
Currently I am painting armies for the 1850’s and with none complete that could not be my starting point. Help was at hand through Charles Wesencraft’s Practical Wargaming (WPW). While I was looking at his Franco Prussian rules I realised they were a build on his Napoleonic rules in the same book. Added to that I had some Napoleonic Figures ready to use and the decision was made.
This was a Faux Napoleonic game. Thank you Renaissannce Troll!
The idea for this game was the Franco Prussian scenario set out in chapter 14 of section 6 entitled “how many generals?”. And the book was Donald Featherstones Advanced Wargames (DFAW).
The scenario written for multiple players sees two forces collide having sent out advanced gauards. The question is who can feed in their main elements and rear gaurds most effectively.
Also objectives are defined by the ongoing campaign – so you don’t play fast and loose “one game” tactics.
The Imperial Forces were
Advanced Guard led by General Hartman (+1) with Staff Officer Kroos (0)
2 Battalions of Jagers (M2, M2)
2 Squadrons of Light Cavalry (M2, M2)
2 Horse guns (M2, M2)
Main Body led by General Gutenstein (+1)
1 Battalion of the Imperial Guardsmen
2 Squadrons of Heavy Cavalry
7 Battalions of Line Infantry
2 Field guns
Rearguard
Not specified
These forces had become broken up and were all heading on different roads which converged at Moulet-Arles.
In the “WPW” rules staff officers provide some variation and control when playing face to face opponents giving each staff officer a temporary +1 on die rolls with the unit they are with. I tweaked this by making staff officers themselves variable to introduce some more friction for solo play. And Generals were included to account for any decisions they made.
General/Staff Officer 6 on a D6 = +2
General/Staff Officer 4 or 5 on a D6 = +1
General/Staff Officer 1,2 or 3 on a D6 = 0
So the Imperial forces were well blessed with leaders
Turning to the Sabaudians we had
The Adavanced Guard led by General Ducrot (0) with staff officer Hautois (+1)
1 Battalion of Chasseurs (M3)
2 Squadrons of Light Cavalry (M2, M2)
2 Battalions of Line Infantry (M2, M1)
1 Horse Gun (M1)
The Main body led by General Forlan (0)
2 Battalions of Guard Infantry
5 Battalions of Line Infantry
2 Squadrons of Heavy Cavalry
3 Field guns
The M and number value for each advanced guard unit denotes their morale classification on the day. WPW assumes that top notch units can underperform and raw units out perform themselves on any one day. This helps with Campaigns or the sort of narrative gaming I do. Not much use to the “lists” gamers though – far too confusing.
So M3 denotes a unit in top form, M2 average condition and M1 – well you need to roll your dice high when testing morale!
I diced for all the units in the main bodies – when they would arrive and by which road (3 options for the Imperial forces!)
In the event the game ended swiftly because of some timing decisions and the weather.
Now there has always been something different to me about Charles Wesencrafts’ rules. Maybe it is because back then my wargames rules were from basically one author – Donald Featherstone: Gavin Lyall, Terry Wise and Charles Grant all passed me by for example.
Anyway WPW gives you a package – nothing outrageous – it is a complete package and everything has its place. With Donald Featherstone I always felt I could emphasise rule aspects sacrificing others with little thought to the overall game. With WPW I basically take them as presented and play them. Yes I do tweak a bit because solo play requires that extra friction in the absence of another human player.
Well the weather started off wet and just got wetter. I had also randomly found the action started part way through the day. So instead of say the example 12 move battle duration shown in the book I reduced it to no more than 6 moves. And once the rain had set in with the Sabaudians in possession of the crossroads it just seemed logical that the Imperial forces would withdraw and consider their options.
So that ended my first post Napoleonic wargame. And was it a damp squib? if you play only the individual games then absolutely. If on the other other hand you play for campaigns and narratives it was good and in fact immediately suggests other courses of action.
Will the Imperialists now exploit the fact that the Sabaudians have concentrated on the road junction. Maybe they will attack from a new direction. Or maybe mask this position and attack elsewhere to draw the Sabaudians from the crossroads altogether. Maybe the crossroads are now no longer important to the Imperialists.
Finally I will cover a few other points about WPC.
Firstly I used written orders – well simple pictograms and crucially I wrote them at least one move ahead. This immediately adds more friction for the solo game as well as making the staff officer element of the rules even more pertinent.
The rules were for their time, in my view, very good in approaching control and morale. The text at 180 odd pages is quite heavy when the basic rules can be condensed into just a few. This is especially so when you consider the rules cover 6 key periods (ancients, medieval, pike and shot, Eigtheenth Century, Napoleonic, ACW/Franco Prussian). Add to that three variations – two large scale game options and a skirimish option.
The point is the whole book is also the design philosophy into the bargain with explanation alongside the relevant part of the rules.
The rules are therefore stripped of unnecessary features yet have the right blend of “kept rules” so you get a good feel for the game.
The figure removal technique in the game, with what was then an unusual multi figure basing approach, is easily replaced with a value solution such as promoted by the Neil Thomas AMW or OHW rulesets. This allows the figures to stay on the table and as Charles Wesencraft says himself it is not obvious which units are degraded until they do something. Here his morale rules take care of that – so be prepared to move units to the rear rather than just remove them. And it follows rallying can still play a part with those staff officers effectively representing the efforts of all the leaders of the army at whatever rank attempting to keep men in the line.
You can still buy these rules here being part of the John Curry Wargaming Project.