If Battlegames and Henry Hyde introduced me to wargames blogs then I guess my next Blog Influence was that blog that most reflected my interests at the time.
And at the time I had decided for budget reasons to switch to 1/72 plastics for new projects. We were still struggling out of the recession.
Into the bargain I was using an idea from Lance and Longbow SocietyHobilar magazine to reduce DBA standard figure numbers on each element/base – the article was about cutting the cost of your hobby yet keeping the pleasure.
At the same time I had encountered Peter Pigs Bloody Barons (15mm focused) which joined up to Society of Ancients article by Mike Tittensor “Do Ancients stop at Quadesh?”.
Peter Pig makes figures and writes rules – many use grid based gaming
The upshot was I found plenty of 1/72 ancient chariot sets for sale and plunged in.
The Chariots never got painted although the infantry did. However I have since then indulged myself across multiple periods painting 1/72 figures.
Behind all this was a particular blog, Wargaming for Grown Ups. Trebian provided lots of inspiration not least that 1/72 was a good table top scale to game with. His large table games had masses of space yet that meant something smaller would still look good and play well.
So Blog influences No2 is Wargaming for Grown Ups. Trebian offered me a window into table top wargaming in 1/72 plastics and even 15mm metals. His blog offered a range of posts – games, figures and of course a bit of real life. And there were the “opinion” pieces in amongst a nice mix of text and images.
I can pretty much say that Wargaming for Grown Ups has been my longest running go to Blog and given me plenty of ideas and enjoyment. Thanks Trebian.
Minus their chariots my 1/72 ancient lybians square up to some Sea People invaders – Hat and Ceasar figures on show on 80mm x 60mm bases “flocked” using a games workshop idea involving bird gritIronically I have used War and Conquest to play my 1/72 bronze age games.
Earlier this year I attended Partizan at Newark Showground. For the first time in many years I have made a second visit in one year – this time its the “other” Partizan.
Same location, same show – sort of.
The Autumn sun blazed through the south facing windows. I think that bright light helps – its uplifting. Except when your looking into the sun at the grasses selection on the Northumbrian Tin Soldier stand. You simply cannot please some people……
I enjoyed the Other Partizan. I almost feel Partizan in Spring was still all about what might be and was upbeat while the Other Partizan is no less upbeat but just maybe many gamers have now got stuff done and there is also an air of reflection maybe even planning thoughts for 2023…….
Here are some pics of things that caught my eye.
Westbury offered a more unusual amphibious demonstration……Dark Ages featured on a few demonstration gamesAn expansive demonstration of the Anglo Danish shieldwall in its strong position at Hastingsa very effective winter demonstration of the Battle of the Bulge winter 1944.A less popular era and also uncommon scale for shows. A neat game with a thoughtful display – quite a few displays chose to use background screens to good effectI like the period and find Phil Olleys armies rather compelling.Its not just the details that attract. The choice of colours, textures – its complimentaryThe castellated gate further adds to the effect.From within – the town offers some delightful vignettesNow a corner backdrop would have capped off this excellent displayEverything here is available to other gamers and yet in combination the game “viewing” was a step above the rest of the demonstrations for me.
Participation Games
Never mind the billhooks was present in the particpation area – 2 games I think. This one (with Andy Callan? – the Billhook brothers) had some nice renaissance figures in play I still cannot make up my mind about printed mats, do they compliment or distract from the figures? I think it depends.I spotted only one balloon – on the “The Bunker PG18” table where Martians? were about to rout human mankind This was a participation, with it seemed, plenty of participation
Back to Demo Land
I liked this table in the demonstration zone but the photo picks up the sky “lines” which is unfortunate.Probably the most striking demonstration scenery was Boondock Sayntes with their Turkish assault on this city comprising a variety of architectural styles but no less impressive for that. Maybe it is a modern eye to look for similarity. consistency and repetition.Peter Pigs Bloody Barons was the chosen ruleset for this demonstration gameRather traditional coloured lichen seemed effective to meLots of Perry miniatures on the table – rule of three figures per base shows you can extend your figures per base without any real loss of unit density.These units felt good – a nice size and the three figures to a base means you can still enjoy all your artwork.also the rule of three somehow makes the soldiers look less ordered – something to be welcomed in medieval armies.The forces close to decide the latest historical findings about this most defining battle in english history.The League of Extraordinary KreigSpeilers put on an excellent display of accurately proportioned 18th century era figures. They were very impressive yet somehow I think my vote remains with Phil Olley’s well fed troops and scenery on this occasion.
Materiel
I turned up in time to get a free figure: The Empress Matilda.
I might paint one one day!
I did buy a few items – nothing like some retail therapy.
I seem to be quite taken with autumnal or dry summer shades at the moment – Nothumbrian Tin Soldier no less.These chaps are not what they seem (from HSLBCo) – you see british while I see Pickelhaubed Prussian types!
2022 The Other Partizan: Another excellent show advertising next years dates as well……………Under one roof – 114 tables/stands offering a massive range of choice in games, demos, societies and tradersI was quite taken with the role playing ranges shown by Nothumbrian Tinsoldier but I must draw the line somewhere………anyway I do have some really ancient RPG kit that I can always drag into the light……….
In that last link nestling at the end of a post about RPG was a 1970’s era Minifig ECW regiment. A very failed project I think. Yet ECW remains an aspiration – I have the armies, copious rulesets and now even more scenarios, but for now the C19th remains a very interesting and compelling period – so unsurprising that I came away with something of that ilk. Vintage already? 2007 era and I have numerous rulesets in use – yet I will enjoy this authors take on a transitional period that effectively sees Napoleonics rubbing shoulders with machine guns
So belatedly my third offering this year finally makes it to the pedestal.
The First Schleswig Holstein War was fought between the Danes and the Prussian driven German Federation – aka the Holy Roman Empire. The Danes won but the Prussian steamroller was just getting going – in 1864 the 2nd war with Danish defeat, heralded the misery of 80 odd years of German led mayhem across Europe. However it is reported, you can argue it was weakness on the part of France and the United Kingdom to stand up for territorial integrity, that condemned Europe to decades of Prussian agression.
In 1848 the Danish Infantryman was clad in red tunic and blue trousers with a bell style shako plus white belts and straps. The bell style shako had evolved from the Napoleonic era shako, both of which were also to be seen in civilian fashion changes on the journey from tricorne to bowler hat.
Almost as soon as the war started the soldiers ditched their shakoes and donned their fatigue hats – bright blue kepi’s. Add in the new all dark blue uniform with black belts and straps gets you a soldier looking not out of place in the American Civil War that was raging 15 years later.
This Piedmont unit from 1859 gives you a rough idea of the transformation in 1848 danish military uniform. The Danes led the way, not just the Prussians.
The metal figures are from Irregular Miniatures. Being 20mm they are at the small end of 1/72 so they get some extra basing to reduce the height disparity with the many 1/72 and 25mm figures I have.
Irregular Miniatures sell them under their Colonial range.
Here are some more views of the unit.
The units are set up for Piquet rules – 4 bases equals a unit.
The 3 figure basing was an idea I picked up from an article in Lone Warrior – magazine of the Solo Wargames Assocation. The article was a cost cutting exercise for DBA armies where the advent of element basing undermined the need to consider figure scale and to have full ranks. Peter Pigs Conquerors and Kings also advocated 3 figure basing as did their Bloody Barons medieval ruleset.
I am quite taken with this unit so will probably add to this force.
I will probably use Neil Thomas’s book – European C19th Wargames which gives you rough army lists to play his rules and scenarios from the book.
For the basing I used my standard three colour paintwork (burnt sienna + yellow ochre + very pale yellow/white dry brush all over budgie grit/pva. This time I have gone for paler washed out grasses. And I am quite pleased with the result.
The flag was an afterthought. I suddenly realised I had the flagstaff from Irregular with no flag! Now I could probably have bought a Danish flag online. But I had started to make crude flags from dried out screen wipes (basically I bought some wipes and found that they had lost their alcohol content). The end result is a rough paper that takes colour easily. I simply used some permanent ink colouring pens. Marking out was the longest task. So very quick – but I suspect I will change them if I get a chance.
So that is the 1848 Danish Infantry unit ready to march!
Peter Pig (PP) have a history of promoting rules which are a little bit different in an engaging way. For the gamer there is an enrichment with pregame activity and this also helps the soloist. For those who like total control and the key variable simply to be them – the general’s actions, then these rules may seem too restricting.
Poor Bloody Infantry (PBI) is PP’s WW2 game. And I say game advisedly. Although PP makes clear that the rules have been well researched to enable necessary compromise for game play, the purpose is an enjoyable game between well matched forces.
The key differences I guess are the prebattle steps, then the use of large control grids (no tape measures please) and what once used to be novel – unit activation.
The success of PP over the decades has seen many other rules writers copy the pregame idea and certainly utilise the activation sequences. PP has a long history of rules development and making a real effort to “design in” their research while retaining game play.
I wanted to get my latest painted figures on the board again, so opted for a PBI game as it had been a few years since I played it. In fact I had to rebuy the ruleset as I had got rid of my original copy in a massive clear out of all wargame things post 1735! Silly me.
Narrative Background
The Vossackians had surprised the Azorians who had over extended their advance and were forced to retreat. The resulting chaos with only a single main route caused the Azorians many problems. The Vossackians failed though, to fully capitalise on the situation. As a result of being well forward, Senior Lieutenant Saray was ordered to advance on a road junction which appeared to be of value to the Azorians in their retreat.
As it happened Captain Turner had orders to secure the same road junction to protect other nearby routes of Azorian retreat.
Both commanders were advised that supporting troops would soon be provided.
As dark clouds gathered overhead the two forces unwittingly collided.
The Forces
Vossackia – Senior Lieutenant Saray had 3 platoons of rifleman, SMG’s and LMG’s. Junior Lieutenant Zhelezo and Junior Sergeant Stali led a platoon each. The platoons were slightly mixed up owing to allocation of replacements and issues with logistics.
Azoria – Captain Turner had Garand armed rifle platoons supported with BAR LMG’s. The Azorians had suffered in some previous actions so were not up to strength. Lieutenants Bacon and Bean led a platoon each.
A Map is to be found at the end of this post.
Lieutenant Bean and his platoon crept along the main road seeking what shelter they could. At least they had reached the road junction without incident.
Note the tough hedgerows! they make a grid harder to leave in PBI. Cover affects movement in an abstract but logical way.
Activation is about mobilising possibly reluctant movement by soldeirs under direct fire. As you will see lack of movement and even pinning the opposition is key to allowing your own freedom of movement.
Peter Pig use groups (figures assumed based together). Rifle figures are in 3’s and LMG’s are in pairs of figures. SMG’s are in 3’s while leader groups can be 2 or 3 strong.Lt Bean brought up the rear. He had good activation to get to the road junction.Hang on I can see movement beyond that building in the distance…………..SLt Saray calmly responded to the excited shout of Junior Sergeant Stali – enemy spotted…..to the south of the main road and east of the South Lane, Lt Bacon had occupied a position which looked defendable. Not a moment too soon as Junior Lieutenant Zhelezo pushed his men forwardA section of Vossackian rifles rushed a nearby group of buildingsSLt Saray had quickly directed fire on the exposed leading section of Lt Beans platoonfurther damage was inflicted on Beans platoon on the Main Road. JLt Zhelezo gathered his men and exhorted them to be brave and unafraid as they assaulted the Azorian strongpoint. Lt Bacon was confident.Lt Bean’s platoon meanwhile was taking a hammering up on the main roadhowever a rash attack on the road junction by SLt Saray ended in disaster for the VossackiansJLt Zhelezo and his men continued to soften up the Azorians in the strongpoint, always building their momentum for an assaultAlthough driven from nearby buildings the Vossackians had now built up some strength. Captain Turner had also responded by sending more of his men to support Lt Bacon.At the road junction Lt Bean with the remains of his platoon fought off ever increasing numbers of VossackiansAnother assault goes in at the road junction with further damage being done to Lt Beans exhausted platoonLt Beans platoon or what remained of it were isolated and surrounded – overrun……The Vossackians took the road junction and were presented with the whole flank of the Azorian position as the fight for the strongpoint had sucked in most of Captain Turners reserves. At the strongpoint the Azorians were suffering.shattered Lt Bean stayed in cover at the road junction. The Vossackians pressed further west. Now Captain Turner had begun to extract some men from the strongpoint but it looked too late.Captain Turner came under attack just west of the road junction in another strongpointThe fight at the East strongpoint was still being hotly contested, but finally Lt Bacon’s strongpoint position was overrun And then the Azorians got lucky – a minus 6!The heavens opened and it turned pitch black in an instant, the Azorian Captain Turner retreated while his two trusty Lt’s Bacon and Bean still actually held their positions – grilled and baked!
Game Over!
This battle narrative came from the actual game. It was most enjoyable seeing the encounter fluctuate before ending. PBI tells you that “ebb and flow” is part of the game design.
Some more PBI rules came into play during the game.
First was the arrivals of troops. In the pregame journey on the equivalent of a snakes and ladders board the Vossackians with the advantage failed to get a clear superiority in numbers and prevent the Azorians gathering sufficient forces for the action.
The Vossackians posture under the rules was agressive while the Azorians was only responsive.
I think the rules are good at covering troops on the board at game start and those being fed in. Another variable to add flavour.
Three objectives had to be taken by the Vossackians for game victory.
The East Strongpoint
the Road Junction
The West Strongpoint
The Map
A countdown tracker starting at 23, and reducing, using 1d6 per turn meant game length was unknown.
The battle started well for Vossackia as the Azorians advanced allowing early contact and then finding the dice rolling for them. The Azorians quickly lost any parity on forces.
But later the rules around activiation started to work against the Vossackians at the critical moment. Things also slowed at the wrong moment.
To cap it all the countdown dice rolled for the Azorians with too many 6’s including the last one when the tracker was at 5. So the game ended early.
Cue – mega thunderstorm.
The positives are you get a fairly quick game – no measuring movement or ranges helps.
The abstraction that allows close proximity of opposing forces requires a bit of getting used to. I used the 6″ grid for 15mm with 20/25mm or 1/72 size figures. Maybe an 8″ (for 28mm figure) grid would give a better look.
What looks like contact isn’t. Contact is a process called assault and requires a lot of momentum to achieve.
The abstraction includes the proximity of the figures who spend some time in adjacent grid squares waiting to build momentum for an assault or simply erode the enemy through fire. The latter requires a decent advantage in numbers but the former is risky without overwhelming force.
The Vossackians lacked any heavy weapons or support which kind of reflected the “encounter” nature of this Scenario. And probably meant the Azorian victory was the right outcome.
Verdict is I will play PBI again.
I use a 2006 edition of PBI – easily picked up at show bring and buys (when they return) and on ebay. Of course Peter Pig will sell you the latest edition with improvements from over a decade more of game play. And PP also offers a fantastic 15mm range of figures and vehicles which, if I was not hooked up to 1/72, would suit my needs.
Roll on the Vossackian advance in Fauxterre 1930+……
My wargaming has continued to evolve. In 2021 I played more games than in previous years and created more fictitious eras for my mythical worlds. Fauxterre expanded in surprising ways. And that of course is the point about imagination – its very chaos is the atrraction. Unless of course your livelihood depends on producing it for others.
My imaginative wargaming is simply for pleasure – a distraction, an escape from the real world.
Wargaming on the other hand seeks rules and restrictions. So rulesets for many wargamers are a pleasure (!) in themselves rather than simply a necessity. The exception is I believe competition gaming where the rulesets are a necessity simply to allow the “fight” to be resolved at all and a winner declared.
In the wargaming arena “rules lawyers” are the pantomime baddy except ruining the event rather than adding to it. Perhaps the solution has always been there – make competitions more fun than theory. Less historical particulars and more game means that the lawyers have less to exploit. That said, even such family games as cards, scrabble or monopoly betray the rules manipulators!
From my perspective there seem to be far more rules published for game enjoyment even in a competitive situation. And despite a drive for simplicity the abstractions are often well thought out so the feel of the game historically is still there – a key part of the wargame enjoyment.
This is another blog post that has deviated already. On the subject of threads and themes I have been musing on the subjects of rulesets, games and imaginations.
I do like a set of wargaming rules and as rules writers have tended towards explaining their ideas ,these publications have become more readable. Even if you never play a ruleset, they give you someone elses opinion about a conflict or technology – what was signficiant when it came to the conduct of a campaign or battle.
In 2021 I indulged myself.
Piquet Field of Battle 1700-1900 – 2nd edition of this ruleset which likes lots of uncertainty – ideal for soloists and those who enjoy a degree of chaos when it comes to game turn sequence
Neil Thomas 19th Century European Wargaming – post napoleonic but very much still horse and musket. Neil Thomas rules work, really work – its that simple.
Practical Wargaming by Charlie Wesencraft – another ruleset that is coherent and in fact I have never felt the need to tinker with – well ok a little bit.
Neil Thomas Wargaming an Introduction – not my first purchase yet some really useful rules in here.
Mike Smith Table Top Battles – my “grid wargames” ruleset – they even gave me an easy way in to some naval wargaming – something I had previously shown no interest in.
Battle – Practical Wargaming by Charles Grant. A complete set of simple rules for World War 2. A vintage ruleset they convey a simplicity of gaming I have since only really found in Neil Thomas rules.
Peter Pig Poor Bloody Infantry is a grid ruleset but so much more. It is definitely a “game” and does not need adaption for me. I play it straight out of the book.
Donald Featherstone rules don’t appear but had regular run outs. The reason is simply that none of his books were in my view a complete set of rules. They were always full of rules ideas. And that means you get to tinker big time. He gets his own list!
Battles with Model Soldiers ever popular for some simple basics
Advance wargames for period specific mechanisms
Wargame Campaigns – does what it says on the tin lid – ideas for campaigns
Surprisingly Neil Thomas One Hour Wargames had little look in this year. That suggests I have had more time to play each game.
The most satisfying ruleset for 2021 has been Neil Thomas Wargaming 19th Century European Wars. It gave me everything I needed for a new era with his excellent balance of simple play and historical feel. Add to that, excellent scenario generators for both historic battles and those of your imagination, This ruleset has sustained my new interest for most of the year without distraction.
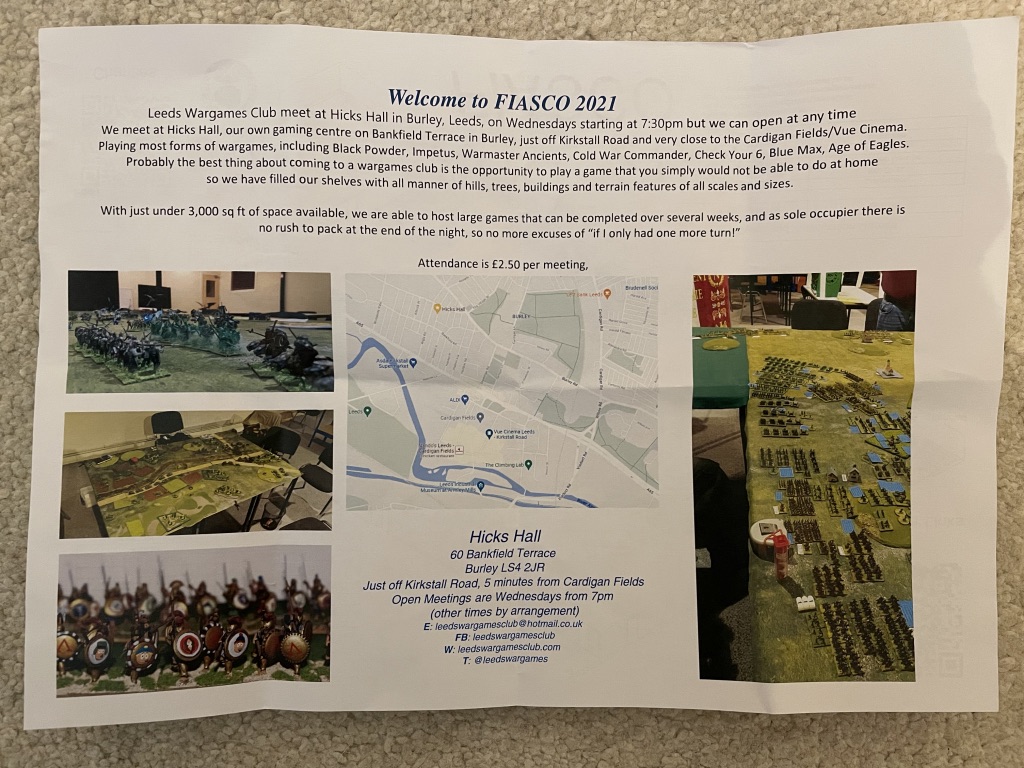
Pursuing my side game of buying “face to face” for my latest project, in the world war two era, means wargames shows count.
For decades wargamers have treated shows as their own very necessary High Street. Remember once upon a time visiting “fairs” were very much part of medieval life for whole areas of a country. And of course prior to the internet and ebay they were the dominant route to wargaming purchases.
Quite simply the hobby could not sustain even general hobby shops on the high street even with railway and broader modellers sharing the same sources.
In fact talking about fairs reminds me that there is an excellent book by Graham Robb called the “Discovery of France” which highlights the circularity of life in France right up to the 20th century where whole rakes of the population derived their living through moving around the country. Even if your not a Francophile this book is a fascinating insight into a country which has dominated European Military history. His book certainly gives, in my view, a different view of France.
And then for the wargame shows, Covid19 really did drive us all fully online which may have far reaching consequences. On the evidence I saw at Leeds I am not sure what they will be though. Yes traders down, gamers down but then again we now have a late year crowded calendar plus organisers still having an obligation to manage their events to minimise the effects of Covid19 spread.
I for one, was a happy customer of the face to face variety.
I had stored up some planned purchases and spending money so here is a run down of my acquisitions and of course a “thank you” to the “SUPPLY CHAIN” without which we would not have the hobby we all enjoy.
First up some basics from Pendraken – 40×40 mdf bases for my currently stopped MAIN 2021 Project of the Italian Wars of Unification 1848/1859.
Colonel Bills yielded some 20mm preloved WW2 metals in the shape of a British Universal Carrier by SHQ and Romanian 47mm Schneider AT gun by FAA.
Regular visit to Coritani aka Magnetic Displays bought me some much needed paintbrush replacements and I spoilt myself with a prepainted crossroads – yes it was one of those days.
Stonewall Figures had some interesting kits and BT7 Russian Tanks were on my shopping list so these two Pegasus models dropped into my hand. And well these T34/76 armourfasts fell in as well.
Next up is a venerable book published in 1973 by Donald Featherstone. No4 in the series this is a bit late for me (1943-1945) as I am focused on early war activity. But it does cover the Tunisian Front and apart from Egypt/Libya where the British main north african action was, there is not so much printed material on matters west of Tunis.
Having grown up with Donald Featherstone books I find them an easy read: I know what I am getting. A nice purchase from Dave Lanchester.
Now for something completely different and I mean different. In this blog I have recounted my “sanity line” being nothing more recent than 1730-ish or the end of Peter the Greats reign. I caved in to Wars of the Italian Unification for 1848/1859/1866/1870 and suddenly found an interest in naval actions as well. You can see the slippery slope here………….Gradually ironclads have been creeping into my wargaming thoughts. So this book at Dave Lanchesters store was shown to me by Dave when I asked innocently if he had anything on Lissa 1866. Thanks to Dave I have a very nice 244 page hardback covering the second half of the 19th century.
Next up in contrast Grubbys Tanks yielded a small booklet at just 16 pages offering Rapid Fire fast play. This ruleset started life in 1994 so if age is pedigree that will do. I will give it a shot.
Now the Peter Dennis paper soldier books always look attractive and I finally picked up one I had previously nearly purchased back in 2018. The Spanish Armada is completely off my gaming list but I just could not resist, what with my current naval gazing.
I also tipped gaslands into the shopping basket at Dave Lanchester’s – not for me but as a christmas present for someone else.
The next two books from Dave were pure indulgence. The Russian Army in the Great Northern War 1700-1721 and William III’s Italian Ally 1683-1697 both Helion publications. I am hoping they will be ok on typos but I am not holding my breath. even so as I have posted before Helion publish where others fear to tread. So I have to be grateful.
Finally this is a repurchase – in fact I think it may be the third time I have bought this ruleset. Careless ……..
I do like Peter Pigs ideas, especially the uncertainty of process, and this set offers something a little different on the WW2 front.
Well thats it. Quite a mix when I think about it: More books than expected and less models.
So apart from Rapid Fire from Grubbys Tanks, I bought all my books at Dave Lanchester’s, who I must say keeps his books in very good condition.
The ones that got away or rather failed to appear – Russians by Plastic Soldier Company (Grubby’s were not short on Germans or US boxes though) and maybe a BA10 armoured car yet Stonewall Figures have promised to look out for one of them and set one aside for next year when they head north again.
So thanks to all my suppliers at Fiasco 2021 may you all prosper.
Thanks to Leeds Wargames Club for a very enjoyable show, all the sweeter, after such a long break from this aspect of wargaming.
Back to painting table………I wonder what will be up next?
I thought I might console myself with a virtual VAP this year via this site. So first up is something about traders.
Vapnartak is run by York Wargames Society volunteers and has a sizeable trader attendance. The York Racecourse site allows plenty of space although the organisers always ensure we all just about fit in!
In more recent times breakout space has improved yet I get the impression the number of traders remains unchanged? Maybe some of the games space has reduced. I am not sure on that.
The traders I have most often shopped with over the years have included
Caliver Books – no links at present
Dave Lanchesters Military Books – no links at present
Caliver Books have always given me a steady supply of books and especially rule books.
Currently preoccupied with mid 19th century warfare, I plan to use Brent Omans Piquet bought from Caliver Books.
I have also dipped into their figures occasionally plus the odd terrain purchase. At the show Caliver are the nearest thing to a street general wargames store before they became gaming cafes or just cafes and now just empty buildings!
These cast and painted buildings from Caliver Books have proved their worth in 2020 in my Saxon, Norman, Viking and Roman Britain outings.
Dave Lanchesters books have been a great source of the older Ospreys and I have often picked up Pen & Sword or Helion publications at great prices.
Many of these Ospreys have been bought at Dave’s store at various shows, all sadly missed.
And Dave has some really excellent condition out of print books.
Irregular Miniatures provide simply a vast range of figures and items that is staggering. Always something tempting to buy.
No pic, I hope to have some news in another post in Irregular.
Magister Militum, Westwind/Forged in Battle and Museum Miniatures have been my preferred 15mm suppliers – mainly ancients.
Forged in Battle command pack, detail is excellent.
All their figures have character despite their small size. I owned some 6mm Naploeonics back in the day but never got the bug so 15mm is as small as I go.
Museum Miniatures “Red Guard” drive off some pesky out of production Corvus Belli Cathaginians. Museum Miniatures got me into 15mm.
Funnily enough Peter Pig is another 15mm supplier yet it is his rules I have loved over the years – RFCM (Rules for the Common Man) remain the only other ruleset for pick up games I automatically think of for WW2 outings aside from my house rules based on the venerable Don Featherstone offerings. OK I do own Too Fat Lardies rules which really are the most engaging game rules in my view. However I have to be in the mood to play them!
Peter Pigs Bloody Barons have also found out my interest in the past although the figure scale has been 28mm or even Mike Tittensor’s SOA Bronze Age deriviative that saw 1/72 plastics take the field.
Peter Pig gave excellent pre game rules in their Wars of the Roses ruleset.
S&A Scenics have given me some excellent scenery of the “precise” kind and which give a nice “gamey” feel to a table top.
That clipped grass and trees from S&A Scenics just cries out for some shiney victorian era soldiersS&A Scenics do offer some nice crossover trees as well
In stark contrast Last Valley offer you trees and hedgerows which do feel very realistic to me. I like both – and yes use both together on occasion!
Last Valley make some nice pieces that often appear in my games.Many a time this last valley copse has held a unit or some piece of armour
Sally 4th have offered various companies products and I have often bought the Foreground pre coloured laser cut wood kits along with original citadel paints.
The detail on these buildings is so fine it is wasted in the gaming context at 3 feet or 1 metre. Mind you Foregrounds view on chiminies just does not chime with the rest of these exquisite models!
Dice are always in demand even if I don’t need them. The Dice Shop does what it says!
Pendraken Miniatures have also yielded some nice dice and I invariably get my bases from them. Alas their delightful figure ranges are just too small for me.
you can never have too many Pendraken bases in store!
I have a soft spot for 1/72 or small 25mm or large 20mm (take your pick). So Tumbling Dice have supplied some nice Dark Age figures.
Scale has always been a problem – Lamming 1970’s 20/25mm norman/saxons bookend 4 Tumbling Dice 1/72 true scale Saxon/Norman foot command figures
Last but not least are Magnetic Displays although I always remember them as Coritani. I buy their paintbrushes and occasionally paints. While their range of terrain features are always compelling and Renedra plastics have often figured in my purchasing, I always obtain spear reinforcements from Trevor & Paula who I just find are simply the most helpful and engaging of traders.
You always need a store of gabions and versatile bridges! Yes this is very old stock I rediscovered – which means I have too much stuff.
And of course there was the “infamous?” bring & buy scrum alley where pitches were offered on a time restricted basis. I could never make up my mind if it was any better than an ordinary bring and buy, except it crucially saved the wargames club members acting as intermediaries – double handling cash and items.
I managed to make some purchases. I never bought bad due to the selling mechanism so thats a good thing.
Whatever your wargaming activity I hope you are able to support your favorite traders despite the pandemic and the decimation it has caused to so many people in so many ways.
Shieldwalls – Dux Bellorum, AMW, OHW and Table Top Battles Rules reviewed
Over quite a few posts I have reported on my use of rulesets to play battles between shieldwalls. In most cases the two opposing forces were mirror images. This meant the mechanisms in the rules might be more transparent and then the rules could be better contrasted in my mind.
Having said all that “one swallow a summer does not make” so everything I write here is caveated – only multiple playing’s will help you like or dislike a ruleset fully in my view.
My consideration of the rules is of course subjective, and my criteria may not be to everybody’s liking. So, my criteria are
Reading the rules (understanding/comprehension) – both at the start and when referencing
Ease of Play – how the game played
Outcomes – the outcomes during the game and overall at the end
AMW
Let’s start with AMW. First I should say that from nowhere these rules have come to represent a modern take on what “I remember” I enjoyed about rules from the 1970’s: Above all simplicity. I used the Dark Age ruleset straight from the book.
The rules take up a couple of pages and are in clear large print and easy to understand. I printed the relevant pages as the paperback is a “tome” and short of breaking the spine it is not easy to “use” in a game.
The rules gave a simple mix of troops and are explained in a chapter on why the troop mix was chosen and what they could and could not do. The Shieldwall concept was well covered.
Saxon Cavalry were permitted, and I think Neil is more on the “they were everywhere in life so why not some on the battlefield”. He restricted their presence and impact.
Selection of the 8-unit force was straight forward. I added some variety in the choice of light troops. I used my 80mm frontage IMPETUS bases showing 1/72 plastics. Each base equates almost to 4 x 15mm scale 40x20mm DBA bases as referenced in the rules. Mine are 60mm deep “for the look” as IMPETUS suggests.
The dice to hit and dice to save has some interest for live opponents although for solo play arguably it simply prolongs the playing time. AMW uses the two-step process to provide the layered differentiation between such a small number of unit types to cover several hundred years of warfare and army types.
It did help to keep the stronger type of unit – nobles in the field longer than the peasants.
The first losses also triggered more (domino effect) as AMW uses morale effects to pile on misery when dice are thrown low.
The battle lines were deliberately aligned and close together as the intention was to show two equally sized shieldwalls simply coming together. And the erosion of the 16 hits or 4 bases in DBA speak resulted in some quick breakthroughs. With no need to put the units in base to base contact visually it did not look quite like two shieldwalls: More like roman maniples!
The use of some cavalry may have speeded up the result although I think the outcome was not in doubt.
The feeling and reality of individual units meant that flank attacks were inevitable, and these were the main mechanism of destruction. And the lines once met were static – which cuts both ways – that’s what happened – short of logging loss of points there is not much game movement.
The cavalry interventions were easy to achieve as there is no restriction on command and control.
Finally, the structure of the ruleset with core rules and some simple extra rules simply cries out for more house rules.
In my battle report I suggested a way to deal with anglo saxon cavalry in battle that might more reflect their power as pursuers and opportunists.
Because of the apparent strength of shieldwalls in AMW I then play tested cavalry against a shieldwall. The result was a defeat for the cavalry army. It showed you need to put the whole force jointly in together as the attrition is such that late comers – in my case the token infantry shieldwall were simply outnumbered and picked off in turn.
Coordination is in the hands of the gamer through movement of units and their proximity. This second game also confirmed that archery is quite potent.
Overall, I felt that AMW is better suited to combined arms battles as opposed to a slogging match. Given the breadth of periods covered by the rules these two battles were enjoyable enough for a further outing at some point.
Dux Bellorum
These rules are more modern in concept with command and control central to their use.
Again, the units were 1/72 plastics on 80mm x 60mm IMPETUS bases. Losses would be recorded use dice and tokens.
The points-based game with stat lines for each unit type were easy to understand yet not so memorable as AMW was to me.
I could not resist a slight difference between the forces with one side having mounted skirmish troops equating to a 1-point advantage – 31 v 32 points. Near enough.
The ineffective skirmishers and straightforward meeting of the two-battle lines using the leadership influence made this all feel realistic to my mind.
As in DBA pushbacks showed visually where units were losing the fight. The battle line was still retained as the movement was small.
Distribution of the leadership points can make or break units, although centrally controlled by the gamer I felt this reflected the fact that a line would comprise areas of strong men and areas of weaker maybe reluctant fighters.
The dice head-to-head felt more interesting than the hit versus saving throw of AMW. In a face-to-face game this might also make the exchanges more exciting.
Again, flanking forces including cavalry provided local advantage as the game moved into its later stages.
Dan Mersey talks about the swirl of battle and this was true although the battle line was still discernible late in the game.
Both armies approached their own demise and it was just a few points either way so although the king’s men lost it could easily have been the rebels.
This felt like two battle lines slogging it out and even though there was some “flanking” it was not significant. The forces to a units front mainly did the damage first.
Table Top Battles
The previous two games used “measure and move” rules. Table Top Battles was “gridded” removing any need to get the tape measure out. I have used gridded wargames before with Peter Pigs WW2 rules being memorable.
While many people will know and have played either AMW or Dux Bellorum I reckon TTB by Mike and Joyce Smith will be new to most people.
Published by Partizan Press the ruleset has a feel of looking backwards in the same manner as AMW. The grid though makes for a different feel altogether.
For two shieldwalls the square grid was perfect.
The rules are covered in a couple of sides of A4. Initiative is gained each turn so you can get the effect of a “push” by one side as they win the aggression dice throws successively.
And that aggression is simply a +1 on all dice throws. Getting the initiative also means losses are inflicted before the opposition replies – extending the benefit of being the aggressor.
TTB starts with some simple rules and like AMW adds a few mechanisms to layer the differentiation. The difference is more about advantage in play rather than troop type.
I used the less brutal rules option of push back rather than straight destruction. I don’t think this affected the outcome too much. And it was more appropriate for the slogging match here.
Again, the differences in forces were out on the flanks with one unit of light cavalry in play.
The head to head style of resolving conflicts felt like Dux Bellorum and flowed well. Combat can be grouped so you can really speed up results of several units being joined up for a particular combat round.
While firing is alternate and affected by the aggression advantage, combat is simultaneous. This seems to work ok.
The mass combat meant that push back saw a whole line move back – a bit mechanical – less attractive than Dux Bellorum. In the later stages the erosion of flank units meant push backs became messier and trickier for some units – no room to retreat leads to destruction. And with grids there is a bit of space management to be done and in the right order – shepherd your resources – quite board gamey or chess like. This will not be pleasing to some.
In close combat the mounted and foot skirmishers die easily – I like that.
Finally, the king’s men turned a flank, and this crumpled the rebel line although none had the ignominy of being pushed off the table edge itself. I had not considered that when choosing a very small battlefield of just 2 foot 6 inches deep.
The king’s men were about to really destroy their enemy when the 12th move was completed, and the game ended. A day is 12 moves in TTB. Victory was based on various criteria including base loss. The Kings men won on this measure alone.
TTB comes in a slim 42 page black and white softback A4 booklet. It’s 2-page battle rules are really aimed at supporting campaigns and scenarios. The design is oriented in that direction.
Overall, this was a quick game and the lack of measuring not missed at all. The bulk combats removed some subtlety. The rules are so simple like AMW that house rules can fix most objections.
Overall, I liked this set of rules and with some tinkering they might become popular with me.
One Hour Wargames
With just 12 bases (six a side) on the table this game should be quick.
One-hour wargames built on the reputation of AMW for a reliable set of basic quick play rules. Here the pursuit was an even simpler ruleset that gave a game in under an hour. The rules are really scenario based. I set up scenario 1 – the straight encounter of two equal armies. I ignored the force generator to retain two matched shieldwalls.
The rules in about one side of A4 are very simple. 15 points of value represents the “abstraction” of everything unique about a unit. Random losses tell their story – those losing least – obviously were the strong units!
The skirmishers were ineffectual and fought their own flanking battle.
The alternating slugging match by the shieldwall saw the two lines stand toe to toe with no movement, just points erosion to indicate the fluctuation of battle.
Eventually most of the units reached breaking point and some rapidly departed. However, the first to go were from the side that eventually won so it was not the case that once you gained a local advantage this would give overall success.
In this battle we started with only six units, so I allowed it to run to the last unit standing.
As a result, later on the flanking successes of each right hand meant the whole battle line swirled 90 degrees. And then it happened again. A visual demonstration of Daniel Mersey’s “swirling” battle description perhaps. After all there would be no dressing of lines with the leaders all to the front pushing at enemy weakness.
Overall these rules did feel similar to AMW and felt generic. They seemed to give the same outcome as AMW without the saving throw step. Sacrificing differences, or “layering” if you like, for speed of the game is one of those compromises faced by all rule’s writers and gamers. It is what you want out of a game that matters.
Table of Ruleset Criteria
Ruleset
Reading the rules
Ease of Play
Outcomes
AMW
Straight forward
Straight forward
All logical yet Lacked feeling for the period
Dux Bellorum
I often reread the small print! And a bit wordy at times
Once memorised easy to play
Logical and a good feel for shieldwalls
One Hour Wargames
Short and simple
Straight forward
Logical and yet lacked feeling for the period
Table Top Battles
straightforward
Straight forward or so I thought*
A whole battle line eventually got turned twice while the shieldwall fight itself felt ok.
*I made mistakes in all these games but more of them in the TTB – simple errors forgetting to do something here and there. I took more care with Dux Bellorum.
Overall score – brutally simple – rank 1 to 4 (4 is highest) direct preferencing with no ties and no weighting!
Ruleset
Reading the rules
Ease of Play
Outcomes
TOTAL
AMW
3
1
2
6
Dux Bellorum
1
2
4
7
One Hour Wargames
4
4
1
9
Table Top Battles
2
3
3
8
Surprisingly I am saying OHW is the best for two straight shieldwalls. That probably is true though, diverse forces with more movement would probably show up the limitations of OHW even against its stable mate AMW.
If you ignore the rules reading as being less relevant after many games, it’s a tie between Dux Bellorum and Table Top Battles.
And in the final analysis I have to say that it is Dux Bellorum that gets my vote as the most “shieldwall feeling” rule set.
The others all betray their origin as generic rule sets while Dux Bellorum shows its depth of consideration by the author for a very specific period.
So next time I put up a shieldwall or two for a battle it will be Dux Bellorum unless I am in a real hurry. Then I will have 2 or 3 worthy substitutes.
Finally, some aspects of each ruleset that might be important.
AMW
Pros – well thought out design that gives you a simple yet good range of armies with sufficient variation and interest. The core rules plus some supplementary ones do work
Cons – no command and control explicitly and if you don’t like saving throws then this is not for you.
Dux Bellorum
Pros – command and control plus the head to head fighting. Also, the ability to put pressure into the game yet not everywhere all the time. Detailed for the period of Arthur so no need to compromise on design
Cons – somehow the rules are simple yet don’t read so well or indeed stick in my mind. I was constantly referencing the book which then suffered for its small print and layout with some key parts at the foot of a page and easily missed in the heat of battle. This is a minor point as after 10 games most of the rules will be memorable.
One Hour Wargames
Pros – it is such a simple concept and with the random forces selector and scenario choices is a gem. Speed of play!
Cons – it is generic
Table Top Battles
Pros – I had a brief spell with Kallistra, Strategos and then Peter Pig. Grid gaming has generally passed me by though. I like TTB and they feel like a set I could tweak or tamper with. And I think that gridded wargames may come back into favour.
Cons – sliding towards a board game with figures. We are at the far end of wargames abstraction. Your required to do a lot of imagining.
In my last post I explained my rediscovery of the ruleset published by Partizan Press and authored by Mike and Joyce Smith.
The Table Top Battles (TTB) ruleset uses a grid. Now I have dabbled in grid based wargaming and played lots of board games which are gridded games of some sort – not a tape measure in sight!
This post is a marathon and I hope you will see that this ruleset although “gamey” has a coherence to it. So the battle flowed and compared to AMW by Neil Thomas and more so with Daniel Mersey’s Dux Bellorum rules, I had little need to keep rereading the rules.
The usual sections follow – set up, then narrative and finally a picture based step by step report.
The rules require you have a base that will fight for each discrete unit. The term used is a “stand”. The General is another base who the way I read the rules is not a stand so does not fight.
I decided to use my leader bases and gave them stand status. The “tinkerman” at work already.
Essentially the line up was a shieldwall with some skirmishers at both ends of the kings battleline. At one end the single rebels skirmisher bow faced up to the kings skirmisher bowmen. At the other the Kings men had a foot bow skirmish stand plus a mounted javelin light cavalry stand facing a shieldwall of rebel spearmen stand.
The diagram below shows the set up. The playing area was kept to a minimum.
Narrative
Earl Toki now felt confident enough to split his forces which had grown due to his successes. He left Thegn Pyrlig with his main forces while he rode to meet some Mercians who promised to come over to his side.
While Earl Toki was away Thegn Pyrlig kept a good lookout and soon enough another force appeared who were yet another collection of the Kings men ready to fight the rebels. Thegn Pyrlig soon confirmed that these were western men but not any they knew or who could be “turned”. And Earl Mathedoi was at their head again, eager to avenge his recent defeat.
The battleground was simple – a flat plain. I used 80 mm squares here as my chosen unit type for 1/72 figures is the Impetus Rules with the 15mm suggested base width! Te grid is some cotton sheeting with penciled lines.On the Earl’s left flank his mounted skirmishers rode forward confidently while his bow skirmishers looked with concern that they faced a solid rebel shieldwall.In the game pictures you will see a peter pig pink die – this denotes the aggressor. Each turn dice are thrown and the winner has the advantage or the aggression in that turn.
TTB in effect uses the “pip” idea from DBA. It is simplified to give a +1 on ALL dice throws made by the aggressor.
The pink die reminds me that my wargame story has included gridded games in the past. My hex gaming with Kallistra never quite got going even though I thought the concept excellent. My problem was the geometrical look of hexes and the fact there is a “weave” for very linear types of warfare. Maybe I was just too focused on DBA at the time. Peter Pig rules for WW2 used square grids and his Poor Bloody Infantry (PBI) rules I really enjoyed before leaving that period altogether. There the grid worked – it did not impose itself in the way hexes did.
Clearly this is a very subjective matter. It is a case of each to their own.
This is my first return to the grid technique.
The orange 12 sided dice is used to decide who is the aggressor and therefore gets the valuable pink +1 diceThe right wing bow skirmishers got into action first. A game turn comprises phases – move, fire and combat with the aggressor going first in the move and fire phases. Crucially the aggressor inflicts firing losses before the passive opponent replies: Another advantage of having the pink jersey – woops – too much giro d’italia. Did I tell you my scenery ideas have benefited to my mind from watching hours of cycling tours riding across Spain, France and now Italy!
In the aggressors fire phase shown above both units have a value of one. This value is a combination of any fighting ability and morale. It is used in all firing and combat. To this fixed value you add the result of a single D6 throw. In this firing phase the aggressor has thrown a six and their opponent just 3. So no need for the +1 here.
The result is the loser score was “slightly lower” in the dice off so the stand is moved back. Not playing the +1 pinkie is an error because it applies in every throw. And in this case had it been properly used the losing score or “Target Player” score is now half. not just slightly less than that of the “Firing Player”. In this case the stand should be removed.
The Kings bowmen are happy to retire a square relieved they were not “removed” or were they?
TTB gives options throughout and I chose the harsher results approach. Stands either move back a square or are removed from the game.
On the kings left flank the mounted light cavalry (orange value 2) beat the shieldwall (purple value 3) 7v5 (yellow dice being the random addition). The kings bowmen managed a lowly 4 which being less than the shieldwall 6 proved ineffective. The net result is the shieldwall are discouraged and retire a square. Firing is between individual bases. Combat is additive.The error is corrected and the Kings bowmen leave the field early losing to the aggressors fire turn 8v4.The Kings men throw themselves against the rebel shieldwall. Even the kings reluctant bowmen, not doubt emboldened by the kings light cavalry, have joined the fray.The General adds the value of any 1 friendly stand in an adjacent square to the combat phase. Combat is simultaneous unlike the firing. Here a shieldwall spearman stand adds +3 to both leaders. Later on the eagle eyed will see I missed a few +3 yellow dice although because the leaders never moved and were always head to head they simply raised the value of both the group scores making it harder to get a decisive result in the grouped combat.The combat allows “grouping”. This speeds up the combat process. Because I had a simple shieldwall with all units the same I could use the grouping. The kings group shieldwall score was 7×3 (21 orange) +1 aggression (pink) and a measly +1 random throw (yellow) = 25 when you add the generals bonus of +3 (yellow)
Remember those brave kings bowmen? Well they were not so brave as the rules allow some stands to engage to fire and then retire if a 4 or more on a D6 is acheived. The kings bowmen threw a 4 and with the pink dice acheived a healthy 5 to retire
The Rebels amassed 7 stands at 3 value (base score of 21) to which they added support values of +1 (yellow)from each flank unit because they faced a different unit type or had no opponent. To that you added the generals bonus of +3 (yellow) and a random +5 (yellow). total score 31. I decided that as the rebel bow were a different unit they could not get the +2 flank attack and were just allowed the +1 supporting value.The whole kings line recoiled to join the already retired bowmen in the bottom of the picture.The Kings men retained the upper hand though and attacked again next turn winning the aggression dice throw with an 8 on their D12The skirmishers attacked again the rebel right flank.By chance the rebel bowmen offered a flank to the recently retired right flank kings shieldwall and they “slid” right as you do in gridded wargames TTB style.
In TTB movement is in any direction with only a few restrictions. No penalties apply for direction change or rather they are absorbed into the move allowance. Generally units face up to their nearest opponent without restriction. The exception is when a unit is pinned on one face – then flank and rear attacks can also be made.
The rebel left flank is driven back againalmost stalemate again but now the rebels have numbers in the group combat as well (7 purple dice v 6 orange dice)yet again the kings men aggressively return to the fray (winning the D12 dice off with a 9 to get the prized +1 pink dice) having lost the last group combatThe rebel bowmen were isolated by the right flank kings spearmen and put to flight with better dice throwing and that useful +1 in pinkNext up the rebel left flank spearmen stand determined to remove the kings own flank spearmen Its that pink dice again – the kings men win this round by just 1 and drive the rebels back. The small gaming space is relevant as if the rebels get pushed off the table (or out of the ring!) they lose those stands.The rebels throw a 12 on their D12 to resume their own aggression and take the fight to the kings men.The weary shieldwall resume their struggle with the kings left flank skirmishers. Yet taking no fire damage they see off the bowmen again while the light cavalry stay too close! (failed to get 4 on a D6)7v7 is a draw in this combat so the aggressor (rebel shieldwall) gets the nod and drives back the light cavalry. The pink dice has lots of ways of rewarding the owner!Close again as the kings men win the central group combat 25 v 24 despite the rebel having that pink +1. The rebels are driven back again.The Kingsmen are feeling good and secure the pink +1 dice with 11 on a D12Out of picture the kings yellow dice of 5 is forcing the rebels back into the group combat off to the left so destroying them instead. With a 90 degree retreat arc I could have had this stand retire towards its enemy baseline. I decided this would not happen and the shieldwall just melted away having been cornered.The kings men again triumph in the pink dice competition and drive forward but it remains a stalemateon the rebel flank the skirmishers cling to the shieldwall but remain ineffectiveIn the centre the rebels hold a small advantage while on both flanks the kings advantage in numbers is clearbottom right is the A4 rule book – to hand – actually despite 42 pages in length only about 2 sides of A4 text are relevant in the heat of battle. And here the rebels again aggressively attack the kings line. In the distance the left flank rebel spearmen drift out to engage the kings spearmen on that far flank.In their movement phase the kings skirmishers again crowd around the rebel right flank scenting bloodDespite driving back the kings spearmen on their left flank, the rebel right flank has collapsed although all units forced to retire have managed to stay in the game (that is “stayed on the gaming board”).A rare aggression victory for the rebels allows them to create some space as they renew their attack. The left handside of their line though, is crumpled.on the far flank the battle remains one of two evenly matched shieldwallsThe kings men begin to turn the rebel linethe javelins of mounted skirmishers still have no impact on the resilient rebel spearmen and neither do the bowmen.On the opposite flank the rebel spearmen get the better of the fight driving back the kings spearmenalthough their flank has been turned the rebel spearmen give the light cavalry short shrift when they fail to evade after another ranging attck with their javelins. The light cavalry fly from the field. Elsewhere the rebels lose the central group combat again and are driven perilously back towards their baseline.Even so with renewed vigour the rebels defend their line defeating the careless bowmen who retireagain the kings men win the centre combat driving the rebels back further. BUT……………..And then the rule of 12 lands! The game ends after 12 turns representing the part of the day the battle was fought. The rebels were still in the field but with more stands lost victory went to the Kings men.
Thegn Pyrlig led his men from the field. Already his camp alerted to the returning stream of wounded and fleeing men had begun to get ready to move.
Fortunately Earl Mathedoi and his soldiers simply remained on the field too exhausted to pursue the defeated rebels. Earl Mathedoi cursed has lack of a reserve and especially a mounted reserve. Come to think of it where had his light cavalry gone?
On impulse I have gathered a set of figures to build a pictish type army for the british isles dark ages.
So which figures have I chosen?
I looked at the plastic solder review site and did not like any of the pictish figures on offer. So I looked around for something that might work. My main choice has been Orions slavic foot soldiers who would be more used to fighting at Adrianople or in the Balkans against the embryonic East Roman Empire.
The army will use the army choice given in AMW for the Picts – I have added two commands as wellThis set was bought for my much stalled stoke field project in 28mm! yes they were too small anyway. I have used some of the javelin and bowmen plus some of the mailed figures for the command basesThese Sarmations were a snap choice when passing through Frome in Somerset. I knew they would come in useful except not for dark age Britain! They provide some mounted troopsHaving now bought these figures they are wonderful sculpts. It is unfortunate that the Plastic Soldier Review plays down these figures on account of poor casting and flash. These figures have fantastic detail. They make up my main units for a pictish army
The army will comprise all the options for AMW so thats 12 units but based singley on impetus style 80mm wide bases with no base removal possible.
Neil Thomas and his Ancient and Medieval Warfare (AMW) book has grown on me over the years. At the start I did not think I would like an 8 unit army requiring 32 DBA bases to allow casualty removal. I tried it with single bases and dice and it worked. The breakthrough came with his One Hour Wargames (OHW) using the same technique and reducing the armies to just 6 units but crucially playing many scenarios.
I have played much more of both OHW and AMW than say DBA or my preferred ruleset of Impetus.
I arrived in Neil Thomas’ world by chance. Mike Tittensor wrote an article in Slingshot magazine published by the Society of Ancients (SOA) about bronze age warfare and using Peter Pig’s Bloody Barons ruleset. I bought the rules and these got me into plastics because I wanted a low cost solution. This was my first departure from what had been a preference for 15mm metals DBA gaming on a 600mm square board – an excellent coffee table sized game by the way. By chance I had now the opportunity to return to a dining table or 1800mm x 1200mm type gaming table. I was toying with 28mm but disliked the size of figures from a painting point of view. I had struggled with my Wars of the Roses Perrys figures to get a look I liked.
So it was the peak of the plastics era in the 2000’s and I just bought lots of chariots none of which in the end made it to the painting table – irony in there somewhere.
What I did get was a drift away from DBA gaming, first into Bloody Barons, then Impetus and then Neil Thomas.
Neil Thomas and 1/72 plastics are a perfect way to experiment in wargaming.
Not sure when this army will complete – sunshine and a last push for summer beckons.