The Second battle using my “Buildings Blast” set up saw a mid 19th century action with Austrians and Piedmontese in play. It was a solo play this time.
I used the rules published by John Curry and the “history of wargaming project” with some adaption for solo play.
Using Neil Thomas grading of troops I adjusted the firing and melee rules.
I also used the Roster system unaltered. Infantry got 4 circles and a cross while Artillery got just 2 circles in this game. Essentially in the basic game a hit meant a unit (= 1 base) was destroyed. Roster rules gave units/bases lives in the form of circles and crosses on the roster which you ticked off as they were lost.
The Scenario was that the Austrians were retreating and the force here was ordered to hold the bridge in the town. The crossing was one of only a few that allowed artillery and logistics easy crossing of the river. The Piedmontese advancing from the north west had orders to seize the bridge as quickly as possible.
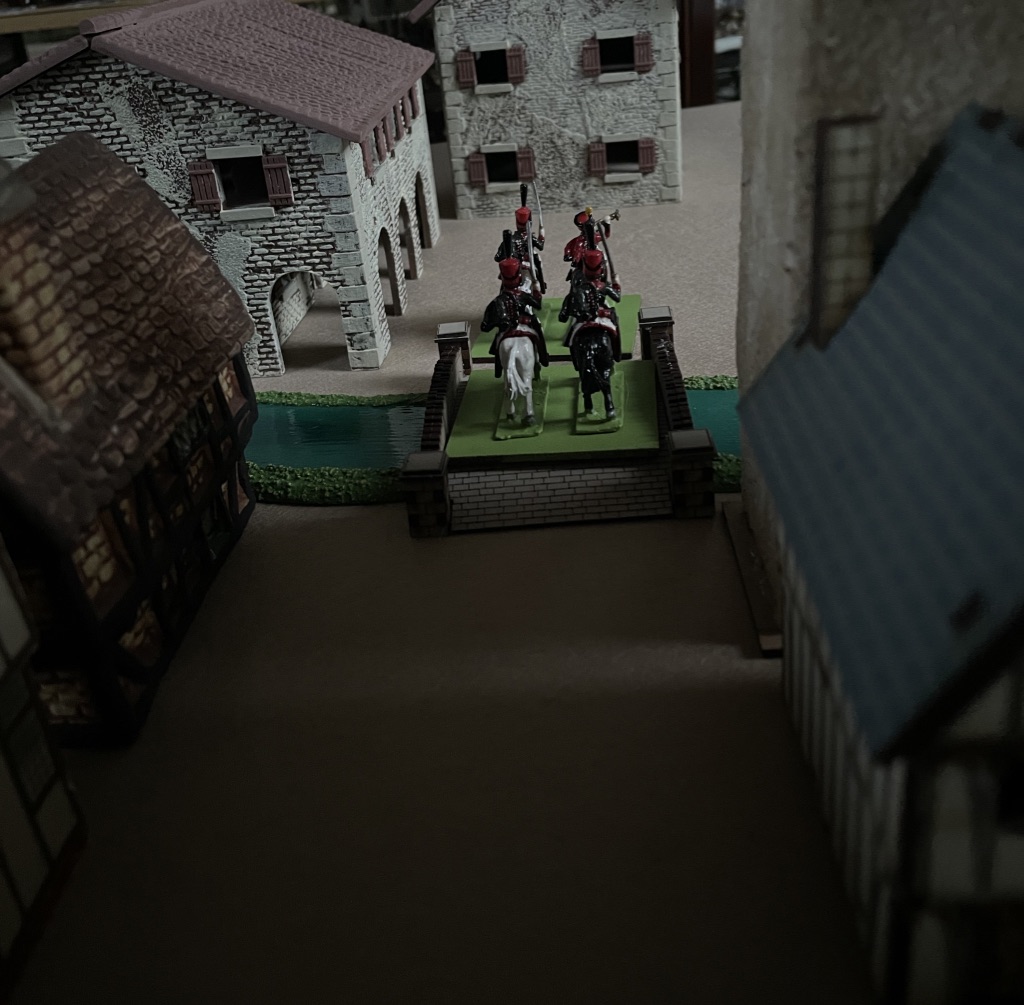
Forces were randomly assigned using playing card allocations along with a portion of blank entriesUnits deployed in contact and units were recognised as such at about 6 inches – the card only turned on a 2-6 D6. Here the right hand Piedmontese were certain nothing was in front of them – a heart was a dummy card while the left hand unit was not so sure so hesitated (on a d1) with no card turn. The right hand units poured forward towards the “old millhouse” spotting some real Austrian defendersThe lefthand Piedmontese units were suddenly exposed to Austrian infantry fire from a slightly sunken roadon the east side of the main road two piedmontese artillery batteries dropped into action again to be surprised by enemy troops in a slightly sunken and walled road. These were riflemen and on good form – one battery was quickly silencedHowever infantry units (white coated British Legion 1860) quickly drove them awayfierce fire was exchanged between the Bersaglieri and Austrians in the sunken road while Garibaldeans stormed the defended houses at the entrance to the townOn the east side 1859 Piedmontese infantry stormed the defended housesElsewhere Piedmontese forces had pushed on meeting little resistance (= dummy cards) to their front. A lone Austrian Artillery battery on the west side of town faces artillery and some more Bersaglieri Stubborn resistance at the Old Millhouse Finally the sunken road defenders are driven offAnd the west side Austrian defenders give up rather too quicklyexchange of fire results in another Austrian lossEven as west side Austrian defenders gather but………The Piedmontese quickly move towards their target – the river crossing. Another Artillery Battery blocks their wayOn the west side the Austrian defenders put up a good defence and with support nearby………The defended houses at the north end of town finally are overrunThe mill house and its defenders are abandoned by the Austrians who can retreatAustrian artillerists put up a stern defenceCrunch time at the town square as the Austrians are hemmed inThe Bersaglieri try to rush the ArtilleryThe Town centre defence collapses The Bersaglieri inexplicably turned tail on the west side while Lancers arrive to their rear. The British Legion finish off the town centre defenders on the left pictureThe Artillery of Piedmont watch as the last Austrian defenders in the town square are defeatedThe defended westside town square buildings are assaultedin a last desparate throw Austrian Hussars ride up the main street to halt the Piedmontese tide.The Hussars beat off the Lancers but to their rear the Artillerists are finally beaten while the East side is alive with Piedmontese. Everywhere Austrian defenders have melted away into the fields or across the bridge.The Hussars beat a retreat across the bridge bringing to an end the defence of the bridgePiedmontese Lancers cautiously follow.
The defended buildings were randomly determined and contained one unit each – no other benefits were given the building defenders. So they simply were a delaying factor assisting the mobile defenders fighting outside.
The scenario I played used a 25 step countdown and 1xd6 reduction per turn. The Austrians had to retire at countdown 16 from the edge of town, 7 – the town square and at 0 abandon the north river bank. Victory to Piedmont required they took the bridge before the countdown reached 0.
The game turns 1 to 3 were spent on the edge of town, then turns 4, 5 and 6 fighting over the town square. Turn 7 forced the Austrians back to the north bank but here ended the action as the Austrians actually ran out of defenders.
So the victorious Piedmontese captured the bridge intact and within the timescale set. There were no Austrian Engineers with a lit fuse to spoil their day! Anyway the Austrians would be back soon enough they thought…. Do I hear a Radetzky March in the distance?
For a very old ruleset Joe Morschauser’s rules played easy as I guess you would expect. With the tweaks to aid solo play they actually played very well.
I had bought the rule book for the Grid rules both the originals and Bob Cordery’s modernised version – Bob co edited the book with John Curry.
So this was a pleasant surprise to find a very playable set of “measurement based” rules into the bargain.
I have slowly started to look at some grid gaming set ups. My starting point has been that they would aid campaigns and to that end allow quicker solo games. I opted for two 3’x2′ boards which could then give me a 4’x3′ table which also figures in Neil Thomas rulesets.
ideas still in play – how to represent rivers and buildings? hills are simply another gridded block shape to suit.
As a bit of a test I used a Neil Thomas scenario from the C19th European Wars book (NT19e) – the Cristinos v Carlists, in my case Piedmont squared up to Austria.
I use 40mm square bases for my 19th century games and I have chosen a 50mm grid – i.e. no perfect fit of base to grid square. And for this test I used essentially formations from Neil Thomas NT19e. The exception being that my square 40×40 basing really distorts the column or line option choice.
Garibaldeans march in my attack column option – I reserve a single base wide column of 4 bases for marching only. Firing lines are 4 bases side by side and don’t advance or retreat, but can wheel.I have Artillery men both on one large base and also individually as shown hereAbstraction – these Neapolitan Riflemen in a built up area may still simply be on a block of a different colour or with buildings/features!I quite like Neil Thomas unit conditions – Fire and Fury and other rulesets in mid 19th century warfare also seem to opt for this type gradationI did not find the grid a problem and it did the job of of having a tape measure on the board at all times everywhere. Also manoeuvring is hard work once you move to multi based units. NT19e allows turning (spinning)on the unit centre (abstraction again) so fits nicely with a grid approach.The undersizing of base to grid feels right for me.Neil Thomas rules do not feature command bases but other rules I like do – so I plan to use single grid base for lowest discrete command with next up having two grids covered and the top man having three of even four bases covered. The bigger the command base the further back from the action is better for them – having no attack or defence values if contacted.Bare bones – right now it feels like I am heading in the right direction.
When the Kingdom of Piedmont and Sardinia went to war in the 1st Italian Independence War in 1848 they had been rapidly mobilising their forces.
A shortage of materials and equipment meant that new units were equipped with a simpler uniform. Tunics were single breasted instead of double breasted. The shako was a different design as well.
These figures represent soldiers in these rapidly mobilised units.
They are are made from two sets of figures.
the body – Hat US ACW infantry
the head and back packs – Hat Dutch Napoleonic infantry
US Infantry in Attack 2 by Hat are the base figure with a cut down dress makers pin driven in to take the new head.Hat Waterloo Netherlands Militia make the sacrifice to provide heads and back packsI ended up with some wacky head positions as accurately driving the head on the pin spike was a lottery. Everything was super glued which seems to work best.The Guard Infantry shown here betray the shoulder pads and white waist/shoulder belts missing on the US figures. But even so I think my chaps pass for that rapid muster of new units who would be defeated by Marshal Radetzky’s Austrians in a matter of months and then again a year later in 1849 at Novarra which effectively finished the 1st War.
Following on from three simple battles using Fire & Fury, Piquet Field of Battle is the next ruleset for consideration. Published in 2011 – 20 years after Fire and Fury and card driven the ruleset should give a different feel.
The battle comprised the same forces that were used in the Fire and Fury ruletest A3 covered in a previous post.
The objective was to secure the ridge and drive off the opposing force.
The Forces this time were……….
The Austrian Right Flank
Austria
Left Flank – Brigade Von Baden (Orange Facings)
Centre Left – No1 Field Artillery Battery
Centre Right – Erzherzog Albrecht Brigade (Red Facings)
Right Flank – 5th Graf Radetzky & 8th Ferdinand, Herzog von Sachsen-Coburg-Gotha Cavalry Brigade
Piedmont Left Flank
Piedmont
Left Flank – National Guard Milan Brigade
Centre Left – “A” Battery Field Artillery
Centre Right – Bersaglieri di Vignola Brigade
Right Flank – 3rd & 6th Piedmont (Lancers) Cavalry Brigade
The Battlefield itself is slightly altered from that used in the Fire & Fury battles.
The road bisects the battle field on the diagonal but notionally there is a ridge which it crosses and where an enclosed Orchard is located.
a 4’x4′ table set up works just fine for these tests. Alas these excellent light weight but sturdy german made Lidl sourced picnic tables have been OOP for 4 years. Crikey they even have 4 height settings in the legs…………….my Kloster Arens encounters made good use of this variable height capability The Orchard on Symmetry Hill (some of the model trees were planted in the 1970’s!). The Austrian Artillery have Unit Integrity of 2 (most infantry have 3) with a Defensive Dice 1xd6 (like all other units) plus Combat Dice 1xd10 again like most of the units in this battle
The Orchard is inpenetrable to all arms for all the remaining rules to be tested. So in effect it is a flank and divides the action into two areas.
The fence supplier is unknown but the orchard dates from the early 1970’s – by german model railway company Noch, not bad for 50 years of play.
In Field of Battle (FoB) terrain is classed for its impact on the game.
This means the orchard is a Class II line of sight blockage and a Class IV movement restriction.
Unit integrity is the key variable for each unit in the game. It reflects status/morale/strength as a variable.
Combat Capability is defined as a Dn (where n=an even value in the range 4-20) so thats D4,D6,D8,D10,D12,D20.
Opposed rolls is the way results are determined.
Command radius determines the limit of a leaders influence on the battlefield and is a variable (Dn x 10 = command radius in inches)
Initiative is determined by opposed rolls of the two Leaders respective dice. The difference equals the total initiative each side can use in this part of a turn. Turns get complicated but the game does not!
The winner of the opposed roll decides order of play.
you can still buy 2nd edition card decks, I have yet to consider moving to 3rd edition.
The game is card driven and a deck for each side needs to be determined. In this case both sides used the exact same variables so ended up with identical card decks. In most games the playing decks would be asymmetrical.
Piquet is essentially an asymmetrical game. Therefore winning has to be defined to ensure the asymmetry does not simply distort the game one way each time.
The forces all elected to “march” with the Austrian left using the road benefit
On Turn 1 Step 1 the Austrians scored 9 on d10 against Piedmont just 4. This gave the Austrians 5 initiative points as the ACTIVE player.
In the event the Austrians drew 5 cards none of which were for movement. Essentially the army just stood transfixed.
Piedmont (REACTIVE player) now promptly drew some excellent cards for move and melee.
Piedmont have already secured the ridgePiedmont right wing crash into the Austrians strung out on the road, a now regretted ploy.
The opposed roll dice off in Piquet is usually with different dice as factors peculiar to that melee move the players dice up or down the scale of d4/d6/d8/d10/d12/d20.
The Lancers went from d12 to d12+3 scoring 3 on the dice and adding 3 = 6
The Von Baden Brigade went from d10 down to d6 mitigating some negative factors through a discard of a tactical advantage card drawn in the ill fated Austrian Initiative as the ACTIVE player. Von Baden scored 3 on the dice.
The difference = 3 hits on the Austrians. This equated to 1 unit of integrity which is the value of 1 UI for all arms.
The Piedmont Lancers won the melee going out of command while the Von Baden Brigade lost unit integrity and the army morale lost 1 point. The Bersaglieri were not so fortunate……
Each Army started with an Army Morale Rating of 4 – determined by the make up of the Army x a variable 1xd12. The range being 3 to 50.
The No1 Austrian Field Battery made short work of the impulsive Bersaglieri.
The Bersaglieri threw their defensive dice in the opportunity fire step. A 1 on the die!
The Austrians had their eye in, with a D10 moving to D12+1 and with a die roll of 4 scored 5. So 4 hits on the Bersagleri meant 1 unit of integrity lost plus a spare hit.
The Bersagleri retired 4″.
Piedmont also now saw their Army Morale drop from 4 to 3.
Piedmont still had initiative and the next cards drawn were Artillery Firepower and Infantry Firepower. Firing is permitted at any time a unit is ready to fire, these cards tell you a unit has reloaded. Hence the puffs denote units who have fired and cannot fire again until they get a firepower card from the deck.
It means you don’t know if that unit will be able to fire when charged…………the sort of randomness that many “face to face” gamers quite simply will find too constraining.
For the Solo Wargamer such an approach offsets the lack of the live opponent uncertainty and simply adds to the narrative.
“A” battery Piedmont Field Artillery open fire on the Erzherzog Albrecht Brigade.
“A” battery went up 2 from d10 to d12+1 threw 6 = 7
In response to this fire the Erzherzog Albrecht Brigade threw 4 on their d6. with 3 hits they lost 1 unit of integrity and another army morale point and went out of command.
The first round of initiative ended. And we are still in game turn 1!
The Austrians won the dice off again and gained 5 initiative.
The Austrians drew another 5 cards which included a lot of LULL’s – basically nothing happens.
They did managed some movement cards to get their troops into line.
On the Austrian Left Flank things were heating up
The Piedmont initiative started badly with an Army Morale card which meant testing for the army morale. failing the d12 throw meant all units went out of command (OOC).
“A” battery opened up again OOC but had no effect.
No other cards were of use and some more LULL put paid to the Piedmont initiative.
The next initiative die roll saw Piedmont win 8 to 2 giving 6 initiative points to them.
Artillery fire caused more damage to Brigade Erzherzog Albrecht
another round had no effect though
no other cards could be played
The Austrians had a mixed hand and did manage to inflict some more unit integrity loss as well as army morale reduction.
The next dice off saw the Piedmont grab the initiative again with 5 points advantage.
firepower was at first ineffective from the Bersaglieri and Milan Brigades
Bersaglieri then managed to attack the Austrian artillery again causing 1UI damage along with 1 army morale reduction
The Milan brigade then blasted the Piedmont Cavalry Brigade inflicting 1UI loss and a further army morale point deduction.
LULL and ARMY MORALE and MANOEUVRE cards followed
The Austrian response was
their artillery again damaged the Bersaglieri who lost 1UI and army 1 morale point
but then ARMY MORALE came up for the Austrians who had to die role their leadership dice of d10 against a d12 because their Army Morale rating was already reduced to zero.
the throw was lost
As a result of losing this throw the Austrians quit the field.
A victory for Piedmont and King Victor Emmanuel.
The faster attrition through loss of army morale eventually worked against the Austrians
In effect this was all one game turn if you say the exhaustion of the deck is a game turn. Both sides had unturned cards.
The Milan Brigade eventually got into action and probably delivered the losses that tipped the balance in favour of Piedmont.
The game did feel different to Fire & Fury however it did play at the same sort of pace. I had played Field of Battle Piquet before which certainly helps as the processes are unusual.
I have some more reports coming, before concluding this rules test series.
This is the third of a series of battles testing the simple aspects of Fire & Fury (1st edition).
As before Marshall Radetzky and his Austrian forces are engaged with the Piedmontese of King Charles Emmanuel.
The commanders are equal rating under the rules and each move initiative is diced for on opposed d10 dice throws.
All the units have the same Brigade effectiveness rating of 4/3/2 Fresh/worn/spent. As the battle rages units decline in effectiveness going from 4 though 3 to 2 rating. This value modifies the opposed d10 dice rolls which are characteristic of the game rules.
The start of the action – the infantry are in attack columns meaning better melee potential sacrificing the firing line. Piedmont in the foreground await the marching Austrian Imperialists.
The Forces are
Austria
Left Flank – Brigade Ritter Von Benedek (Green Facings)
Centre Left – No1 Battery Field Artillery
Centre Right – Brigade Von Baden (Orange Facings)
Right Flank – 5th Graf Radeztky & 8th Ferdinand, Herzog von Sachsen-Coburg-Gotha Cavalry Brigade
Piedmont
Left Flank – Pinerolo Infantry Brigade
Centre Left – “A” Battery Field Artillery
Centre Right – Bologna Volunteers Infantry Brigade
Right Flank – Piedmont Lancers 3rd & 6th Regiments
The initiative went with the Austrians who as one “well handled” moved forward in one line.
In response some “desultory fire” came from the Piedmontese.
in turn the Piedmontese line move forward “well handled”.
The Piedmontese advance in lineThe Austrian line becomes slightly raggedModified opposed rolls of d10 are at the heart of Fire & Fury. This is a contrast to more recent tastes for d6 roll to hit and saving throws. Actually there is something about the instant dice off. Especially as it did not feel like my memory of opposed dice rolling under WRG 6th edition where the factors made most throws pointless – accurate maybe but not enjoyable.The Austrian No1 Battery drops into action and disorders the Bologna Volunteers. To their right The Hussars drive back the Pinerolo Brigade in disorder, while the Austrian Brigade Ritter Von Benedek silence the “A” battery piedmont field artillery. Brigade Von Baden issue a “telling fire” disordering the Lancers.
The Austrian Hussars had achieved a breakthough and promptly fell upon the Piedmont “A” battery field artillery.
The attack “faltered” miraculously for Piedmont, as it looked like their whole line was about to collapse under the first assault. (hussars rolled modified = 4 against artillery unmodified max die throw of 10).
everywhere the Piedmontese managed to rally. But “lively” and “telling” fire from the Austrians continued to cause problems.The Piedmontese “A” field battery hold their own.Finally Brigade Ritter Von Benedek chase off the Piedmontese Artillery while Brigade Von Baden move on the Bologna Volunteers and “drive” them back with loss. The resulting breakthrough took the infantry into the Lancers who were “swept” from the fieldEffectively the Austrians have the advantage and as evening falls the Piedmontese retire
It was all over so quickly – one swift attack by the Austrians and the Piedmontese turned tail! The Empire is restored, the rebels suppressed and folk can return to drinking coffee and smoking in the cafes of Lombardy…….
Victory Points are usually won by destroying enemy units. The emphasis is not on objectives. Not surprising as a 1990’s era ruleset rarely made objectives the focus. Not so today where often it is the dominant aspect of working out the winner.
Here Austria accrued 7 victory points versus 2 for the Piedmontese.
Just to be clear – no arrangement was made in these battles – the die rolls were as you see them. I suspect it was such as the hapless artillerymen holding off rabid hussars that caused so much ire when these rules were first published.
The rules contain outcomes with descriptions that feed a narrative easily. Telling fire or desultory? you know which one is having an impact.
The Fire and Fury rules (FaF1ed) use scales to help the gamer play Gettysburg on the table top! So the Brigade is the key unit size. Battalions and Regiments don’t figure. This actually also narratively worked for me, which I had not expected.
All in all three very enjoyable games.
Before I conclude my thoughts on FaF1ed, I will run some more rulesets out for a canter.
King Victor Emmanuel gathered some more troops and returned to the battlefield, this time his infantry were supported by some cavalry.
Austria (furthest away) versus Piedmont(nearest) in Game A2
The forces were
Piedmont
left flank – Pinerolo Brigade
centre – Bologna Volunteers
right flank – 3rd & 6th Line Cavalry (Lancers) Brigade
Austrians
left flank – Brigade IR59 Von Baden (orange facings)
centre – Brigade IR28 Graf Latour (green facings)
right flank – 5th & 8th Hussars Brigade (5th Carl Albert, Konig von Sardinien with 8th Ferdinand, Herzog von Sachsen-Coburg-Gotha)
I used Fire & Fury Rules 1st Edition with no amendments. Again each unit had identical Brigade effectiveness 4/3/2 fresh/worn/spent ratings.
Initiative was diced for with unmodified d10 opposing rolls.
Again Charles Emmanuel and Marshall Radetzky faced each other. As it happens the 5th Hussars were already being renamed Marshall Radetzky given Piedmont had turned its back on the Empire.
The Marshall won the initiative no doubt buoyed by success in the previous engagement.
However both infantry units were “tardy” in moving to contact while the Hussars galloped ahead.
The Piedmont Lancers advanced with the Bologna VolunteersThe Austrian Hussars galloped headlong towards a somewhat hesitant PInerolo Infantry BrigadeHowever it was the Piedmont Lancers who made first contact being “well handled” charging into the Brigade Von BadenThe Lancers had the worst of it with their “attack checked” and being forced to retreat (in this case the variable dice came up with just 2″ – inches). Being disordered and very close to the enemy brigade things looked bad for the Lancers.The Bologna Volunteers took the worst of a long range fire fight becoming disordered – but they rallied with “elan” while The Piedmont Lancers managed to rally but simply to “hold position”While the lancers were holding, the austrian Hussars had also been a bit too keen and the Pinerolo Brigade has forced them back in disorder. The Hussars also rallied with “elan” and charged the piedmontese infantry. In the centre the Brigade Graf Latour charged the Bologna Volunteers.
In the opposed rolls using modified d10’s the results were
Graf Latour scored 6 against the Bologna Volunteers scoring 12, the minus 6 forced the Austrians to retreat 8″
The Austrian Hussars scored 9 while the Pinerolo Brigade could manage just 4, the Piedmontese Infantry were driven back
Here the Piedmontese left wing is collapsing while the Austrians are forced back in the centre and on their left.Move 4 Piedmont win the initiative but trying to rally, the Pinerolo Brigade “break”, the Bologna Volunteers “hold” while the Lancers manage a “tardy” charge, The Austrian Von Baden brigade disorder the Lancers but fail to stop the charge.
In the melee there is nothing between the Lancers and Von Baden so a “desparate struggle” begins.
As the melee continues (desparate struggles play out extra rounds before the next move) the Lancers get the upper hand (“7 plus” result being difference in the opposed rolls) and the Von Baden brigade is swept from the field.While the Von Baden Brigade quit the field in the centre a charge by the Graf Latour Brigade only just fails and the two centre brigades are left facing each other. Which trumphant cavalry will swing matters in the centre?The Austrian Hussars ignore the infantry melee and make for their natural enemy – the Piedmont LancersIn the centre although driven back the Graf Latour Brigade fail to break the Bologna VolunteersWhile the Pinerolo and Lancer Brigades rally with “elan” the Bologna Volunteers are only just holding on “wavering”. Desultory Fire all round means melee’s resume.
The Lancers charged home against the Austrian Hussars. The Hussars “checked” the Lancers charge forcing them back.
Move 6 and the Austrians have the initiative with the Graf Latour Brigade “well handled” and charging the Bologna Volunteers while the Hussars charged home again in a “tardy” way against the Lancers of Piedmont.
The Bologna Volunteers held and the “attack faltered” for the Austrian infantry who lost many men.
The Hussars drove back the Lancers inflicting heavy casualties, and they achieved a “breakthrough”. Yet it was hollow and the Lancers were able to retreat intact.
With the Pinerolo Brigade somewhat recovered and the Bologna Volunteers still in control of the centre the Austrian Brigade Latour retreated – covered by the Hussars
As evening draws in the Austrians quit the field. No victory celebrations for the Marshal tonight.
This rules test used the 1990 1st Edition ruleset called Fire & Fury. No rule amendments were applied except to deal with the minimal number of units on the board.
My starting point was actually Donald Featherstones Battles with Model Soldiers and his three battle scenarios to show rules in action.
ruletest A – just infantry
ruletest B – infantry plus cavalry
ruletest C – infantry plus cavalry plus artillery
So first up is the all infantry affair. Having never used these rules before it was an easy way into them.
The table set up is shown below in the first photo with two brigades per side each of 4 bases.
Piedmont Forces led by none other than King Victor Emmanuel comprised
The righthand Brigade comprised the Bologna Volunteers in red banded kepis
The lefthand Brigade comprised the Brigade Pinerolo
The Austrians were amazingly led by Marshal Radetzky (brought out of retirement yet again)
The righthand Brigade comprised IR28 Green facings: Graf Latour
The lefthand Brigade comprised IR59 Orange facings: Leopold, Grossherzog von Baden
Uniforms are anything but, as my figure painting interests have ranged from 1848 to 1870! So 1848 uniforms will jostle with those of 1859 or even 1866/70. It was a period of much change in weapons and warfare which in turn influenced what soldiers wore.
The Brigade Effectiveness table is your starting point.
I gave all units a 4/3/2 rating = Fresh/Worn/Spent. This factor which declines during the battle modifies the basic die rolls for manoeuvring and combat. You can see this is a key way to show uneven forces from actual battles.
King Victor Emmanuel marched confidently towards the Austrian Line. Marshall Radetzky was confident these Piedmontese would be driven from the field.The Generals are not attached. Attaching Leaders to brigades confers benefits to events.Both forces changed formation (requiring a D10 + modifiers against a manoeuvre table of results). They adopted field column formation.Each turn starts with an initiative test – the winning General has the advantage of moving first as the ruleset is a IgoUgo turn based game. The rules are actually set up for refighting Gettysburg so each scenario defines the order of play. My solution was to assume both Leaders to have equal effectiveness through opposed rolling an unmodified D10 each.Both forces were very close now and the next initiative would give significant advantage. So far the Piedmontese rolled high…….The Piedmontese rolled high again opted to move and fire as well as changing from field column into line. The Austrians got their fire in first (opportunity fire) but this was “desultory”. I like the terms used to describe outcomes. The Austrian brigade leaders were not used to measure firing effects.Desultory fire all round and generally a lack of manoeuvre……….until the Austrian Brigade Von Baden disordered their Bologna Volunteer opponentson Move 3 the Austrians now managed to get into line and charged the Piedmontese. The Pinerolo Brigade managed to disorder the charging Austrian Brigade Graf Latour whose own fire was desultory before their charge was a success.The Pinerolo Brigade were driven back with significant losses (this is always a randomised value so can lead to interesting follow ups)Meanwhile the Austrian Brigade Von Baden were outstanding with their “elan”, charging home. The Bologna Volunteers were swept from the field, one base skedaddled (ran away), one stand was captured and the rest retreated a full move in disorder
This last event was I guess, what a lot of complaint was about when the rules first landed. Evenly matched forces could play out a massive swing on the “opposed rolls”. The Austrians rolled 7 up and 4 up to get the Bolognese “swept from the field” and “driven back”.
In the Wars of Italian Unification forces often melted away before renewing an attack with more vigour.
So maybe these rules might bear further examination
Narrative
On this occasion King Victor Emmanuel decided to lick his wounds and retired from the field damaged but not yet defeated. He would return to the fray……….
In the Spring of 1848 a provisional government sprang up in Milan after the Austrians under Field Marshall Radetzky withdrew their troops eastwards to the “Quadrilateral”.
The Provisional Government sought protection from Piedmont under King Charles Albert.
At the same time they raised their own forces.
Here are the Milan Line Infantry of the National Guard in field attire.
* Prior to the Austrians retiring, protests included the Milanese refusing to smoke as the Austrian Government had a monopoly on tobacco sales!
Within a year the uprisings were squashed and Field Marshall Radetzky was a hero of the Empire – complete with Johann Strauss Senior composing the Radetzky March to celebrate the Austrian victory at Custoza in July 1848.
173 years ago this month events were gathering pace across Italy after the Vienna 1848 uprising. Earlier in the year protests in Lombardy and the Veneto about tobacco taxes with boycotts had set in train popular unrest.
And then the news of an uprising in Vienna itself fuelled the powder keg of rebellion that had built up since the Vienna Treaty of 1815 had ended the Napoleonic era.
In Milan the people revolted and after 5 days Marshall Radetsky withdrew his forces to the east.
Venice declared itself a republic again with the Austrians capitulating while their Italian soldiers simply deserted – many even declining to join the rebels.
And then Piedmont declared war on the Empire and mobilised its army to march on Milan and Lombardy.
Across the Papal States and Southern Italy into Sicily uprisings installed populist governments. Many only lasted just a few weeks or months.
This week 173 years ago the Austrians were bottled up in the “quadrilateral” (bounded by Verona, Legnano, Mantua and Peschiera). They were about to inflict serial defeats on Piedmont and its Italian allies.
An Armistice followed.
Then a year later the Piedmontese and Austrians did battle again at Novara, resulting in a decisive victory for the Austrians and giving them 10 more years of power in the peninsula.
So in 1849 while the Piedmontese were being defeated to the north, Guiseppe Garibaldi was leading the doomed but heroic defence of Rome under its short lived Republic. By summer 1849 Garibaldi was retreating north into the Romagna, with the remnants of his forces, having fought the French and Neapolitans to a standstill despite being massively outnumbered.
Garibaldi was pursued across the spine of Italy tying up 100,000 troops of 4 nations (the spanish joined austria, france and naples to destroy this most wanted rebel).
Fortunately Garibaldi escaped with amazing help from Italians all across the lands he travelled.
He lived to fight another day – it would be 10 years before his chance would come again.
These are my Piedmontese Line Infantry. They compliment the Bersaglieri which I posted earlier this year.
They also compliment the first unit in this Wars of the Italian Unification (WotIU) project which I completed. However in one respect they don’t – height. Some of these figures are 26mm tall so verge on the 28mm club!
That first unit was Hat ACW union troops so “kepi” men. I reckon that by 1860 Piedmontese troops would still be seen in frock style coats while sporting kepi’s.
The current offering here is soldiers wearing the small shako with a greatcoat. They also have short gaiters with baggy trousers. The french style is clear.
The figures are by Lucky Toys.
I just made up two sprues from the lucky toys sets – you get four in each set. And I took King Victor Emmanuel II from the Garibaldi redshirt set.
The Plastic Soldier Review gave them a muted response being very unhappy with the moulds – lack of undercut or some things like the shakoes struggling to even look remotely correct.
I have previously posted the Bersaglieri.
Verdict – these figures don’t look much on the sprue and the Plastic Soldier Review is unfavourable. Yet they painted up ok and the animation is some of the best in the world of 1/72 plastics. My one objection is that they are big and tall so fail to fit in with my strelets/hat figures.
Still I might just build some skirmisher units with them.