Categories
Mid 19th Century Wargaming wargame rules wargaming

Buildings Blast 2: Joe Morschauser – no grids

The Second battle using my “Buildings Blast” set up saw a mid 19th century action with Austrians and Piedmontese in play. It was a solo play this time.

I used the rules published by John Curry and the “history of wargaming project” with some adaption for solo play.

Using Neil Thomas grading of troops I adjusted the firing and melee rules.

I also used the Roster system unaltered. Infantry got 4 circles and a cross while Artillery got just 2 circles in this game. Essentially in the basic game a hit meant a unit (= 1 base) was destroyed. Roster rules gave units/bases lives in the form of circles and crosses on the roster which you ticked off as they were lost.

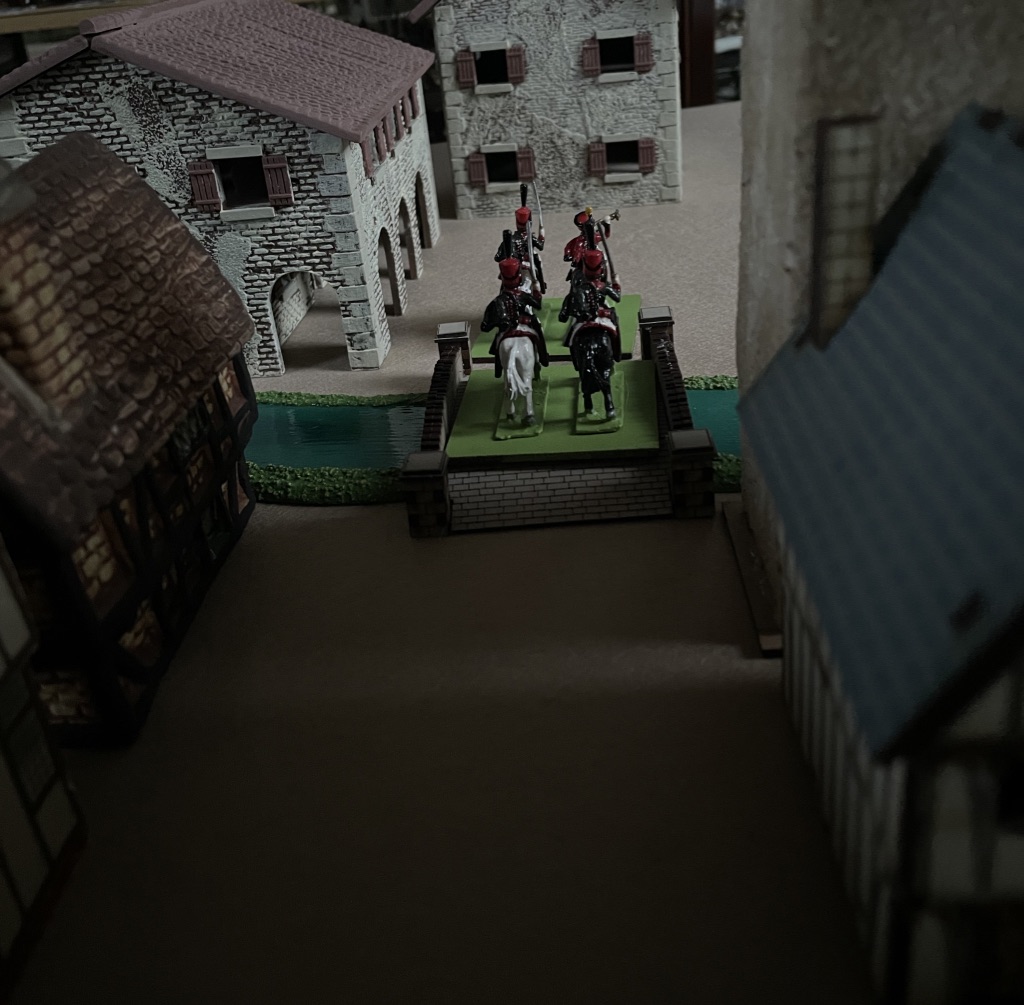
The Scenario was that the Austrians were retreating and the force here was ordered to hold the bridge in the town. The crossing was one of only a few that allowed artillery and logistics easy crossing of the river. The Piedmontese advancing from the north west had orders to seize the bridge as quickly as possible.

Forces were randomly assigned using playing card allocations along with a portion of blank entries
Units deployed in contact and units were recognised as such at about 6 inches – the card only turned on a 2-6 D6. Here the right hand Piedmontese were certain nothing was in front of them – a heart was a dummy card while the left hand unit was not so sure so hesitated (on a d1) with no card turn.
The right hand units poured forward towards the “old millhouse” spotting some real Austrian defenders
The lefthand Piedmontese units were suddenly exposed to Austrian infantry fire from a slightly sunken road
on the east side of the main road two piedmontese artillery batteries dropped into action again to be surprised by enemy troops in a slightly sunken and walled road. These were riflemen and on good form – one battery was quickly silenced
However infantry units (white coated British Legion 1860) quickly drove them away
fierce fire was exchanged between the Bersaglieri and Austrians in the sunken road while Garibaldeans stormed the defended houses at the entrance to the town
On the east side 1859 Piedmontese infantry stormed the defended houses
Elsewhere Piedmontese forces had pushed on meeting little resistance (= dummy cards) to their front. A lone Austrian Artillery battery on the west side of town faces artillery and some more Bersaglieri
Stubborn resistance at the Old Millhouse
Finally the sunken road defenders are driven off
And the west side Austrian defenders give up rather too quickly
exchange of fire results in another Austrian loss
Even as west side Austrian defenders gather but………
The Piedmontese quickly move towards their target – the river crossing. Another Artillery Battery blocks their way
On the west side the Austrian defenders put up a good defence and with support nearby………
The defended houses at the north end of town finally are overrun
The mill house and its defenders are abandoned by the Austrians who can retreat
Austrian artillerists put up a stern defence
Crunch time at the town square as the Austrians are hemmed in
The Bersaglieri try to rush the Artillery
The Town centre defence collapses
The Bersaglieri inexplicably turned tail on the west side while Lancers arrive to their rear. The British Legion finish off the town centre defenders on the left picture
The Artillery of Piedmont watch as the last Austrian defenders in the town square are defeated
The defended westside town square buildings are assaulted
in a last desparate throw Austrian Hussars ride up the main street to halt the Piedmontese tide.
The Hussars beat off the Lancers but to their rear the Artillerists are finally beaten while the East side is alive with Piedmontese. Everywhere Austrian defenders have melted away into the fields or across the bridge.
The Hussars beat a retreat across the bridge bringing to an end the defence of the bridge
Piedmontese Lancers cautiously follow.

The defended buildings were randomly determined and contained one unit each – no other benefits were given the building defenders. So they simply were a delaying factor assisting the mobile defenders fighting outside.

The scenario I played used a 25 step countdown and 1xd6 reduction per turn. The Austrians had to retire at countdown 16 from the edge of town, 7 – the town square and at 0 abandon the north river bank. Victory to Piedmont required they took the bridge before the countdown reached 0.

The game turns 1 to 3 were spent on the edge of town, then turns 4, 5 and 6 fighting over the town square. Turn 7 forced the Austrians back to the north bank but here ended the action as the Austrians actually ran out of defenders.

So the victorious Piedmontese captured the bridge intact and within the timescale set. There were no Austrian Engineers with a lit fuse to spoil their day! Anyway the Austrians would be back soon enough they thought…. Do I hear a Radetzky March in the distance?

For a very old ruleset Joe Morschauser’s rules played easy as I guess you would expect. With the tweaks to aid solo play they actually played very well.

I had bought the rule book for the Grid rules both the originals and Bob Cordery’s modernised version – Bob co edited the book with John Curry.

So this was a pleasant surprise to find a very playable set of “measurement based” rules into the bargain.

Categories
Mid 19th Century Wargaming Military History Vienna Treaty Wars wargaming

A bit jittery

This month I picked up Wargames, Soldiers and Strategy magazine mainly because it contained an article on the Battle of Dorking. This late 19th century event has passed many a historian by. Of course it happened in someones imagination and they wrote about it.

At the the time people were concerned about the neglect of the army. Nothing new but despite the Crimean War the British probably still marched to war on the back of their Waterloo success. Perhaps they preferred sailing to the echoes of Trafalgar though.

It was a nervous time and if anything British politicians made the wrong calls.

Lord Palmerston is famed for framing the Schlieswig Holstein Question – the issue he should have dealt with in hindsight. British interests elsewhere meant they simply ignored the inexorable rise of their Waterloo allies, the Prussians.

Instead Palmerston oversaw millions of pounds of military budget squandered on his follies. The biggest coastal defence spending made to ensure we could see off the real enemy – France.

It was the 1860’s

Plymouth was of strategic importance to British Defence and its Global Naval reach.

Plymouth with its massive bay has been a key naval asset to Britain on its south western coast seen from Maker Heights looking East.
The approaches are littered with Palmerston follies – built for the French Invasion that never came
West of Plymouth on the Rayne Peninsula is a particulary fine example of the construction work undertaken
Massive in scale and build quality for eye watering amounts of money – no wonder the army was short changed later in the century.
These forts were self contained able to sustain themselves.
The work was cutting edge for its time
The fortress locations which housed artillery with signficant ranging capability were designed to prevent any enemy fleet effectively reaching Plymouth and especially Kingsand.
Some areas are still in use by the Military.
Maker Heights above Kingsand – Kingsand a small fishing village was of strategic concern because land forces climbing up the valley behind Kingsand could reach Maker Heights which give a panoramic view of Plymouth and its Sound.
More evidence of military interest on Maker heights
Redoubts above Kingsand seen from Maker heights – all to ensure the Kingsand route to Maker Heights could be defended
On Maker Heights Defences remain
Excellent build quality means many forts have realised new lives
The sheer concentration of forts shows the fear of this weakness in Plymouths defences
Today naval traffic is a regular feature of the area – Cawsand/Kingsand/Make Heights is an excellent view point for Plymouths sea traffic
And lots of activity goes on – not just coming and going
all this activity happens in and amongst sailing boats, motor launches and ferries

Today you can still visit these Palmerston follies although only Maker Heights itself can really be inspected. There is an excellent cafe at the top of the heights.

Wargame Scenario Possibilities?

Possible scenarios could be the original 18th century concerns prior to any effective defences being in place – with a landing force fighting its way up the valley while defenders are rushed in piecemeal.

19th century options might be harder to conceive for a game: Although quite how the Prussians sidestepped the whole British Navy to reach Dorking is intriguing. One option then is that the cost of the defences and end of the French threat caused the defences to be semi abandoned by 1875 – making it easier for a Prussian assault this far west to be gamed with some more balanced possibilities.

One other possible scenario is around a WW2 imaginations/Sealion scenario of the “guns of navarone” style sabotage as a prelude to a naval landing? Parachute troops even – securing Maker heights as a prelude to taking Plymouth?

Categories
wargame shows wargaming

Partizan at the Double

Earlier this year I attended Partizan at Newark Showground. For the first time in many years I have made a second visit in one year – this time its the “other” Partizan.

Same location, same show – sort of.

The Autumn sun blazed through the south facing windows. I think that bright light helps – its uplifting. Except when your looking into the sun at the grasses selection on the Northumbrian Tin Soldier stand. You simply cannot please some people……

I enjoyed the Other Partizan. I almost feel Partizan in Spring was still all about what might be and was upbeat while the Other Partizan is no less upbeat but just maybe many gamers have now got stuff done and there is also an air of reflection maybe even planning thoughts for 2023…….

Here are some pics of things that caught my eye.

Westbury offered a more unusual amphibious demonstration……
Dark Ages featured on a few demonstration games
An expansive demonstration of the Anglo Danish shieldwall in its strong position at Hastings
a very effective winter demonstration of the Battle of the Bulge winter 1944.
A less popular era and also uncommon scale for shows.
A neat game with a thoughtful display – quite a few displays chose to use background screens to good effect
I like the period and find Phil Olleys armies rather compelling.
Its not just the details that attract. The choice of colours, textures – its complimentary
The castellated gate further adds to the effect.
From within – the town offers some delightful vignettes
Now a corner backdrop would have capped off this excellent display
Everything here is available to other gamers and yet in combination the game “viewing” was a step above the rest of the demonstrations for me.

Participation Games

Never mind the billhooks was present in the particpation area – 2 games I think. This one (with Andy Callan? – the Billhook brothers) had some nice renaissance figures in play
I still cannot make up my mind about printed mats, do they compliment or distract from the figures? I think it depends.
I spotted only one balloon – on the “The Bunker PG18” table where Martians? were about to rout human mankind
This was a participation, with it seemed, plenty of participation

Back to Demo Land

I liked this table in the demonstration zone but the photo picks up the sky “lines” which is unfortunate.
Probably the most striking demonstration scenery was Boondock Sayntes with their Turkish assault on this city comprising a variety of architectural styles but no less impressive for that. Maybe it is a modern eye to look for similarity. consistency and repetition.
Peter Pigs Bloody Barons was the chosen ruleset for this demonstration game
Rather traditional coloured lichen seemed effective to me
Lots of Perry miniatures on the table – rule of three figures per base shows you can extend your figures per base without any real loss of unit density.
These units felt good – a nice size and the three figures to a base means you can still enjoy all your artwork.
also the rule of three somehow makes the soldiers look less ordered – something to be welcomed in medieval armies.
The forces close to decide the latest historical findings about this most defining battle in english history.
The League of Extraordinary KreigSpeilers put on an excellent display of accurately proportioned 18th century era figures. They were very impressive yet somehow I think my vote remains with Phil Olley’s well fed troops and scenery on this occasion.

Materiel

I turned up in time to get a free figure: The Empress Matilda.

I might paint one one day!

I did buy a few items – nothing like some retail therapy.

I seem to be quite taken with autumnal or dry summer shades at the moment – Nothumbrian Tin Soldier no less.
These chaps are not what they seem (from HSLBCo) – you see british while I see Pickelhaubed Prussian types!

https://wordpress.com/post/thewargamingerratic.home.blog/5079

2022 The Other Partizan: Another excellent show advertising next years dates as well……………
Under one roof – 114 tables/stands offering a massive range of choice in games, demos, societies and traders
I was quite taken with the role playing ranges shown by Nothumbrian Tinsoldier but I must draw the line somewhere………anyway I do have some really ancient RPG kit that I can always drag into the light……….

https://wordpress.com/post/thewargamingerratic.home.blog/3388

In that last link nestling at the end of a post about RPG was a 1970’s era Minifig ECW regiment. A very failed project I think. Yet ECW remains an aspiration – I have the armies, copious rulesets and now even more scenarios, but for now the C19th remains a very interesting and compelling period – so unsurprising that I came away with something of that ilk.
Vintage already? 2007 era and I have numerous rulesets in use – yet I will enjoy this authors take on a transitional period that effectively sees Napoleonics rubbing shoulders with machine guns

Happy Gaming!

Categories
Mythical Realms wargaming world war two

Fauxterre 1930+ The Observer

Lieutenant Kuznets replayed his orders – ascend the valley side to the small wooded hill south west of the 3rd companies position, securing it and then reporting on any activity observed to the west.

Hill 91 was more than wooded – there was “fight” in it. Lieutenant Kuznets cursed – ripe for ambush.

It seems there was concern about the presence of the enemy. So far the loose talk was that the Azorians were to the south east, so who or what else could be to the west? Rugians?

Meanwhile Lieutenant Grabern looked at his watch, then the sky and finally signalled Sergeant White forward. Grabern thought about his objective – escort the observer to hill 91, wait and protect him/them until they pull out.

The climb to hill 90 was far too wooded for Lieutenant Grabern’s taste. Ambush country….

Straightforward orders though. The whispers were that the enemy were in the valley beyond and that the hill was probably occupied already. It felt like trouble.

Grabern did not like the open ground east beyond Hill 90 – the most direct route to Hill 91.
Grabern having crested hill 90 directs his platoon south east to the building enclosure – here was some cover he could use
Sergeant White secured the buildings and then followed by Sergeant Donovan pushed on
Donovan’s Section held the enclosure
All was quiet and Grabern did not like it – the mist was not lifting which was good and bad – bad not least because the observer would have little to see – surely this mission would be a waste of time!
The observer team moved through the enclosure. Sergeant Bird looked at the sky or rather the mist – this was going to be a pointless task. But orders are orders and he needed to look into that valley.
White was now on top of Hill 91 and the valley drop would begin soon
Sergeant Bird had crested Hill 91 and without any trouble. Maybe this would be a quiet day all round after all? Sergeant Donovan circled round to the left of Whites section moving on the clearing near the very hill top. White then moved through a copse to the open clearing and some swampy ground……….
Too late White saw some furtive movement ahead, followed by a harsh sound of a machine gun opening up. Damn, the Vossackians really were here already………
An LMG team of Kuznets platoon commenced firing on the advancing Azorians
Having broken cover by the clearing both Donovan’s and White’s sections were an easy target. They returned fire as best they could but the target was difficult. At least there was only one of them……..
To their right the Azorians now received new fire from another Vossackian fire team. Donovan’s Section finished off the Vossackian LMG to their front.
To compound matters another LMG opened up to the north – this time on Sergeant Bird himself. Runners were everywhere as Bird told Grabern, Donovan and White he was pulling out.
White and Donovan were already locked in an unequal firefight
Grabern had just arrived on the hill 91 and quickly agreed with Bird that withdrawl was in order – the mission was now pointless as the fire fight heated up
His own section immediately took casualties from LMG fire
White was losing men fast as well
White and Donovan’s sections withdrew, firing as they went
The Vossackians now moved into the clearing to get better fire positions but they also took casualties
The Vossackian southern fire team took casualties as well………..
This image has an empty alt attribute; its file name is unadjustednonraw_thumb_58fe.jpg
Reluctantly Grabern pulled back to cover the observer team and get relief from the Vossackian LMG to the north. In the copse by the clearing White and Donovan were only slowly withdrawing. Grabern wanted them out faster.
It was then apparent that the remnants of White and Donovan’s sections were being overwhelmed.
The observer team had now retired to the enclosure closely followed by some of Grabern’s section sent to hold the enclosure itself. Grabern stayed on the edge of the woodland to give what cover he could to what was left of White and Donovan’s sections
Then as Grabern made it to the enclosure White and Donovan’s survivors broke clear of the woodland and retreated across the open ground for the safety of the enclosure.
Now though, the Vossackian firing died away – fortunately the Vossackians either lacked confidence in numbers, were wary of getting caught in the open themselves or had orders simply to hold the hill.

Lieutenant Grabern continued his retreat back to Hill 90 protecting his charge – the Observer. His platoon had suffered many casualties yet performed well under fire.

Later Lieutenant Kuznets crept amongst his men praising them and checking their condition. He was still wary of what the Azorian intentions were. He had already sent back a runner to report his success at clearing Hill 91. Also he had seen firsthand that these Azorians were well armed and disciplined under fire. Unlike in some of their previous encounters.