Here is a small scale map used to show a part of greater Rugia – the red framed white arrow indicates some action being gamed.This larger scale map is used to provide more local detailThe two maps together which represent real geographies and are patently different but for my purposes it matters not – they are near enough.
Welcome to my fuzzy logic mapping !
The small scale map is 1:500,000 and typically I am using these for corps/division actions
While the other map at 1:125,000 is for division/brigade/regiment actions
Of course the scale is extremely nominal under my fuzzy rules.
My recent painting blast over winter had dried up with the end of the Analogue Hobbies Painting Challenge XIV. It broke my preoccupation with the mid 19th century.
The Danes and Germans are sat there in the various painting queues but making no progress.
Green-shoots anywhere?
something different maybe?
yes!
It is a case of returning to an old favorite. Ancients.
In fact two threads emerged from the languid waters I found my wargaming boat resting in. One followed the other.
The first, which I will cover in another post was partly prompted by Wargames, Soldiers and Strategy recent magazine running a Bronze Age theme: I have lots of Bronze Age figures for a long abandoned project.
But the impulse here was mainly due to Curt’s Trojan horse entry for the analogue hobbies painting challenge 14.
Curts fantastic Trojan horse entry for AHPC14These chaps have dwelt long in the deep halls of the plastic mountain- just maybe they will get some paint – finally – who knows?
The second concerns DBA. DBA got me back into the hobby after an almost 20 year break. It also propelled me into 15mm scale at the time – the late 1990’s. Those armies had since lain unused for years as 1/72 and 25/28mm tempted me back to bigger figures.
I dug them out – quite a mixed bag – could I run a campaign using the 1st or 2nd Editions 6 nation offering. I mulled this over before the figures went back into a slightly more accessible store and the unpainted ones joined the paint queue jostling with mid 19th century Danes and Germans.
And then I went to York one weekend for the annual open studios tour. Somehow somewhere I came away with the urge to craft. Note – not paint.
The next minute I was cutting card and with drawing pens to hand inking DBA bases. I had picked a campaign and lacking the right figures thought I would simply play empty bases. I have done this many a time and its a very enjoyable digression. And then I remembered all these 2mm armies currently in vogue plus that crafting itch had not been sated fully. And so out came some discarded HEAT board gaming counter sheets! minus the useful counters. Maybe I could use these “blocks” to suggest groups of soldiers?
A bit of crafting is invariably satisfying activityI grabbed some thin card and used the DBA 15mm base width of 40mm then just played around with the game counter offcuts to get the look I wanted.I went for a standard DBA campaign list which gave me six armies and I added in a Thracian army because I like them!The magnificent seven! A day later glue dried, a take away container holds 7 dba armies
And there we have it instant 2mm armies for a 6 nation DBA Bronze Age campaign: The Thracian’s might make a guest appearance!
The Second battle using my “Buildings Blast” set up saw a mid 19th century action with Austrians and Piedmontese in play. It was a solo play this time.
I used the rules published by John Curry and the “history of wargaming project” with some adaption for solo play.
Using Neil Thomas grading of troops I adjusted the firing and melee rules.
I also used the Roster system unaltered. Infantry got 4 circles and a cross while Artillery got just 2 circles in this game. Essentially in the basic game a hit meant a unit (= 1 base) was destroyed. Roster rules gave units/bases lives in the form of circles and crosses on the roster which you ticked off as they were lost.
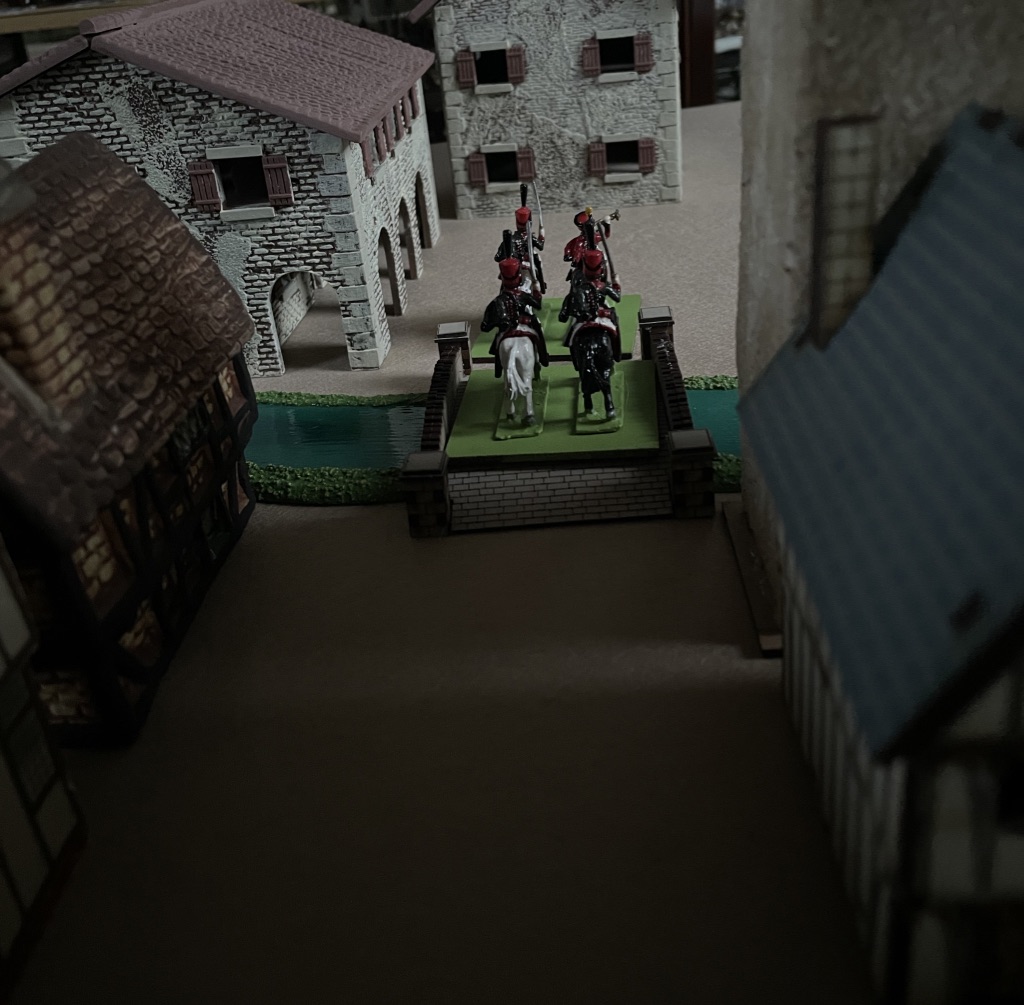
The Scenario was that the Austrians were retreating and the force here was ordered to hold the bridge in the town. The crossing was one of only a few that allowed artillery and logistics easy crossing of the river. The Piedmontese advancing from the north west had orders to seize the bridge as quickly as possible.
Forces were randomly assigned using playing card allocations along with a portion of blank entriesUnits deployed in contact and units were recognised as such at about 6 inches – the card only turned on a 2-6 D6. Here the right hand Piedmontese were certain nothing was in front of them – a heart was a dummy card while the left hand unit was not so sure so hesitated (on a d1) with no card turn. The right hand units poured forward towards the “old millhouse” spotting some real Austrian defendersThe lefthand Piedmontese units were suddenly exposed to Austrian infantry fire from a slightly sunken roadon the east side of the main road two piedmontese artillery batteries dropped into action again to be surprised by enemy troops in a slightly sunken and walled road. These were riflemen and on good form – one battery was quickly silencedHowever infantry units (white coated British Legion 1860) quickly drove them awayfierce fire was exchanged between the Bersaglieri and Austrians in the sunken road while Garibaldeans stormed the defended houses at the entrance to the townOn the east side 1859 Piedmontese infantry stormed the defended housesElsewhere Piedmontese forces had pushed on meeting little resistance (= dummy cards) to their front. A lone Austrian Artillery battery on the west side of town faces artillery and some more Bersaglieri Stubborn resistance at the Old Millhouse Finally the sunken road defenders are driven offAnd the west side Austrian defenders give up rather too quicklyexchange of fire results in another Austrian lossEven as west side Austrian defenders gather but………The Piedmontese quickly move towards their target – the river crossing. Another Artillery Battery blocks their wayOn the west side the Austrian defenders put up a good defence and with support nearby………The defended houses at the north end of town finally are overrunThe mill house and its defenders are abandoned by the Austrians who can retreatAustrian artillerists put up a stern defenceCrunch time at the town square as the Austrians are hemmed inThe Bersaglieri try to rush the ArtilleryThe Town centre defence collapses The Bersaglieri inexplicably turned tail on the west side while Lancers arrive to their rear. The British Legion finish off the town centre defenders on the left pictureThe Artillery of Piedmont watch as the last Austrian defenders in the town square are defeatedThe defended westside town square buildings are assaultedin a last desparate throw Austrian Hussars ride up the main street to halt the Piedmontese tide.The Hussars beat off the Lancers but to their rear the Artillerists are finally beaten while the East side is alive with Piedmontese. Everywhere Austrian defenders have melted away into the fields or across the bridge.The Hussars beat a retreat across the bridge bringing to an end the defence of the bridgePiedmontese Lancers cautiously follow.
The defended buildings were randomly determined and contained one unit each – no other benefits were given the building defenders. So they simply were a delaying factor assisting the mobile defenders fighting outside.
The scenario I played used a 25 step countdown and 1xd6 reduction per turn. The Austrians had to retire at countdown 16 from the edge of town, 7 – the town square and at 0 abandon the north river bank. Victory to Piedmont required they took the bridge before the countdown reached 0.
The game turns 1 to 3 were spent on the edge of town, then turns 4, 5 and 6 fighting over the town square. Turn 7 forced the Austrians back to the north bank but here ended the action as the Austrians actually ran out of defenders.
So the victorious Piedmontese captured the bridge intact and within the timescale set. There were no Austrian Engineers with a lit fuse to spoil their day! Anyway the Austrians would be back soon enough they thought…. Do I hear a Radetzky March in the distance?
For a very old ruleset Joe Morschauser’s rules played easy as I guess you would expect. With the tweaks to aid solo play they actually played very well.
I had bought the rule book for the Grid rules both the originals and Bob Cordery’s modernised version – Bob co edited the book with John Curry.
So this was a pleasant surprise to find a very playable set of “measurement based” rules into the bargain.
Colonel Ansaldi was fretting – having gained so much from the raid on Austrian storehouses he was worried that none of his scouts had been able to stay in touch with the Imperial troops known to be in the area. What he would give for a decent squadron of guides…….
Meanwhile not far away Colonel Albrecht considered the recent reports, nearby Austrian Hussars were watering their mounts. They had ridden hard to report finding the raiders. Now we shall obtain some satisfaction from those Sardinians thought the Colonel……..
Colonel Ansaldi cursed as the nearby hill was clearly occupied by troops – and they were not friendly – Austrians! To arms, to arms, went up the shout.
Looking South the Austrians were well placed on the hillThe Scenario 25 straight from One Hour WargamesThe random force generator gave Blue (Sardinians) only infantry while Red (Austrians) gained some Cavalry to support their infantry
The Sardinian force consisted of 3 infantry units and 1 skirmisher unit. The Skirmisher unit headed for the Austrians on the hill
The Scenario Set up required one unit of Austrians on the table before the Sardinians arrived from the south west heading north. The Zone 1 was the required deployment area for the one Austrian unit, in this case some skirmishers (note I used 4 bases per unit for both line and skirmisher foot troops)
Already a brisk firefight had broken out between the two sides.
There was no time time to lose and anyway there was only one direction the Sardinians could take and that was straight past those Austrians on the hill.
Despite orders there was hesitancy on the part of the Sardinians who still traded fire with the lone Austrian unit. Now other forces appeared – infantry and cavalry!
Cavalry and Infantry appeared from the north on the main road the Sardinians had avoided. (the rules included random arrival of reinforcements)Things are not looking good for the Sardinians
Panic breaks out in the Sardinian ranks. I used the solo rules chance table which offered confusion, ammunition shortages, demoralisation, initiative, rallying and enemy panic.
the skirmisher firefight was prolongedsome good luck (chance) means the Sardinians move swiftly past the hill.The Austrian Hussars close in on the Milan GuardIt looks like the Sardinians are moving clear.
The Sardinians continue to push on with their escape.
The Hussars clash with the Milan GuardIt all hinges on whether the Hussars can hold up the escaping Sardinians
The Austrians continue to press with a further charge by the Austrian cavalry despite them being demoralised.
The Sardinian firing slackens off – Colonel Ansaldi sends a runner to find out what is going on. (chance intervenes)
Suddenly there are Austrians everywhereMore Austrians troops arrive on the Main Road from the South. Aiming for the road was now a problem for the SardiniansMore chance favours the Austrians whose Infantry march rapidly up the road while the Cavalry catch the Sardinian SkirmishersThings are looking bleak for Colonel Ansaldi as the Milan Guard break before the Hussars repeated attacks
But finally the Austrian cavalry also retreat as things are just too hot. Meanwhile the Austrian fire is good and effective and they continue to press the Sardinians.
The Hussars break while the Austrian Infantry close in on the remaining two Sardinian unitsThe Sardinians must exit the road northwards with two units to secure victory. Despite the Piedmontese Infantry driving off the Hussars, the Sardinian Skirmishers fail to reach the safety of the woods before being crushed by the Austrian Cavalry
Now on the point of victory the Austrians seem confused. Yet with a final effort they corner the Sardinians.
The Piedmont Infantry leave the field while the second Milan Guard unit is decimated by the pursuing Austrians.Its all over as Blue force Sardinians fail in their mission to exit two units northwards on the main road.
Colonel Albrecht curses his cavalry – they are blown and clearly fit for nothing as some of the Sardinians are still making good their escape. He calls for some scouts.
Later Colonel Ansaldi manages to regroup his shattered forces and with poor pursuit from the Austrians is able to restart his march back to Sardinian lines by a new route. Later many more of his dispersed men come in.
The solo rules regarding random confusion, demoralisation, panic and ammunition shortage added that “unknown/unexpected” element to the game that a real opponent usually brings. The interventions were not gigantic but did chip away at each forces potential.
Early on the Sardinians were stalled, then gained initiative before the Austrians finally gained lots of initiative to enable them to hem in the Sardinians even with a hesitation at the end.
Next up the Sardinians, having continued their march, encounter more Austrian forces intent on preventing their escape.
Ok so it was just two days – well it was that hot for two days. My optimum operating temperature is 22.333333333 degrees centigrade – either side by a degree and I am too cold or too hot, so 40 degrees was simply too much for this soul. Even the light was dazzling – queue troglodyte behaviour.
Neil Thomas’s one hour wargames ruleset is probably the ultimate “pick up” game for historical miniatures gaming, six units a side on a game area of 3×3 feet or 90cm square.
So I reached for the book and then remembered it not only has 30 scenarios and 9 period rulesets but also campaign and solo gaming suggestions.
I opted for Horse and Musket plus a best of 5 battles campaign – Blue versus Red. I was playing solo as well.
I randomly chose the 5 scenarios getting 6,9,13,24 and 25. Now Neil Thomas suggests for narrative purposes ordering the games. And you could include some consequences game to game but I did not go for that extra step.
Looking at the scenario types I opted for the following and the narrative fell into place. Local Blue forces go on a raid while Red forces try to find and destroy the raiders. The finale sees their activities ended as they are both ordered to support their main army forces…….
25 – Infiltration – Blue is plundering Red’s supply lines
13 – Escape – Blue now turns for home but is blocked by Red forces
24 – Bottleneck – Blue attempts to clear another Red blocking force (while still escaping with their plunder)
6 – Flank Attack I – Blue encounters yet another Red blocking force
9 – Double Delaying Action – Forget that raiding, the local forces are both ordered to seize the same town in support of their main armies actions
That was easy. For this set of battles the Blue forces were Sardinianish
while the Red were Austrianish.
The figures were mid nineteenth century with smoothbore artillery and inaccurate musketry still to the fore. The cavalry still strutted about with the confident self importance of being the premier arm.
I used the scenario scenery layouts as per the book with a few slight adjustments for my table and the items to hand.
I will cover the various specific rules as each scenario occurs.
I used the random deployment from the “solo wargaming” chapter. The campaign is basically straight out of that chapter, and it generated my scenario list, except I took a chance and drew from all 30 available scenarios each time rather than segment the list as suggested by Neil Thomas.
I also used the chance rule as per the chapter on campaigns.
In the next post I will cover Scenario 25 – Infiltration.
6 units a side using my Piquet Field of Battle 4 bases per unit.
How do you compare rulesets? empathy or process – which factors give you a good ruleset?
My recent challenge has been to find a preferred ruleset for mid 19th century European warfare. And that provides the first criterion – what exactly is mid 19th century warfare? Maybe we should be saying post Napoleonic Warfare or Pre Franco Prussian Warfare? Or should we classify with technology – percussion cap, needle gun, sabre, rifling, telegraph, ironclad…..
The thing is that between 1815 and 1865 not a lot seemed to happen. Apparently things regressed as West Point Officers tried to emulate Napoleon in the early years of the Amercian Civil War despite their Mexican war experiences.
1865 to 1915 is the same timespan – would the ACW soldier have recognised the trenches of Europe – well sort of but not the aeroplanes surely.
In fact between 1815 and 1850 warfare was still largely smoothbore in weaponry and equipment and uniforms remained similar. Changes were afoot as more accurate muskets made their mark with percussion caps and more rifling. Uniforms saw frockcoats, trousers and kepis appear.
And between 1850 and 1870 breechloading rifling transformed infantry and artillery capabilities.
Quite a bit going on which means your chosen ruleset is either narrowly period, even campaign, specific or has to be clever and flexible.
My recent simple testing of a series of rulesets has caused me to reflect on what those Criteria for my gaming preferences might be.
I have ended up with 4 areas on interest. First of all I am assuming the choice of ruleset is not limited to an examination of mechanisms.
Production
Philosophy
Game Mechanics
Action Mechanisms
Production includes everything about the printed or e delivered publication. So images and print clarity matter as do the range of wargaming aspects covered.
Philosophy I suppose could be called game design and includes period choice, scale and game size as well as chosen outcomes.
Game Mechanics covers things like army lists, pre battle activity, player numbers and figures.
Finally Action Mechanisms are aimed squarely at movement, combat resolution, control and turn structure.
When I had finished my long list of criteria a massive 43 items had been generated. I did consider some rationalisation when I looked and saw a lot of similarities. And then I decided to leave my longlist intact for now.
I used it to score my rulesets and accepted the potential weighting due to duplicated criteria. Otherwise there is no other weighting in terms of importance of one criterion over another. Action mechanisms are not prioritised over Production Values for example.
In each case a criterion gets a single mark.
That mark is relative to my perceived ideal. The scores can be +1, 0, -1. positive values are favorable.
Lets look at Production first:
NT19e
BwMS
GW
F&F
FoB
TTB
PW
Relevant Images
0
0
+1
+1
+1
-1
0
Fair Wear & Tear
0
0
+1*
-1
-1
+1
+1
Logical clear layout
+1
0
+1
+1
-1
+1
+1
Plain text
0
+1
+1
+1
+1
+1
+1
Lots of Design Thinking
+1
+1
+1
+1
+1
-1
+1
Simple Rules
+1
+1
0
0
-1
+1
+1
Scenarios included
+1
0
+1
+1
+1
-1
+1
Campaigns included
0
0
0
+1
+1
+1
-1
Totals
+4
+3
+6
+5
+2
+2
+5
Table 1: Production Criteria
Not all softcover publications fail – Mike Smith Table Top Battles is stapled – crude but effective. Later Fire & Fury editions have gone to hardback meaning rulebook collapse is less likely.
So GW comes out top followed by F&F and PW. Before I list the rulesets in question the scoring is “relative” and not absolute. It is best thought of as indication of preferencing.
In my case these rules have all been through some sort of preselection in my decision to buy them in the first place. So they all score positively. It is how much more I value them against each other that is measured here.
When it comes to historical wargames rulesets today – in a 60 year old industry, we are talking about marginal gains. I think with fantasy/scifi etc. it is still possible to deliver up a “game changer”!
I have used the following abbreviations.
NT19e – Neil Thomas’s European Warfare in the Nineteenth Century – hardback edition published by Pen & Sword Military 2012
BwMS – Battles with Model Soldiers – hardback edition by Donald Featherstone published by David & Charles 1972
GW – Gentlemans War – “e” publication by Howard Whitehouse and Daniel Foley and published by Pulp Action Library 2018
Fire & Fury – 1st Edition in softback by Richard W Hasenauer 1990 published by Fire & Fury (2nd editions under Brigade and Regimental titles available)
Field of Battle – Piquet 1700-1900 by Brent Oman 2nd Edition published by Piquet Inc 2011
Table Top Battles – by Mike & Joyce Smith 1st Edition published by Mike Smith 2007 (2nd Edition 2018 available)
Practical Wargaming – hardback edition by Charles Wesencraft published by Elmfield Press/Shire Publications 1974
Is it fair to compare rulesets which are published decades apart written for vastly different audiences? I believe so. Despite visually apparent differences, there are some common threads in wargames.
On to Philosophy
NT19e
BwMS
GW
F&F
FoB
TTB
PW
Period – technology emphasis
+1
+1
+1
0
0
-1
+1
abstraction in scaling
+1
0
+1
0
+1
+1
-1
no figure/base removal
+1
0
-1
0
+1
+1
-1
cavalry ineffective
+1
+1
+1
+1
+1
0
+1
irritant skirmishers
+1
0
+1
0
+1
+1
+1
vunerable yet destructive artillery
+1
+1
+1
+1
+1
0
+1
column and line infantry formations
+1
+1
+1
+1
+1
-1
+1
attack defense objectives
+1
+1
+1
+1
+1
0
+1
morale dominant
+1
+1
-1
+1
+1
0
+1
battle narrative
0
0
+1
0
0
0
-1
Totals
9
6
6
5
8
1
4
Table 2: Design Philosophy
So NT19e along with FoB seem to have edged it on philosophy for me. I should say that by having a lot of scores to make, it may reduce my own unintentional bias (of course on the other hand wargames magazines are all about bias – “Buy me” bias).
Fire & Fury was very busy but brisk………..
Talking about bias – my requirement concerns European Warfare so I am effectively biased against other “continents” warfare considerations that are different.
Ok next up is Game Mechanics:
NT19e
BwMS
GW
F&F
FoB
TTB
PW
option to solo game
0
+1
0
+1
+1
+1
-1
measure not grid distance
+1
+1
+1
+1
+1
-1
+1
army selection/lists available
+1
0
+1
+1
+1
0
-1
pre battle actions available
+1
+1
+1
-1
+1
-1
-1
game time required (<2hrs)
+1
+1
0
-1
-1
+1
+1
units per side (6-12)
+1
+1
+1
-1
-1
+1
+1
unit ratings (varied)
+1
+1
+1
+1
+1
0
+1
table size (5’x4′)
+1
+1
+1
-1
-1
+1
+1
concealment/ambush/surprise
+1
+1
+1
-1
-1
0
-1
chance (situations/ cards etc.)
0
+1
+1
0
+1
0
0
figures per basic unit (12-20)
+1
+1
+1
+1
+1
+1
-1
support functions (engrs/ sappers) rules
0
0
+1
0
0
+1
-1
Totals
9
10
10
0
3
4
-1
Table 3: Game Mechanics
Earlier I asked is it fair to compare rulesets from different decades? Now the question might be should you compare battle rulesets with skirmish rulesets or measured games versus grid games. The answer is of course. Just be consistent in the criteria used for the scoring and try to avoid criteria that directly preference one solution. In my case grids games are not a requirement so do score badly on the requirement for a measured game that I chose to include – some personal bias there.
Battles with Model Soldiers and Gentlemans War seem preferable when it comes to Game Mechanics.
Battles with Model Soldiers gets you into action rapidly and is brutal……In Battles with Model Soldiers units were cast to the four winds in the first rounds of action
Finally we turn to Action Mechanisms:
NT19e
BwMS
GW
F&F
FoB
TTB
PW
alternate moves with opportunity
+1
+1
+1
+1
+1
+1
+1
initiative
+1
+1
+1
+1
+1
+1
+1
simple manoeuvre rules
+1
+1
0
0
+1
+1
+1
measure ranges
+1
-1
0
+1
+1
+1
+1
move and fire in a move
+1
0
+1
-1
+1
-1
+1
road movement restricted
+1
0
0
-1
+1
-1
-1
simple interpenetration
+1
+1
+1
+1
+1
+1
+1
saving throws
+1
+1
+1
-1
-1
-1
-1
leadership/pips/orders
0
+1
-1
+1
+1
+1
+1
written orders
0
+1
-1
-1
-1
-1
+1
cards for actions
0
0
+1
0
+1
0
-1
turn structure is fluid
0
0
+1
0
+1
0
0
simple combat resolution
0
-1
-1
+1
-1
+1
0
simple firing resolution
0
-1
-1
+1
-1
+1
0
8
4
3
3
6
4
5
Table 4: Action Mechanisms
Neil Thomas 19th century European rules come out preferred for Action Mechanisms along with Field of Battle.
Neil Thomas rules provide an excellent mix of production, design, game mechanics and action mechanisms making them hard to beat for all round use in mid nineteenth century gaming
In summary we have table 5
NT19e
BwMS
GW
F&F
FoB
TTB
PW
Production
4
3
6
5
2
2
5
Design Philosophy
9
6
6
5
8
1
4
Game Mechanics
9
10
10
0
3
4
-1
Action Mechanisms
8
4
3
3
6
4
5
Totals
30
23
25
13
19
11
13
Table 5: Summary
So there you go Neil Thomas rules are to be preferred in meeting my perceived gaming requirements. But……
I really like the liveliness of Fire & Fury while sometimes the grid games using Table Top Battles are just so easy and convenient. And then Gentlemans War offers a sense of detail which drives narrative – an essential requriement for the solo wargamer I would suggest.
Field of Battle uses the house theme of the card driven randomised turn structure of Piquet. I like it a lot but you need to invest your concentration in that ruleset even with the simpler FoB version. Like GW it offers narrative benefits.
My least liked set was actually BwMS even though Donald Featherstone has been the mainstay of my house rules over the years. This is because much of what he wrote was about design philosphy rather than pushing a particular ruleset. You could say nearly all his books were design handbooks for wargames rules writers.
A Gentlemans War or “Glossy Coats and Tin Bayonets” is a bit different to the previous rules tested. It is much more towards a skirmishing style and is definitely for enjoyment of the game. These rules are aimed at the period 1875 to 1914 so are a bit later than my interest.
The losses are per figure so the units were
12 man infantry brigades
4 man field artillery batteries
6 man light cavalry brigades
I used their 1850-1875 shooting modifications to the rules
Essentially it shortens all the ranges giving you just rifled muskets or smoothbore cannon.
I ran out some new playing cards for this game.
Modern playing cards in a victorian style.
With a normal playing card deck red cards work for one force, black for the other.
numbered cards allow singular activitions
court cards allow brigaded activations ( I did not use these) or singular activations
ace allows double move and cannot be held in the hand
cards in the hand are used as hold cards to be used as above
cycle ends when every unit on one side has activated
first joker end all cycles – with all disorder markers removed
both sides start new cycles
second joker – cycles end plus all held cards are discarded and packs reshuffled for a restart
Marshall Radetzky squares up to the Rebels led by General Durando. On the left is the Austrian line – Hussars, Benedek Line Infantry, No1 Field Artillery with Erzherzog Albrecht Line Infantry in the distance. On the right the Milan Infantry Brigade with A battery field artillery next then the Bersaglieri di Vignola and finally in the distance the 3rd/6th Line Lancers.
The set up was identical to previous tests and the Orchard was inaccessible to all arms, while the road offered some benefit.
The Empire Forces were
left flank – Erzherzog Albrecht Infantry
centre left – No 1 field artillery battery
centre right – Ritter Von Benedek Infantry
right flank – Graf Radetzky Hussars
The Republican Forces were
left flank – Milan Brigade
centre left – “A” battery field artillery
centre right – Bersaglieri di Vignola
right flank – 3rd & 6th Line Lancers (combined)
The action was swift with the rebel lancers charging first……
The 3rd/6th Line Lancers charged the Erzherzog Albrecht Infantry inflicting alittle damage but taking heavy casualities from the Austrian Firing and then in the melee.
As they charge in the Austrian Infantry fire scoring on 5 or 6 on 1d6
Rebel saving throws on a 5 or 6 mean only 2 hits make a mark. Yet this meant 1/3 losses 2 out of 6 men killed so a morale check was required which said the Lancers were “bothered” but continued their charge albeit “lukewarm”.
In the melee the “advantage factors” were with the Austrians meaning the Lancers needed a 6 to hit against 3-6 for the infantry. 6 hits on the cavalry halved meant the remnants of the cavalry ran away (1 cavalryman!) while the infantry were reduced by 1 man to 11.
I did not do figure removal but either way the Lancers are in full retreat. The Beraglieri are arriving to engage the Austrian artillery in the foregroundMeanwhile an exchange between the Von Benedek Infantry and the Piedmont Artillery resulted in the artillery being “disconcerted” so they ran away. In return the Milan Brigade fired on the Von Benedek Infantry
The Bersaglieri attempted to rush the Austrian artillery but became “bothered” and had to retreat. while a fierce firefight took place between the Von Benedek Infantry and the Milan Brigade.
Eventually the Von Benedek Infantry became “disconcerted” – morale test on 50% losses, and ran away.
Von Benedek infantry flee after firefight with the Milan BrigadeThe Austrian left flank is relatively unscathedIn the distance the General Durando returns having failed to rally the piedmont artillery while in the foreground the Austrian Hussars have lost almost all their men to the Milan Brigade firing and then repelling their chargeThere is still possibilities of action on the Austrian left flank. Again the Austrian Artillery “bother” the Bersaglieri who run away again only to be rallied by General DurandoFinally the Hussars are destroyed by the Milan Brigade – in this game I used dice to show accumulated damage for a change!The Milan Brigade now move against the Austrian left flank, getting favorable cards they fire on the Austrian Artillery who are “disconcerteed” and fall back.
With just one infantryman left in the Erzherzog Albrecht Infantry the game is up for the Austrians as the Milan Brigade still numbers 10 men and the Bersaglieri have 8 although they keep running away!
So General Radeztky decides to quit the field. General Durando celebrates a great victory largely down to his Milan Infantry brigade which destroyed the Hussars, routed the Von Benedek Infantry and drove off the Austrian Artillery almost single handedly.
Following on from three simple battles using Fire & Fury, Piquet Field of Battle is the next ruleset for consideration. Published in 2011 – 20 years after Fire and Fury and card driven the ruleset should give a different feel.
The battle comprised the same forces that were used in the Fire and Fury ruletest A3 covered in a previous post.
The objective was to secure the ridge and drive off the opposing force.
The Forces this time were……….
The Austrian Right Flank
Austria
Left Flank – Brigade Von Baden (Orange Facings)
Centre Left – No1 Field Artillery Battery
Centre Right – Erzherzog Albrecht Brigade (Red Facings)
Right Flank – 5th Graf Radetzky & 8th Ferdinand, Herzog von Sachsen-Coburg-Gotha Cavalry Brigade
Piedmont Left Flank
Piedmont
Left Flank – National Guard Milan Brigade
Centre Left – “A” Battery Field Artillery
Centre Right – Bersaglieri di Vignola Brigade
Right Flank – 3rd & 6th Piedmont (Lancers) Cavalry Brigade
The Battlefield itself is slightly altered from that used in the Fire & Fury battles.
The road bisects the battle field on the diagonal but notionally there is a ridge which it crosses and where an enclosed Orchard is located.
a 4’x4′ table set up works just fine for these tests. Alas these excellent light weight but sturdy german made Lidl sourced picnic tables have been OOP for 4 years. Crikey they even have 4 height settings in the legs…………….my Kloster Arens encounters made good use of this variable height capability The Orchard on Symmetry Hill (some of the model trees were planted in the 1970’s!). The Austrian Artillery have Unit Integrity of 2 (most infantry have 3) with a Defensive Dice 1xd6 (like all other units) plus Combat Dice 1xd10 again like most of the units in this battle
The Orchard is inpenetrable to all arms for all the remaining rules to be tested. So in effect it is a flank and divides the action into two areas.
The fence supplier is unknown but the orchard dates from the early 1970’s – by german model railway company Noch, not bad for 50 years of play.
In Field of Battle (FoB) terrain is classed for its impact on the game.
This means the orchard is a Class II line of sight blockage and a Class IV movement restriction.
Unit integrity is the key variable for each unit in the game. It reflects status/morale/strength as a variable.
Combat Capability is defined as a Dn (where n=an even value in the range 4-20) so thats D4,D6,D8,D10,D12,D20.
Opposed rolls is the way results are determined.
Command radius determines the limit of a leaders influence on the battlefield and is a variable (Dn x 10 = command radius in inches)
Initiative is determined by opposed rolls of the two Leaders respective dice. The difference equals the total initiative each side can use in this part of a turn. Turns get complicated but the game does not!
The winner of the opposed roll decides order of play.
you can still buy 2nd edition card decks, I have yet to consider moving to 3rd edition.
The game is card driven and a deck for each side needs to be determined. In this case both sides used the exact same variables so ended up with identical card decks. In most games the playing decks would be asymmetrical.
Piquet is essentially an asymmetrical game. Therefore winning has to be defined to ensure the asymmetry does not simply distort the game one way each time.
The forces all elected to “march” with the Austrian left using the road benefit
On Turn 1 Step 1 the Austrians scored 9 on d10 against Piedmont just 4. This gave the Austrians 5 initiative points as the ACTIVE player.
In the event the Austrians drew 5 cards none of which were for movement. Essentially the army just stood transfixed.
Piedmont (REACTIVE player) now promptly drew some excellent cards for move and melee.
Piedmont have already secured the ridgePiedmont right wing crash into the Austrians strung out on the road, a now regretted ploy.
The opposed roll dice off in Piquet is usually with different dice as factors peculiar to that melee move the players dice up or down the scale of d4/d6/d8/d10/d12/d20.
The Lancers went from d12 to d12+3 scoring 3 on the dice and adding 3 = 6
The Von Baden Brigade went from d10 down to d6 mitigating some negative factors through a discard of a tactical advantage card drawn in the ill fated Austrian Initiative as the ACTIVE player. Von Baden scored 3 on the dice.
The difference = 3 hits on the Austrians. This equated to 1 unit of integrity which is the value of 1 UI for all arms.
The Piedmont Lancers won the melee going out of command while the Von Baden Brigade lost unit integrity and the army morale lost 1 point. The Bersaglieri were not so fortunate……
Each Army started with an Army Morale Rating of 4 – determined by the make up of the Army x a variable 1xd12. The range being 3 to 50.
The No1 Austrian Field Battery made short work of the impulsive Bersaglieri.
The Bersaglieri threw their defensive dice in the opportunity fire step. A 1 on the die!
The Austrians had their eye in, with a D10 moving to D12+1 and with a die roll of 4 scored 5. So 4 hits on the Bersagleri meant 1 unit of integrity lost plus a spare hit.
The Bersagleri retired 4″.
Piedmont also now saw their Army Morale drop from 4 to 3.
Piedmont still had initiative and the next cards drawn were Artillery Firepower and Infantry Firepower. Firing is permitted at any time a unit is ready to fire, these cards tell you a unit has reloaded. Hence the puffs denote units who have fired and cannot fire again until they get a firepower card from the deck.
It means you don’t know if that unit will be able to fire when charged…………the sort of randomness that many “face to face” gamers quite simply will find too constraining.
For the Solo Wargamer such an approach offsets the lack of the live opponent uncertainty and simply adds to the narrative.
“A” battery Piedmont Field Artillery open fire on the Erzherzog Albrecht Brigade.
“A” battery went up 2 from d10 to d12+1 threw 6 = 7
In response to this fire the Erzherzog Albrecht Brigade threw 4 on their d6. with 3 hits they lost 1 unit of integrity and another army morale point and went out of command.
The first round of initiative ended. And we are still in game turn 1!
The Austrians won the dice off again and gained 5 initiative.
The Austrians drew another 5 cards which included a lot of LULL’s – basically nothing happens.
They did managed some movement cards to get their troops into line.
On the Austrian Left Flank things were heating up
The Piedmont initiative started badly with an Army Morale card which meant testing for the army morale. failing the d12 throw meant all units went out of command (OOC).
“A” battery opened up again OOC but had no effect.
No other cards were of use and some more LULL put paid to the Piedmont initiative.
The next initiative die roll saw Piedmont win 8 to 2 giving 6 initiative points to them.
Artillery fire caused more damage to Brigade Erzherzog Albrecht
another round had no effect though
no other cards could be played
The Austrians had a mixed hand and did manage to inflict some more unit integrity loss as well as army morale reduction.
The next dice off saw the Piedmont grab the initiative again with 5 points advantage.
firepower was at first ineffective from the Bersaglieri and Milan Brigades
Bersaglieri then managed to attack the Austrian artillery again causing 1UI damage along with 1 army morale reduction
The Milan brigade then blasted the Piedmont Cavalry Brigade inflicting 1UI loss and a further army morale point deduction.
LULL and ARMY MORALE and MANOEUVRE cards followed
The Austrian response was
their artillery again damaged the Bersaglieri who lost 1UI and army 1 morale point
but then ARMY MORALE came up for the Austrians who had to die role their leadership dice of d10 against a d12 because their Army Morale rating was already reduced to zero.
the throw was lost
As a result of losing this throw the Austrians quit the field.
A victory for Piedmont and King Victor Emmanuel.
The faster attrition through loss of army morale eventually worked against the Austrians
In effect this was all one game turn if you say the exhaustion of the deck is a game turn. Both sides had unturned cards.
The Milan Brigade eventually got into action and probably delivered the losses that tipped the balance in favour of Piedmont.
The game did feel different to Fire & Fury however it did play at the same sort of pace. I had played Field of Battle Piquet before which certainly helps as the processes are unusual.
I have some more reports coming, before concluding this rules test series.
This game was thrown in firstly because Battles with Model Soldiers was the source of my original ruleset test scenarios for Fire & Fury.
Battles with Model Soldiers is really a 200 page design/ideas book with rules dotted throughout.
The rules I used are explained briefly at the end of this post. A key aspect is alternate moves with losses incurred before any responses. Initiative (who goes first in each turn) therefore matters.
Donald Featherstones book provides basic rules for American Civil War actions. he shows the mechanics through three stepped up siutations
infantry only
infantry plus cavalry
infantry, cavalry and artillery
In this game I used the last stepped up situation of infantry, cavalry and artillery.
Narrative – Near Rome in 1849
In this confused affair a wargaming Napoleon faces off against Garibaldi – I suppose the nearest real conflict would be 1849 at Rome where Garibaldi gave the French a shock defeat.
The forces were
Roman Republic (Garibaldi) on the left
Red Dragoon Volunteers in foreground left
White Legion Volunteers
Roman Artillery (in liberated Austrian uniforms!)
Milan Sharpshooters in distance
The French were led by General Oudinot looking a bit like the great Napoleon himself.
33rd Line Regiment right foreground
Austrian Artillery on loan
66th Line Regiment in distance
French Cuirassiers
In terms of “ground” the battle was fought on a low ridge (no effect on movement) crossed by a rough track (no benefit) and the fenced orchard (inaccessible to all forces).
The rings denote remaining strength – red = 4 artillerymen/5 figures, yellow = 10 figures, blue = 20 figures with green showing 15 figures in value.
What you see is almost what you get – counting actual figures equals strength. I don’t do figure removal normally – using rings and dice to show remaining strength. So 8 cavalrymen on show were actually 10 in value. I also did some selected base removal in this game (for visual effect) just to confuse matters!
The action was brisk!
This game is a bit short on images – it was quick – almost done in 3 moves really……
Move 1
Both forces deployed and marched forward to drive the other from the ridge otherwise known as Orchard Hill.
Move 2 – Oudinot won the initiative
the 33rd Line fired on the Red Dragoon Volunteers inflicting 3 casualties at medium range
The Austrian artillery opened up on the White Legion Volunteers missing them completely
the 66th Line fired on the Roman Artillery and the artillerymen promptly ran away (die throw = 6 hits versus 4 figures in strength)
The 10 French Cuirassiers charged the 20 Milan Sharpshooters.
Basically a melee is headcount times 1 point for an infantryman or 2 points for a cavalryman.
So this fight was on equal points. 1 d6 is rolled per 5 points – 4 dice each. Cavalry get +1 on each dice throw (2 to 7 range possible) for charging.
Cuirassiers scored 17 versus Sharpshooters 20.
The points tally HALVED equals the damage. So 17 points halved and fractions rounded down meant 8 points of damage to the Sharpshooters. Thats 8 figures lost from the 20 that started the fight.
Meanwhile the 20 points of damage halved was 10 and divided by 2 points per cavalryman gave 5 cavalry killed.
The survivors represent their basic morale – 10 points of Cuirassiers x 1d6 throw of 5 = 50 while the Sharpshooters at 12 points x 1d6 throw of 6 = 72.
The Sharpshooters won while the Cuirassiers retreated with 50% losses. (bit of Roman gloss there…..)
Garibaldi responded
The Milan Sharpshooters hit the 66th Line with 4 hits
The White Legion hit the Austrian Artillery for six literally – destroying them
The Red Dragoon Volunteers charged the 33rd Line
7 remaining Dragoons x 2 pts versus 20 infantry x 1 pt meant 14 points versus 20 points or 4 v 3 dice (round up half or better fractions – 14 points becomes 15 points = 3 dice)
Cavalry get +1 for charging. The Dragoons inflicted 16 points damage halved = 8 infantrymen killed
The 33rd Line threw 12 in all = 6 Cavalry points damage or 3 actual dragoons killed
Now the Dragoons had already lost 3 casualties to firing so were now down to 4 dragoons
4 cavalry x 4 die roll versus 12 infantry x 2 die roll was 16 v 24 or a victory for the 33rd Line
The Cavalry retreated
Move 3 Garibaldi won the initiative to move first
The Milan Sharpshooters fired on the 66th Line scoring 1 hit
The White Legion fired on the 33rd Line scoring 8 hits – destroying the 33rd
Oudinotin Move 3 sent his 66th Line against the Sharpshooters. In the melee the 66th won reducing the Sharpshooters to just 4 men who retired.
The game is almost over!
Move 4 Oudinot moved first
The 66th fired at the Sharpshooters but missed
The Blue Cuirassiers now returned to the fray
Move 4 Garibaldi
The Red Dragoons also returned to the fray
The White Legion now closed on the 66th Line
The Milan Sharpshooters scored 2 casualties on the 66th Line reducing them to just 10 men.
Move 4 the french right is now under attack – the french left having been destroyedMove 5 the French Curiassiers charge in as the infantry trade fire
Move 5 Oudinot took the initiative
The French Cuirassiers made one last valiant charge into the Milan Sharpshooters.
The Sharpshooters killed 1 Cuirassier in turn receiving 3 casualties
The Cuirassiers won the melee driving off the Sharpshooters
The 66th Line fired on the approaching White Legion scoring 6 casualties (I allowed liberal firing arcs!)
Move 5 Garibaldi
The White Legion fired on the 66th Line inflicting 5 casualties in return
Move 5 the French Cuirassiers chase off the Milan Sharpshooters
Move 6 Garibaldi won the initiative
The White Legion fired on the 66th scoring 4 more casualities
Move 6 Oudinot attacksin desparation
The 66th Line and Cuirassiers charge home against the White Legion.
The White legion suffered 2 casualties
In return they inflicted 4 infantry casualties with 1 cuirassier loss
Move 6 The last knockingsMove 6 – the 66th Line break leaving the Cuirassiers alone to hold off the White Legion and the Red Dragoons
Oudinot knows the games up and in Move 7 his Cavalry retire covering the rest of his routing forces.
General Garibaldi triumphs capturing the ridge.
Rules used in the Battle of Orchard Hill
Donald Featherstone distributed his many periods (10) rules within the 200 pages of text. The basic rules presented were for horse and musket and his three stepped up situations used an American Civil War example.
My Summary of Rules from Battles with Model Soldiers
No sooner am I drifting from the mid 19th century by almost 100 years into world war 2, than I go the whole hog and leap several centuries – welcome to Bronze Age to Baroque does SciFi! – maybe.
I started the Wargaming Erratic blog in 2019 and aimed to cover my self declared restriction of “Bronze Age to Baroque”. In fact I had determined (for wargamer sanity reasons) to abandon not just my long time interests in world war 2 but also Napoleonics and the Seven Years War – anything after about 1730. The decision has proven to be easier to say than do.
It is not just bookshopping which can sidetrack your latest project (in my case Wars of the Italian Unification 1,2,3 – WOTIU). Strolling through other gamers blogs can be seriously distracting. Of course that is a very enjoyable activity with the vast range of ideas, activity and games being shown.
In this case “wargaming with barks” served up their new project using “five parsecs from home”. Now SciFi wargaming really has passed me by – even my D&D era, now eons gone, did not really depart from ancient medieval themes.
What caught me eye was that this ruleset is for solo wargaming – now that it is something that does fascinate me: Well wargames rules fascinate me anyway, solo rules especially so, because of the potential mechanisms on offer.
A hardback subA4 sized rulebook with very high quality print – colour throughout.
As Neil Thomas (author of one hour wargames) says, it is easy to write complex wargame rules while simple ones that constantly work are very challenging to compose.
In Five Parsecs from Home (FPfH) the movement and combat mechanisms themselves, look simple with the narrative derived from the wider aspects of character and weaponry for example.
at almost 200 pages loaded with data and ideas – this is the 2021 edition
So it is the case that two player wargames rules are more easily composed than solo rules when it comes to creating that unexpected and surprising element, which is at the heart of so much enjoyment in wargaming.
So far I have bought the book and had a quick speed read.
It looks very interesting and is a complete package including all your necessary rules plus both scenario and force generators.
Solo wargames much depend upon narrative to provide the variety and surprise in any game. It looks like this ruleset offers that potential in spades?
Finally solo wargames work just as well with live opponents – often just simply leaving out some rules is all it takes. So maybe you actually get two rulesets for the price of one!