The Corinovans are in retreat, “B” division has been destroyed holding the coastal city of Viana and now inland, “A” division is dangerously exposed to isolation by the rampant Gombardian forces.
Remnants of “B” division and elements of “C” division in retreat, continued to try and intercept Gombardian thrusts on “A” division’s eastern flank.
My previous Fauxterre post covered the strategic situation that lead to this action.
The game
Essentially this is an escalating engagement and I simply used the scenario from Neil Thomas’ “An introduction to wargaming”. His World War Two rules reflect his simple yet interesting approach you can find in his more popular books like one hour wargames, C19th Century European warfare or ancient and medieval warfare.
The rulebook offers four scenarios
Encounter
Frontal assault
Surprise assault
Escalating engagement
I opted for an escalating engagement action reflecting the chaos of a rapid advance experienced by both sides.
I took the real world unit lists in the book and came up with two slightly different lists for the Gombardians – plenty of armour like Germans while the Corinovans were more likely to field infantry like the French.
I used my own table for observation – everything had an observation rule to help cause friction that’s required for a solo game.
The scenario set victory conditions based on three shared objectives – the winner having two or all three at the end of the game. I had a count down variable tracker but this had not expired when one side patently had run out of forces.
The three objectives were the
Town
Sawmill
Orchard
Both sides quickly acquired either the sawmill or town.
It remained simply to fight it out for the orchard.
As the table was created first before selecting the scenario it was also the case that the opposing forces diced for arrival points.
Each side had 9 units and deployed 3 units to start but I also applied scenario requirements that all six remaining units arrived on an improving odds dice throw each turn.
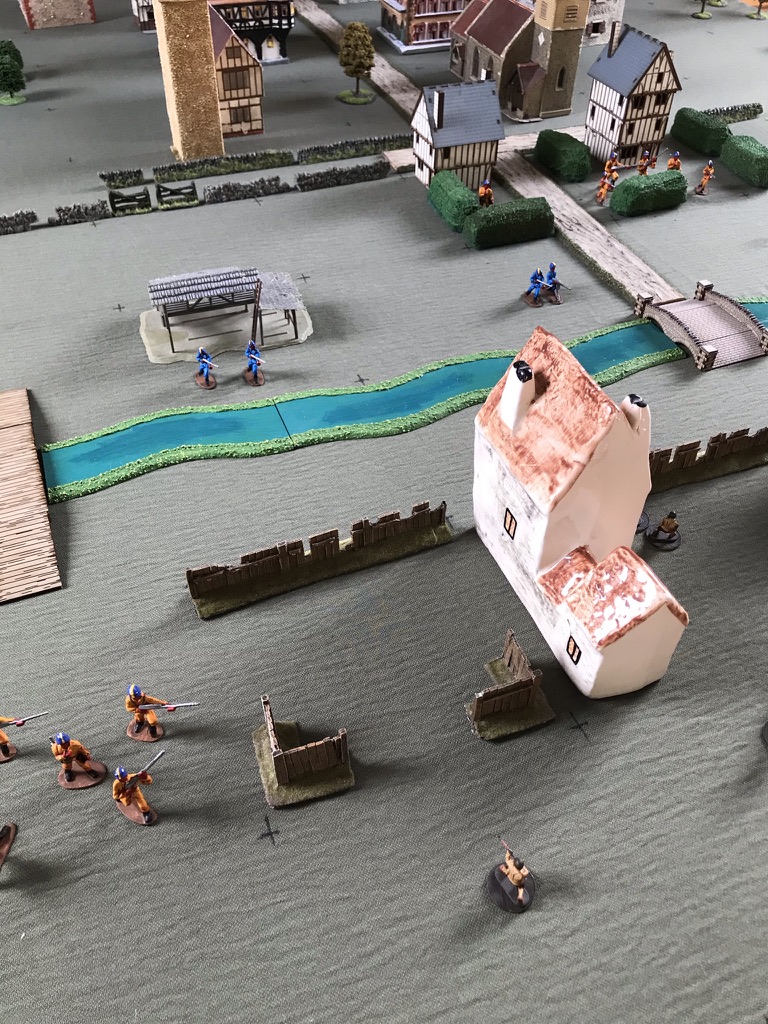
Here is some of the key action.
The base cloth can use its grid but today I am using Neil Thomas rules with measured distances Gombardians enter the town The walled orchard – soon to be the centre of attention In the distance an old sawmill nestles beneath the hillThe gombardians venture cautiously through the townThe Gombardians enter the orchardUnknown to them the Corinovans had entered the orchard at the same time in some strength, fighting eruptsThe gombardians already had one of the three objectives- the townMore gombardians pass through the town while the Corinovans have already taken the third objective – the old sawmill. Both sides have to secure the orchard to meet their orders
The action now centres on the walled orchard
The gombardians are beginning to wear down the Corinovans in the orchardThe Corinovans launch an attack past the orchardMore gombardians arriving through the town A defiant single soldier from the first gombardian assault hangs on frustrating the Corinovans The newly arrived gombardians decimate the Corinovans attacking past the orchardThe Corinovans benefit from some excellent barrage though, in turn decimating the gombardians
The battle moves toward a conclusion
The gombardians are now driven back to the town areaA few Corinovans hold the orchard and so have secured the “two objectives” orders. The gombardians have failed and decide to withdraw leaving the town in the possession of the Corinovans.
The Gombardians had arrived with armour which fits the scenario of a fluid front in the campaign situation. But they did not have enough infantry to take on the Corinovans in the congested orchard area.
The army lists therefore helped create an asymmetric game and the armour heavy force on this occasion lost.
September is a busy month for battle anniversaries in Yorkshire not least in 1066.
On the 20th the Vikings of King Harald defeated the Saxons of Earls Edwin and Morcar at Germany Beck in what is now Fulford. There are not many references to this battle – given that two climatic battles followed, its understandable.
The battle was according to records fought near where the beck joins a sharp turn in the river Ouse.
Crucially the defeated Saxons made good their escape as a rising tide flooded the beck. This meant they could fight another day.
There is a tapestry of the Fulford battle displayed at various locations over the years since it was made in 2012 after ten years effort!
On the 25th September the Saxons under King Harold of England defeated Harald and the Viking host at Stamford Bridge.
It was the end of the Scandinavian Viking threat after hundreds of years of invasion.
A tapestry of the Stamford Bridge battle can be seen in the old railway station at Stamford Bridge.
It was another Viking Scion – the Norsemen who took land in the Carolingian Empire and called it Normandy – who a few generations later then defeated the English in turn at Hastings.
It can be argued that without Fulford and Stamford Bridge there would have been no Hastings and maybe a different war between Harold and William might have played out.
So maybe instead of waiting for yet another Norman invasion (the bayeaux tapestry is en route to the UK) you could visit these other tapestries when they are on show instead or as well as.
People remember William for what followed yet Harold had marched 500 miles with his household troops and won a great victory putting together two separate regional armies before arriving at Hastings: William fought an outstanding adversary.
Back in 2020 I put together some shield wall armies and had some fun trying out various rules.
The thing about one hour wargames is it’s genuinely “pick up” attraction. If you want to throw dice, move figures and get that war game with a purpose feeling for minimal preparation, then I find it’s a winner.
Yes, the mechanisms are abstract but you have to compromise somewhere and Neil Thomas rules generally offer that blend of compromises I like.
In the first game the Royalists held the hill with some rookie blues and grays in actionThe royalists divide their forces to hold both enemy objectives The royalists include this new blue unitRoyalist artillery hold the town road The royalists are none other than DanesDanish volunteer horse make up the royalist cavalryMore Dane’s this time by HatStrelets Danish Royalist GuardsEverything hung on the defence of the town
Rebel forces enter the fray
A mixed brigade of cavalry The rebels mass their infantry before the town The royalists are caught outThe rebels quickly assault the town The royalists seek to outflank the rebel attackThe rebel cavalry attack the rookie blues royalists
Rebel victory
The rebel attack on the town is overwhelmingThe rebel cavalry destroy the royalist right wing infantry The rebel cavalry move on the second objective – the hillThe royalist defence stiffens around the town The rebel cavalry are destroyed Rebel infantry struggle in the townThe royalist cavalry rush to aid their compatriots in the town but it is too late
So the second battle ends in Royalist defeat. It’s all square and all to play for…..
The royalists needed to escape through the town and up the great road……
Rebels held the river line woods The rebel cavalry brigade – lucky toys and hat miniatures Irregular miniatures garibaldeansMore irregular miniatures garibaldeansStrelets rebel sharpshooters hold the town roadThe royalists pour forwards The royalists choose the remote river crossings on their left wing to make progress The royalists are peppered by the rebel skirmishers The royalists attack the townThe royalist left wing cavalry lead the way The rebels abandon the river line The royalists begin to make progress The rebel cavalry are swept awayThe rebels are fleeing pell mell Some royalists race up the great road The royalist cavalry take a beating getting to close to formed infantry The royalist cavalry break The last few royalist units must make good their escape up the great roadAgain the rebel infantry shoot well The last royalist infantry are driven away
And so victory to the rebels in the action and also the short campaign.
Today of course saw the end of 3 days of fighting at Gettysburg – the great Union victory which along with the capture of Vicksburg saw the war finally turn against the Confederate Southern States.
Pauls Bods is a blog that celebrates 1/72 plastic wargames figures. Yet it is so much more because Paul as an ace modeller who can turn even unpromising sculpts into fantastic pieces of the wargamers art.
His head, body and everything else swops are inspiring.
He also has a great sense of humour which appears often in his creations.
The headline image is of my own work prompted by Paul’s bods. Taking a leaf from his book I painted some mini art medieval cavalry that were given a searingly negative plastic soldier review.
Here are some posts highlighting the range of his work.
I was back at Recon in Pudsey for what is the year end show for me.
First a massive hats off to the Pit Gaming Shop who stepped in after last years event proved to be the last that Wakefield Gamers were able to host. https://thepitgamingshop.co.uk/
I like Recon – it is a good regional show and has that blend of traders, games to see, games to play and a bring and buy. The venue – Pudsey Civic Hall is equipped for such events so you get a nice bar and seating area and plenty of space to circulate.
Wintry but bright and sunny – the civic hall has good lighting unlike Fiasco venue in Leeds
I was late arriving this year and then played a game straight away, then discovered the bring and buy had been huge but also plundered very very quickly.
The Ottoman Turks defend a hill against impetuous Crusaders
I played two games at the Lance and Longbow Society participation table. First up I took the Crusader Centre for a Nicopolis 1396 era encounter. I quickly advanced and was promptly decimated by the defending turks led by Bob.
The crusader centre looked suitably heavy
In the second game I took a flank of the turkish army and got badly beaten up by the crusaders led by Andy.
Second game flank force – mainly bow although they did okSecond games ends abruptly when the Porte is killed! on first contact! The dreaded dice throw check for leaders in melees…….
Rules were home adapted Lion Rampant and they are fun to play.
The first floor this year contained the very much enlarged bring and buy plus a HOTT competition.
In the main hall were the traders and games. Pit Gaming were located on the large stage – but I failed to snap their offering!
1941 – Mussolini launches his Greek adventure
Attack on Height 518 from the 1941 Italian invasion of Greece caught my eye. Ironically they were using Rapid Fire Rules which I had recently started to look at – I had got a free copy of the “reloaded” booklet somewhere last year and became interested in the original ruleset. Then I passed up a secondhand copy at battleground https://wordpress.com/post/thewargamingerratic.home.blog/7155
Anyway the guy hosting gave me a lot of his time to chat about the game which I appreciated, and is one of the benefits of a demonstration game – although this was actually a game being fought by him and two other gamers. So hats off to him.
tankettes are a feature of early war combat as well as towed artillery/anti tank guns. scale was 1/72.
Hill 518 was a few metres lower after this battle simply because the Italians deluged the location with so much bombardment – neatly illustrated in the game by the shellholes and destroyed trees
Immaculate model aircraft – 1/72 does give you unlimited airpower of course
Blotz is a trader, they had some very interesting buildings on show. I liked their offerings.
Actual Size Miniatures had some interesting boats and just in the distance an impressive range of 28mm mid 19th century guns
This Sci Fi dropship I also liked along with a nicely detailed RPG gaming set up for a control centre building
Another Sci Fi game attracted me. This time the precise and colourful hexes drew you in.
What a pirate also looked engaging.
What a tanker in 15mm? was on offer
In 15mm? again were two Napoleonic games by Central London Wargames Club.
Undaunted – another grid game looked intriguing
Blucher Rules in 6mm was being fought on stage!
Archduke John and eugene peruse their options from the erie ………
All in all I had a very enjoyable day.
Once again thanks to Pit Gaming, I hope Recon is back in 2024.
I had previously encountered Bob’s grid rules in the History of Wargaming publication of Joe Morschausers early 1960’s book on wargames. Although a contemporary of Donald Featherstone, Joe’s rules better resonate with 21st century rulesets in my view.
This purchase collided with my stop-start diversion into “pound store warriors” and ultimately a bit of sci fi gaming. Man of Tin had been instrumental in starting me to look at these figures that did not even look like green army men. It is a measure of my lack of progress (the figures arrived during lockdown……) that my recent first game only fielded half a “sci-fi” set up. Some WW2 Russians and Americans filled in as opponents and neatly delivered the unexpected scenario and indeed a back story into the bargain.
Captain Parker of the US 21st Army held the edge of Exetown along the river Exe. In the town were the Russian 33rd Army forces led by Senior Lieutenant Yashin.
The front such that it was involved nothing so much as a watching brief. There had been “no action” when the two forces had closed up to each other – just looking and with even the odd conversation exchanged across the river.
When the Russians were surprised by the Aliens in Exetown all that changed, Yashins troops just ran hell for leather at the Americans who fortunately hesitated to fire long enough to spot the new enemy beyond. Somehow the Americans could sense that the Russians were not trying on a surprise attack – they were genuinely running for their lives.
So the scenario made itself – The renewed Allies have to fight off the Aliens and at least hold the river line. The Aliens have to drive the humanoids off the table.
Rules
Rules used were The Portable Wargame by Bob Cordery. I used the solo option.
Only rule change of note was to assign the “alien blasters” 5 dice per firing round. So they were like super heavy machine guns in effect. But they had only a grid range of 2 instead of 3.
I also permitted some unit size differences. The Aliens had fewer units but 4 or more figures per unit. The Allies were basically 3 man units.
In the event the Allies had a higher break point for exhaustion yet got there quicker as their units were destroyed more easily.
I had just played a game so had the table set up plus some figures that in turn fed the scenario and storyline. My grid was 8 long x 12 wide, using 6 inch (150mm) grids. Not very portable!
Opposing Forces
Allies (Exhaustion Point is at 6 units left)
American (First Lieutenant Osteen)
CO unit 3 figures
rifle squad 3 figures each
rifle squad
rifle squad
rifle squad
rifle squad
Russian (Senior Lieutenant Yashin)
CO unit 2 figures
Machine gun unit 2 figures
machine gun unit 2 figures
rifle squad
assault squad
rifle squad
Aliens (Exhaustion Point is at 3 units left)
Blue Troop (Colonel Blue)
Colonel Blue and Heavy Machine Gun 2 figures
Blaster unit A1 3 figures (one figure armed with what looks like a bazooka)
Blaster unit A2 3 figures (one figure armed with what looks like a bazooka)
Yellow Troop (Colonel Yellow)
Colonel Yellow unit
Attack unit A3
Attack unit A4
What happened?
First up – the Allies (US/Russian) threw high in the first 6 moves for “first to move”. The Aliens took heavier losses as they advanced, then at close range they began to wear down the Allies. Exhausted the Allies had to hold their line and so my scenario backstory kicked in and the allies retired rather than simply continuing to hold under the rules.
So a new ruleset, some abandoned figures and also a new grid surface** combined with a storyline from nowhere, resulted in an excellent game.
The game played out in 12 moves and took half a day as I left it quite a few times to do some real life activity! So I guess maybe it took about 1 hour to 1h30m to play the 12 turns including set up and take down. Remember I already had the table set and in fact the US/Russian troops were from that game.
I suspect that this sort of game is easily a one hour set up, play and put away operation.
Biggest impact for me was the ease of play and how it simply connected with my rather mad scenario. So very high on the Enjoyment scale.
Here are some episodes from the game.
The Russians race across the bridge towards the stunned AmericansAs First Lieutenant Osteen gathered his men Senior Lieutenant Yashin called his men in and sent a squad to the sawmill.Lieutenant Yashin finally gets a sighting on what appear to be different types of enemy foot soldiersA brisk firefight at the edge of town as the Russians retreat across the unfordable river Exe by the main bridgeThe enemy pursue the russian squad to the sawmillOn the right flank the US troops, in the morning sun, began to get a sighting of their opponentsagain what seemed to be a mixture of enemy troops in their bright uniforms loomed into view
The brightly uniformed enemy had been easy targets and the allies gained an early advantage decimating the orange unit that tried to reach the main bridge first – the remnants retreated to the hedged half timbered house where they stayed for the remainder of the battle
The defenders in the sawmill got a shock as the blue unit and orange units combined fire felled many russiansIn the centre the firefight was heating up with one Lieutenant Osteens squad falling victim to the accurate enemy fire. On his right the remaining russian machine gun team continued to stop any enemy advance on the bridge.As Yashin crossed over to the now threatened right flank a US squad took aim at the enemyin the open the allies were decimated – Petrov and Lefebvre fell hereThings were going from bad to worse on the right flankAnd now on the left flank the orange unit stormed over the foot bridgein the centre it was still a stand offYashin managed a counter attack on the right which drove back the blue blaster unit and weakened the orange unit.but the enemy responded in turn and Yashin fellOn the left flank the footbridge looked lost as the US defenders were being overrunbut a heroic effort by the left and centre threw the enemy back, they even silenced one of those dreaded “blasters”only for the enemy to attack again – the last allied squad moving up to the footbridge at that momentThe uneven contest at the footbridge was short and the allies lost and with it their left flank as well
With both flanks destroyed Osteen, Kachalin and the remnants of both Russian and US combat teams retreated from the field.
The Aliens move on the main bridge over the River Exe as Osteen prepares to retreat.
* – tacfos or “the aliens came from outer space!”
**- for this game I used one of my new grid sheets. I have been experimenting with different surfaces when it comes to grid games. Like most Board games, the grid surface is integral to the game. So I have not yet settled on the best grid surface for any one game. Given I have quite a few cloths and boards for my “measured” table top games this should come as no surprise.
The empty field – the trees wonder what will happen next?
The Second battle using my “Buildings Blast” set up saw a mid 19th century action with Austrians and Piedmontese in play. It was a solo play this time.
I used the rules published by John Curry and the “history of wargaming project” with some adaption for solo play.
Using Neil Thomas grading of troops I adjusted the firing and melee rules.
I also used the Roster system unaltered. Infantry got 4 circles and a cross while Artillery got just 2 circles in this game. Essentially in the basic game a hit meant a unit (= 1 base) was destroyed. Roster rules gave units/bases lives in the form of circles and crosses on the roster which you ticked off as they were lost.
The Scenario was that the Austrians were retreating and the force here was ordered to hold the bridge in the town. The crossing was one of only a few that allowed artillery and logistics easy crossing of the river. The Piedmontese advancing from the north west had orders to seize the bridge as quickly as possible.
Forces were randomly assigned using playing card allocations along with a portion of blank entriesUnits deployed in contact and units were recognised as such at about 6 inches – the card only turned on a 2-6 D6. Here the right hand Piedmontese were certain nothing was in front of them – a heart was a dummy card while the left hand unit was not so sure so hesitated (on a d1) with no card turn. The right hand units poured forward towards the “old millhouse” spotting some real Austrian defendersThe lefthand Piedmontese units were suddenly exposed to Austrian infantry fire from a slightly sunken roadon the east side of the main road two piedmontese artillery batteries dropped into action again to be surprised by enemy troops in a slightly sunken and walled road. These were riflemen and on good form – one battery was quickly silencedHowever infantry units (white coated British Legion 1860) quickly drove them awayfierce fire was exchanged between the Bersaglieri and Austrians in the sunken road while Garibaldeans stormed the defended houses at the entrance to the townOn the east side 1859 Piedmontese infantry stormed the defended housesElsewhere Piedmontese forces had pushed on meeting little resistance (= dummy cards) to their front. A lone Austrian Artillery battery on the west side of town faces artillery and some more Bersaglieri Stubborn resistance at the Old Millhouse Finally the sunken road defenders are driven offAnd the west side Austrian defenders give up rather too quicklyexchange of fire results in another Austrian lossEven as west side Austrian defenders gather but………The Piedmontese quickly move towards their target – the river crossing. Another Artillery Battery blocks their wayOn the west side the Austrian defenders put up a good defence and with support nearby………The defended houses at the north end of town finally are overrunThe mill house and its defenders are abandoned by the Austrians who can retreatAustrian artillerists put up a stern defenceCrunch time at the town square as the Austrians are hemmed inThe Bersaglieri try to rush the ArtilleryThe Town centre defence collapses The Bersaglieri inexplicably turned tail on the west side while Lancers arrive to their rear. The British Legion finish off the town centre defenders on the left pictureThe Artillery of Piedmont watch as the last Austrian defenders in the town square are defeatedThe defended westside town square buildings are assaultedin a last desparate throw Austrian Hussars ride up the main street to halt the Piedmontese tide.The Hussars beat off the Lancers but to their rear the Artillerists are finally beaten while the East side is alive with Piedmontese. Everywhere Austrian defenders have melted away into the fields or across the bridge.The Hussars beat a retreat across the bridge bringing to an end the defence of the bridgePiedmontese Lancers cautiously follow.
The defended buildings were randomly determined and contained one unit each – no other benefits were given the building defenders. So they simply were a delaying factor assisting the mobile defenders fighting outside.
The scenario I played used a 25 step countdown and 1xd6 reduction per turn. The Austrians had to retire at countdown 16 from the edge of town, 7 – the town square and at 0 abandon the north river bank. Victory to Piedmont required they took the bridge before the countdown reached 0.
The game turns 1 to 3 were spent on the edge of town, then turns 4, 5 and 6 fighting over the town square. Turn 7 forced the Austrians back to the north bank but here ended the action as the Austrians actually ran out of defenders.
So the victorious Piedmontese captured the bridge intact and within the timescale set. There were no Austrian Engineers with a lit fuse to spoil their day! Anyway the Austrians would be back soon enough they thought…. Do I hear a Radetzky March in the distance?
For a very old ruleset Joe Morschauser’s rules played easy as I guess you would expect. With the tweaks to aid solo play they actually played very well.
I had bought the rule book for the Grid rules both the originals and Bob Cordery’s modernised version – Bob co edited the book with John Curry.
So this was a pleasant surprise to find a very playable set of “measurement based” rules into the bargain.
Having played out Neil Thomas’s minigame scenario I was left wondering if the unlikely Danish victory was just that.
In the first battle with this scenario the Austrians attacked straight up the road that was to be cleared yet they simply ran out of time.
This second battle was again run exactly as per the basic scenario suggestion by Neil Thomas.
same board size
same terrain
same units
units deployed at the start in the same way as the first battle except as below
At least the Danish Artillery put in an appearance.
The Austrian units arrived at the same point on the road but moved differently.
The Hussars charged up the road as before……..
The Hussars take a critical 4 hits from musketry and fail the required morale test – losing 2 bases at a stroke while the Austrian Artillery can’t seem to get the range right.The Danish Artillery push up the roadThe Elite Jaegar Infantry square up to the Danish Infantry (1866 style on the left and 1850 on the right!) Or Irregular Metals versus Hat Plastics – both are welcome in 20-25mm scaleThe 1866 dark blue caps drew their first melee with the Elite Jaegar (forcing their retreat) so had to advance in column to regain position in their own turn, meanwhile the artillery deploy. The 1850 Sky Blue caps decide to advance having suffered little damage from the austrian artilleryMove 5 and the 1866 Dark Blue caps have been driven off while a devastating artillery barrage has all but destroyed the 1850 sky blue caps. The Danish artillery made little impression on the remaining Elite Jaegar. Things are going wrong for the Danish With low morale to start with the Danish artillery fleeThe 1848 Danish Redcoats square up to the next assault by the Austrian Infantry. The Austrian Artillery fire blanks again but the 1850 Sky blue caps can only watch the austrian infantry charge past – they cannot attack unless they have more bases than the defender whereas the Austrians in this scenario get to attack anything anytime for the loss of their firing line capability. In the bottom right the Austrian skirmishers have sneaked round through the wood.Move 7 and the Austrians have been pummelled. Both Austrian Infantry columns have been shot away by the Danish defenders. The Austrian Artillery are still firing blanks while the Austrian Skirmishers are getting some hits on the Danish rear. Another assault and the 1848 Red coats have gone while the last danish infantry unit is taking hits from the skirmishers on their flankFinally the Austrian artillery are getting going – they blast away the last danish infantry alongside the skirmishers and remaining Austrain Infantry unit.Move 10 arrives and the Austrians have achieved their objective – time for some Radetsky Marching music………
A close run to the end but this time the expected outcome.
The Skirmishers had more effect by circling the eastern flank of the Danish. The dice throwing favoured the Austrians at critical moments – triggering morale collapse amongst the danish. As the danes were mainly levy this was to be expected and again its was more a case of their saving morale throws that meant the action went to 9 of the 10 permitted moves.
Neil Thomas offered this battle as an example of a small action using his mini battle setting. His rules assumed a 2’x 2′ or 600mm square. So thats board game sized.
His rules say you do not need to rebase. Always a positive these days.
I have a mixture of units – a result of my lock down era painting activity tending to paint what I fancied than worrying about actual armies!
The action is straightforward – the Danes are retreating and use a bottleneck on the key route north towards Jutland. The Danish rearguard are buying time for their main forces to retreat to their last defence line in Schlieswig – the Duppel fortifications.
suggested set up from book – copyright Neil Thomas.
Their opponent was the geographic “Empire” effectively still the Holy Roman Empire but now really the German Confederation post Waterloo with Austrian and Prussian interference/support.
In this case the Austrians were attacking the rearguard.
The Danish Rearguard
Infantry Unit A
Infantry Unit B
Infantry Unit C
Infantry Unit D
Artillery Battery E
The Artillery was Bronze Rifled while the Infantry were all Levy in loose order armed with rifled muskets.
The Danish troops are all deployed in the bottleneck.
The Austrians Attack starting at the river line comprise
9th Hussars – Average
Artillery – 2 batteries both with bronze rifled cannon
Their main forces arrive from move 1 on the main road
Jaeger Infantry unit – elite, rifled musket, loose order
Skirmishers – elite, rifled musket
On moves 2 & 3 the following units arrive via the same southern road access
Infantry Unit 6 – move 2 – average, rifled musket, loose order
Infantry Unit 7 – move 3 – average, rifled musket, loose order
Infantry Unit 8 – move 3 – average, rifled musket, loose order
Battle Narrative
With the objective to clear all danish forces from the road (at least 12cm from the road) essentially the Austrians simply went through the Front Door.
They had 10 moves to do it in with a win lose outcome and no draw.
Special Rules as suggested by Neil Thomas were used
Colonel Muller personal leadership of the Danes means any one unit at the start of any turn can be elite.
The Danish Artillery were quite ineffectual so get half the nortmal values in defence and attack
The Austrians fresh from rough handling by the French in 1859 adopt bayonet charges in preference to distance firefights. They stay in column the whole game and can charge without restriction (no unit base quantity advantage required)
Some shots of the action
Danish defence face the Austrian advance guard
The stream has no effect on movement except Artillery must use the bridge. The town can be accessed only by Infantry. The lake is impassable to all troops while infantry can move through the wood.
The Austrian battery drops into action as the 9th Hussars begin their fateful attack
The Danish front line are in line and not moving, supported by more mobile Column units behind. If infantry want to move in Neil Thomas’ rules they must be in column.
The 9th Hussars much reduced by musket fire charge home. The Austrian Skirmishers have made little impact but the Artillery have seriously depleted the Danish infantry to their front.The Danish front line has been blown away by the Austrian Artillery and the Elite Jaeger unit
Note in this game I chose not to field the woeful Danish Artillery ( i.e. I forgot to place them on the board!)
The second line of Danish infantry eventually destroy the Elite JaegerBut at the cost of another Danish unit when more Austrians charge homeIts the end of move 10 and the final Danish defence was about to be overrun by the Austrians
An Austrian victory seemed to confirm Neil Thomas’ view that history repeats itself with his suggested set up. In his notes he offers several options to up the defence capability of the Danes.
In this case a very narrow Danish Victory suggests a well thought out scenario by Neil Thomas. Generally I have found Neil Thomas scenarios are fun to play because they tend to lead to a lot of action and no quick outcomes. So although asymmetrical in set up they seem to be well balanced games.
Footnote:
The Figures are Irregular Miniatures and Hat for the Danish
In this picture top right clockwise – 1848 Danish Infantry, 1849 Danish Infantry then 1864 Danish and finally some rogue 1860 Piedmontese.The Austrians are top left clockwise Hat Grenzers – being Skirmishers then Minifigs (1970’s) French Hussars posing as the 9th, Waterloo1815 1859 Austrian Artillery and finally the elite Jaeger are WW1 Belgians painted as Neapolitan 1859 Cracciatori Light Infantry
Elsewhere in the photographs the regular Austrian Infantry on show are Waterloo1815 1859 Austrians in their white coats – in 1864 it was bitter winter weather so soldiers actually fought in their greatcoats.
Neil Thomas offers the mini game as a quick affair and it certainly was. Lots of enjoyment from a two foot square, scenery, dice and some figures.
Colonel Ansaldi was fretting – having gained so much from the raid on Austrian storehouses he was worried that none of his scouts had been able to stay in touch with the Imperial troops known to be in the area. What he would give for a decent squadron of guides…….
Meanwhile not far away Colonel Albrecht considered the recent reports, nearby Austrian Hussars were watering their mounts. They had ridden hard to report finding the raiders. Now we shall obtain some satisfaction from those Sardinians thought the Colonel……..
Colonel Ansaldi cursed as the nearby hill was clearly occupied by troops – and they were not friendly – Austrians! To arms, to arms, went up the shout.
Looking South the Austrians were well placed on the hillThe Scenario 25 straight from One Hour WargamesThe random force generator gave Blue (Sardinians) only infantry while Red (Austrians) gained some Cavalry to support their infantry
The Sardinian force consisted of 3 infantry units and 1 skirmisher unit. The Skirmisher unit headed for the Austrians on the hill
The Scenario Set up required one unit of Austrians on the table before the Sardinians arrived from the south west heading north. The Zone 1 was the required deployment area for the one Austrian unit, in this case some skirmishers (note I used 4 bases per unit for both line and skirmisher foot troops)
Already a brisk firefight had broken out between the two sides.
There was no time time to lose and anyway there was only one direction the Sardinians could take and that was straight past those Austrians on the hill.
Despite orders there was hesitancy on the part of the Sardinians who still traded fire with the lone Austrian unit. Now other forces appeared – infantry and cavalry!
Cavalry and Infantry appeared from the north on the main road the Sardinians had avoided. (the rules included random arrival of reinforcements)Things are not looking good for the Sardinians
Panic breaks out in the Sardinian ranks. I used the solo rules chance table which offered confusion, ammunition shortages, demoralisation, initiative, rallying and enemy panic.
the skirmisher firefight was prolongedsome good luck (chance) means the Sardinians move swiftly past the hill.The Austrian Hussars close in on the Milan GuardIt looks like the Sardinians are moving clear.
The Sardinians continue to push on with their escape.
The Hussars clash with the Milan GuardIt all hinges on whether the Hussars can hold up the escaping Sardinians
The Austrians continue to press with a further charge by the Austrian cavalry despite them being demoralised.
The Sardinian firing slackens off – Colonel Ansaldi sends a runner to find out what is going on. (chance intervenes)
Suddenly there are Austrians everywhereMore Austrians troops arrive on the Main Road from the South. Aiming for the road was now a problem for the SardiniansMore chance favours the Austrians whose Infantry march rapidly up the road while the Cavalry catch the Sardinian SkirmishersThings are looking bleak for Colonel Ansaldi as the Milan Guard break before the Hussars repeated attacks
But finally the Austrian cavalry also retreat as things are just too hot. Meanwhile the Austrian fire is good and effective and they continue to press the Sardinians.
The Hussars break while the Austrian Infantry close in on the remaining two Sardinian unitsThe Sardinians must exit the road northwards with two units to secure victory. Despite the Piedmontese Infantry driving off the Hussars, the Sardinian Skirmishers fail to reach the safety of the woods before being crushed by the Austrian Cavalry
Now on the point of victory the Austrians seem confused. Yet with a final effort they corner the Sardinians.
The Piedmont Infantry leave the field while the second Milan Guard unit is decimated by the pursuing Austrians.Its all over as Blue force Sardinians fail in their mission to exit two units northwards on the main road.
Colonel Albrecht curses his cavalry – they are blown and clearly fit for nothing as some of the Sardinians are still making good their escape. He calls for some scouts.
Later Colonel Ansaldi manages to regroup his shattered forces and with poor pursuit from the Austrians is able to restart his march back to Sardinian lines by a new route. Later many more of his dispersed men come in.
The solo rules regarding random confusion, demoralisation, panic and ammunition shortage added that “unknown/unexpected” element to the game that a real opponent usually brings. The interventions were not gigantic but did chip away at each forces potential.
Early on the Sardinians were stalled, then gained initiative before the Austrians finally gained lots of initiative to enable them to hem in the Sardinians even with a hesitation at the end.
Next up the Sardinians, having continued their march, encounter more Austrian forces intent on preventing their escape.