It’s not often you get a major historical movie these days and even less by a mainstream producer. So Ridley Scotts “Napoleon” is a good excuse to get some figures on the pedestal.
First up is the man himself – Napoleon – as imagined back in the early 1970’s by Miniature Figurines (the Warlord of their day).
Next up is one of a kind for me…..
*the painting of the same name by edouard detaille hangs in the New South Wales art gallery showing the charge of the 4th hussars at Friedland 1807.
I had previously encountered Bob’s grid rules in the History of Wargaming publication of Joe Morschausers early 1960’s book on wargames. Although a contemporary of Donald Featherstone, Joe’s rules better resonate with 21st century rulesets in my view.
This purchase collided with my stop-start diversion into “pound store warriors” and ultimately a bit of sci fi gaming. Man of Tin had been instrumental in starting me to look at these figures that did not even look like green army men. It is a measure of my lack of progress (the figures arrived during lockdown……) that my recent first game only fielded half a “sci-fi” set up. Some WW2 Russians and Americans filled in as opponents and neatly delivered the unexpected scenario and indeed a back story into the bargain.
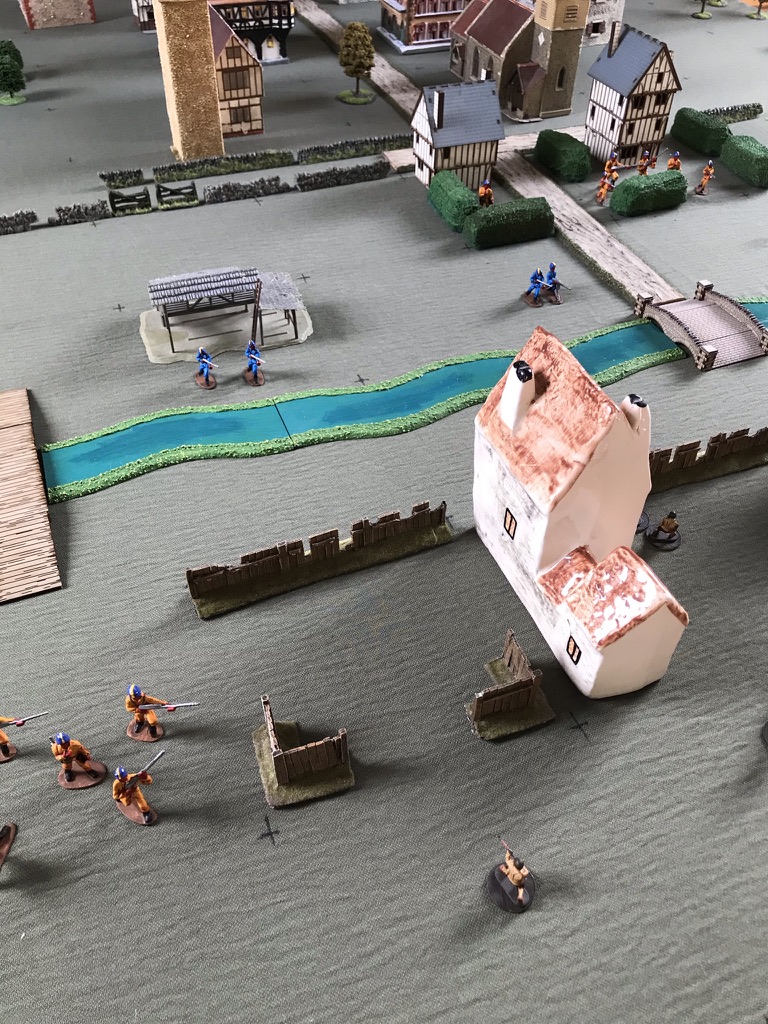
Captain Parker of the US 21st Army held the edge of Exetown along the river Exe. In the town were the Russian 33rd Army forces led by Senior Lieutenant Yashin.
The front such that it was involved nothing so much as a watching brief. There had been “no action” when the two forces had closed up to each other – just looking and with even the odd conversation exchanged across the river.
When the Russians were surprised by the Aliens in Exetown all that changed, Yashins troops just ran hell for leather at the Americans who fortunately hesitated to fire long enough to spot the new enemy beyond. Somehow the Americans could sense that the Russians were not trying on a surprise attack – they were genuinely running for their lives.
So the scenario made itself – The renewed Allies have to fight off the Aliens and at least hold the river line. The Aliens have to drive the humanoids off the table.
Rules
Rules used were The Portable Wargame by Bob Cordery. I used the solo option.
Only rule change of note was to assign the “alien blasters” 5 dice per firing round. So they were like super heavy machine guns in effect. But they had only a grid range of 2 instead of 3.
I also permitted some unit size differences. The Aliens had fewer units but 4 or more figures per unit. The Allies were basically 3 man units.
In the event the Allies had a higher break point for exhaustion yet got there quicker as their units were destroyed more easily.
I had just played a game so had the table set up plus some figures that in turn fed the scenario and storyline. My grid was 8 long x 12 wide, using 6 inch (150mm) grids. Not very portable!
Opposing Forces
Allies (Exhaustion Point is at 6 units left)
American (First Lieutenant Osteen)
CO unit 3 figures
rifle squad 3 figures each
rifle squad
rifle squad
rifle squad
rifle squad
Russian (Senior Lieutenant Yashin)
CO unit 2 figures
Machine gun unit 2 figures
machine gun unit 2 figures
rifle squad
assault squad
rifle squad
Aliens (Exhaustion Point is at 3 units left)
Blue Troop (Colonel Blue)
Colonel Blue and Heavy Machine Gun 2 figures
Blaster unit A1 3 figures (one figure armed with what looks like a bazooka)
Blaster unit A2 3 figures (one figure armed with what looks like a bazooka)
Yellow Troop (Colonel Yellow)
Colonel Yellow unit
Attack unit A3
Attack unit A4
What happened?
First up – the Allies (US/Russian) threw high in the first 6 moves for “first to move”. The Aliens took heavier losses as they advanced, then at close range they began to wear down the Allies. Exhausted the Allies had to hold their line and so my scenario backstory kicked in and the allies retired rather than simply continuing to hold under the rules.
So a new ruleset, some abandoned figures and also a new grid surface** combined with a storyline from nowhere, resulted in an excellent game.
The game played out in 12 moves and took half a day as I left it quite a few times to do some real life activity! So I guess maybe it took about 1 hour to 1h30m to play the 12 turns including set up and take down. Remember I already had the table set and in fact the US/Russian troops were from that game.
I suspect that this sort of game is easily a one hour set up, play and put away operation.
Biggest impact for me was the ease of play and how it simply connected with my rather mad scenario. So very high on the Enjoyment scale.
Here are some episodes from the game.
The Russians race across the bridge towards the stunned AmericansAs First Lieutenant Osteen gathered his men Senior Lieutenant Yashin called his men in and sent a squad to the sawmill.Lieutenant Yashin finally gets a sighting on what appear to be different types of enemy foot soldiersA brisk firefight at the edge of town as the Russians retreat across the unfordable river Exe by the main bridgeThe enemy pursue the russian squad to the sawmillOn the right flank the US troops, in the morning sun, began to get a sighting of their opponentsagain what seemed to be a mixture of enemy troops in their bright uniforms loomed into view
The brightly uniformed enemy had been easy targets and the allies gained an early advantage decimating the orange unit that tried to reach the main bridge first – the remnants retreated to the hedged half timbered house where they stayed for the remainder of the battle
The defenders in the sawmill got a shock as the blue unit and orange units combined fire felled many russiansIn the centre the firefight was heating up with one Lieutenant Osteens squad falling victim to the accurate enemy fire. On his right the remaining russian machine gun team continued to stop any enemy advance on the bridge.As Yashin crossed over to the now threatened right flank a US squad took aim at the enemyin the open the allies were decimated – Petrov and Lefebvre fell hereThings were going from bad to worse on the right flankAnd now on the left flank the orange unit stormed over the foot bridgein the centre it was still a stand offYashin managed a counter attack on the right which drove back the blue blaster unit and weakened the orange unit.but the enemy responded in turn and Yashin fellOn the left flank the footbridge looked lost as the US defenders were being overrunbut a heroic effort by the left and centre threw the enemy back, they even silenced one of those dreaded “blasters”only for the enemy to attack again – the last allied squad moving up to the footbridge at that momentThe uneven contest at the footbridge was short and the allies lost and with it their left flank as well
With both flanks destroyed Osteen, Kachalin and the remnants of both Russian and US combat teams retreated from the field.
The Aliens move on the main bridge over the River Exe as Osteen prepares to retreat.
* – tacfos or “the aliens came from outer space!”
**- for this game I used one of my new grid sheets. I have been experimenting with different surfaces when it comes to grid games. Like most Board games, the grid surface is integral to the game. So I have not yet settled on the best grid surface for any one game. Given I have quite a few cloths and boards for my “measured” table top games this should come as no surprise.
The empty field – the trees wonder what will happen next?
In part 1 we encountered 1940’s action between Americans and Russians on some unknown wargames table………………..
Osteen and Yashin briefly discussed the situation….. “who the hell are those guys Yashin?” “Lieutenant Osteen your guess is as good as mine – they appeared from nowhere and started shooting”……..
Just then a bloompf – “what the………..Drabowsky report!” Luis Drabowsky scrambled across to his Lieutenant, right now he could not get used to rubbing shoulders with these Rushkies: OK so they had fought the common enemy but now it was 1946 and a deteriorating stand off existed between the former allies.
Meanwhile Senior Lieutenant Gregori Yashin rushed over to one of his squads led by Sergei Petrov. “What was that? that noise Petrov?” “Senior Lieutenant the enemy have some sort of energy weapon – there was muzzle flash and then an unusual airburst – our men were dazed but that is all…..” Yashin nodded then ordered Petrov to organise the right flank with his new american comrades.
“We will make good communists of you Johncheeses yet” laughed Junior Sergeant Eduard Kachalin – Sergeant Wes Lefebvre was about to respond when fire erupted all along the line, “Kachalin, it looks like we will have to delay our discussion!”. The two men scuttled off to organise their squads.
The fighting was quick and one sided, the renewed allies withdrew from the edge of town as their new common enemy forged towards them.
As Osteen withdrew in the centre he met Kachalin, one of the good english speakers amongst the Russians………”Hey Kachalin where is Yashin?”, ” Kachalin between gasps “Lieutenant, he fell, they got him,,,,, he stood no chance” – Osteen – “damn, damn these monsters……..”
Captain Parker repeated his statement again “yes sir we have been attacked by a superior enemy – we have retreated from sector 6, repeat we have retreated from sector 6…………the russians? the russians are with us sir………….I can explain sir, no sir they fought with us, sir, sir……..”. “Yes Lieutenant Osteen is one of my best men – solid and dependable………..yes sir I know this hard to take………….no this is not, I repeat not a russian trick………”
“Damn it Barnes where is that link to Osteen?” Sergeant Barnes groaned – “nothing sir, nought, zilch……”
The noise of guns and other weapons invaded Captain Frank Parker’s mind – then he realised they were for real.
“Roseborough call up the jeeps we are moving, Barnes radio we are pulling back to sector Y zone 3A”
Just then a massive noise erupted near Parker/Roseborough and Barnes.
They rose dazed but uninjured. Nearby others were not so lucky.
Later in sector Y zone 3A Parker listened …..”so you see sir its an ASF situation with probably a RIM aspect……….”, “cut the crap Kouffax – give it to me in words……” Kouffax took a deep breath and continued ” Well sir it looks like an ASFI, I mean an Any Scale Figure incursion and involves Rogue Injection Moulded forces…..” meaning what exactly?” – Parker being now completed exhausted by the whole mess. Joe Kouffax took another breath, “well sir we have contacted OTO…” stop stop! “what/who is OTO” – Parker was exasperated. “well sir he is the One to One scale operator, we think there has been a WTMU, I mean a wargames table mix up”. Parker was lost for words as the line went dead………..
Barnes was incredulous “so Sir we were fighting the wrong forces? they were in the wrong place – sorta like a time travel event? and this OTO guy, he sorted it all out……….”
Parker gazed at the sky “…….Barnes……….yes, yes for gods sake if you like………anyway it is all SNAFU”. “Barnes get me Osteen on the line I want to know he got those new Russian friends off his back, that they are on their side of the line….”
With the Painting Pedestal hiatus showing no sign of being over its back to some promised 19th century troops for some light relief.
Here are some new figures I painted up to be part of my German Confederation force of 1848/49. They represent the Lippe contingent. I used Hat ww1 infantry and just tried a paint job alteration – clearly the short rifle is an obvious period error while the pickelhaube is the later squashed variety.
my standard 40mm square bases of 3 figures arranged for a Piquet Field of Battle Battalion
I am quite pleased with the paint job especially how the pickelhaube does not appear so squashed when highlighted with the brass finish spike and reinforcing strips.
I have gone for a grass finish on these bases – I used a fine sawdust brand – Javis I think?Bases still get the games workshop pva/birdgrit solution and then 3 layer brown, ochre and yellow/white paint job.I like the poses although again the revolver armed officer is a bit premature for 1848/49 period.The confederation carried tricolour rosettes which i have enlarged so they can be seen and I have just painted over the jack boot which is never shown at this time. Again at wargame distance you don’t really notice.Alongside my Parma infantry of 1851 the helmet shape is noticeable. Yet again at wargame distance its all fine.The Pickelhaube was quite the fashion mid century – Russians and of course the British all followed the Prussian style just like the Duchy of Parma.All I need now is a whole rake of these from the different states……………..
Right now Hat seem to have ceased/reduced production and whether these figures will reappear is anyones guess
Next on the Painting Pedestal statistically should be more mid 19th century figures but right now it’s back to the future as they say – hang on to your hats 23x part 2 beckons.
Lieutenant Osteen’s voice crackled over the airwaves.”……the ruskies – their rushing us…..”/ Captain Parker cut in “kill them Lieutenant, take them out – thats an order” / Lt. Osteen “……but sir their not even trying to fight their just crazy running at us…….”/ Cpt. Parker “it is a Ruskie rooze……..take ’em out – over and out!”.
“Damn it, Barnes what the hell is up with Osteen?”. Sergeant Barnes groaned, Osteen as usual had to complicate matters – shoot first ask questions later was the Barnes approach – it had kept him alive after all…..
Capt. Parker stomped out of the command tent.
Lieutenant Osteen’s voice cackled again on the radio, “Lt. Osteen reporting – russian troops have surrendered to us, repeat russian troops have surrendered to us…….”. “What the……” Sgt.Barnes began before Lt Osteen again “We are under attack – who the hell are these Yashin……..” the line fell dead but not before Yashin could be heard by Barnes responding………….. “Captain, Captain, Captaiiiiiiiinnnn Parker” – Barnes raced out the tent.
Meanwhile on the front line………
What is going on? Its only a painting pedestal after all……….
The tanks in use were the usual suspects, however the C19th game included several units which were converted – head swops or using different paint jobs.
Here are some of the units that were in play.
For 1859 Piedmontese I basically used these Hat ACW Infantry Firing, a paint job adaption. Crucially the kepi gradually replaced the tapered stove pipe in Piedmont/Sardinian Armies between 1848 and 1870 so ACW sets are a good source for these forces and require little adaption. And at a squint can cover Danish troops in their German wars 1848-1864, but thats another story.Hat Napoleonic Russian Militia were simply painted as Milan Civil Guard. A couple of figures had flat hats created to replace their busby like hats. The Flag is a home made effort using artists acrylic pens on dried out glasses cleaner material. Yep some “value” glasses cleaner wipes don’t have a long shelf life – and I have packets of them! However oddly they are a bit like tough crepe paper so of course ended up in the hobby spares box.
The biggest conversion on show was my 1849 Piedmontese or Sardinians – rapidly expanded infantry were sent into battle with simple frockcoats and larger red tapered shakoes. (the regulars had double breasted frockcoats and smaller tapered stove pipe hats). I used Hat marching ACW union troops and took the Shakoes and back packs from Hat Dutch Napoleonic Infantry. These lancers are circa early 1970’s Minifigs – conversion is in my “minds eye” to some Piedmont Lancers who of course did not wear green! or had combs on the helmets, red on their pennants……oh well its amazing what you can forgive.
These figures are Strelets 1877 Russian Artillery posing as french artillery circa 1850. The “piece” is I think a Zvezda item from their Great Northern Wars rangeThese trusty Hussars date from the 1970’s and are French Napoleonic. They regularly turn up as Austrian Hussars in my games.The river is from S&A Scenics and the bridge is a laser wood cut kit from 4ground
My last unit on show is the 1860 British Legion – that sailed to Sicily with Garibaldi’s Mediterranean Invasion Army. The figures are Strelets Russian Turkish war of 1877 Russians in summer uniform.
Even in these days of a truly massive games market the more obscure historical events being modelled benefit from some conversion and adaption in order to capture the flavour of uniforms.
Well David Stones’ challenge finally got this piece of scenery done. Credit really goes to john@justneedsvarnish who alerted me to this challenge plus Frank tank rants who suggested that posting about fabulous pro-cycling scenery ought to translate into building some stuff!
Either way I finally completed this 2021 model. Better late than never as the saying goes.
Final touches were a ochre (rowney acrylic tube) whitened (MP Paints) dry brush to suggest some sun bleaching plus a bit of black (MP Paints) in the mix to dry brush the base area suggesting dirt.
Then some gamers grass (2mm summer green tufts) and an ancient pot of games workshop grit to finish the base.
Of course the unbelievably extravagant archway and door are round the back!
Thanks to John, Frank and Dave, I now have a new piece of terrain to use and enjoy.
out of the archive for john just needs varnish, looks like knife work and maybe not cutting before stripping outer card layers.
For those who made it this far…………….
Leaning tower of Parma! For scale here are some 1/72 miniatures – new kids on the block 1848 German Confederacy no less……….which can also double as Rifleman from Duchy of Parma 1851.
You can guess whats next on the Painting Table.
Finally, the question is, whether this will now lead to some more scenery making on my part?
A combination of Frank tank rats and john just add varnish have propelled me finally to do some scenery.
A 2021 lockdown tower knocked up in a day and then nothing…….
This subject was started back in April 2021 – I was motivated by john just add varnish and his excellent scratch builds.
It’s all card/plain and corrugated, uhu and some judicious glue gun work finished with some fine silver sand and pva. The ubiquitous laser cut bases came in useful
And just for the hell of it I registered this week to join scenery season challenge……
It’s still a work in progress…….
Just need some more dry brush on walls and maybe roof. Then some groundwork oh and door – it’s endless work in progress 😀
What are 28mm figures good for? Well if your a 1/72 figure follower then they are fantastic to paint!
Or rather in my case to experiment with. Recently Wargames Illustrated ran a contrast paints article while Wargames Soldiers and Strategy dealt with slap chop.
I have been edging towards these products simply because I bought a load on impulse. This is normal behaviour for an Erratic: A solution looking for a problem.
The problem has been I could not bring myself to use them in anger on my 1/72, 20-25mm figures without knowing their possibilities for me including my failures. Clearly they have been a great success for others.
And then there was the Wargames Illustrated article on “what a cowboy”, next minute I dug out some Dixon and Blue Moon figures from the dim and distant past, gathering dust in the great figure vault.
And then “ping” what if I experimented with these new paints and methods (new for me) on these figures?
They were definitely bought at Triples in Sheffield but around 2011!!! I think that means they were on the back burner……..
Anyway this is as far as I got and maybe I might not get much further – back on the painting table……
Big turf out and a surprising number of figures – they were already based and undercoated white. I sloshed cheap burnt sienna over them….I realised some were prohibition era gangsters while I also found a couple of freebies – Rasputin and Karl Marx. I primed these black. I then did some slap chop white dusting – at least I used a stolen make up brush on the gangsters……it worked quite nicely. Need to buy some.And then I simply ignored all the video and magazine advice I had gathered recently and got paint on the figures! Which was very pleasing. Note the appalling slap chop white work on Mr red hats arm – never mind.
Well this Tangent may develop or simply become another Icarus episode in the world of the wargaming erratic.
Wargames in Print has been on a rocky road – I was a subscriber to Battlegames (BG) not long after I found it by chance on a WHSmith railway station stall back in 2008. I abandoned that journey when it really disappeared into Miniature Wargames (MW). MW had always been a mixed blessing for me while Wargames Illustrated (WI) had been a favorite before leaving the hobby.
Henry Hyde and BG brought me back into the hobby. And I returned to the Wargames Publication world transformed by the Internet with Blogging/Being online all the rage.
I started reading blogs about 2011 and the print market now seemed terminal although BG helped sustain my interest. WSS I luckily discovered at another WHSmith when that shops footfall was in serious decline.
Today I am fully erratic! If I buy at all, it is mainly WSS but occasionally WI and MW.
The WSS focus was Hundred Years War and although at the wrong end of the war for my latest interest I decided to take a punt. I enjoyed it and I liked the range of scenarios/actions.
The Slap Chop/Grisaille method painting article was a bonus. I have read quite a few online articles on this subject yet some printed paper words and pictures were still enticing. That is the “print preference” still in me. I could contrast it (sorry) with the Speedpaint article in WI425, but I won’t, it was another very effective print article on a subject I have read round on the internet.
Now MW484. The last word was by Brenden Wheatley who talked about the importance of the Solo Wargamers Association and solo wargaming that sustained his hobby which he now pursues in both Budapest (see some hussars and music at the end of this post in Budapest) and Brecon!
Mid 19th Century warfare was a topic in WI425 – Perry French Franco Prussian War (FPW) plastics painting class while MW484 led with the Schlieswig Holstein Question.
Dave Tuck gave an excellent taster for the two wars – 1st and 2nd (1848 and 1864 respectively). Given MW style and content he did the subject justice and I would definitely recommend it to anyone wanting a clear straighforward way into the subject.
FREE RULES – Dave Tuck offers his ruleset via a link on the MW web page. FREE WARGAME RULES
Interestingly Dave Tuck started his journey before the FPW range from Perrys appeared and after the Helion range had ceased production. He had also used the North Star range. For coverage of the second war (1864) the one he opted to develop, he also resorted to conversions.
And I do think you should not be put off by the lack of a “go to” range. in 28mm 1864 can draw on Perrys FPW and any number of ACW ranges as well as other mid century wars in the Americas as well as the Crimean war of 1854.
If you are a uniform purist then that lack of exact replicas will probably drive you mad!
For the 1st war in 28mm, if you want to literally start at the beginning you can steal lots of Napoleonic era forces. 1815 to 1848 saw new uniform ideas but a lot of conservatism while weapons technology appeared to have stalled. A few months into the 1849/50 war and its all changing with kepis and pickelhaubes gathering pace alongside frockcoats, breechloaders, rifling and even the very early machine gun. Given quartermasters stores and regulations were never up to the minute, you can have lots of leeway in my view. You can borrow both back, forward and sideways for these wars!
I have grown to like the 1st Schlieswig Holstein war period simply because I get the best of both worlds – with the early versions of FPW uniforms and weapons still mixed up with Napoleonics. You have tailcoats, frockcoats, all types of shako, kepis, pickelhaubes, flat caps, smoothbores and rifled weapons in the mix plus of course emerging railways and telegraph.
If I was doing 28mm I would follow Dave Tucks approach and start with 1864 (the 2nd War) using FPW/ACW resources.
If your more Napoleonic in outlook opt for the 1848 or slightly earlier uniforms – the Danes are clearly still Napoleonic as are many German Confederation troops which just leaves the Prussians and Bavarians in their iconic pickelhaubes and combed helmets to be sourced from ACW/FPW era. And you don’t need fancy rifled/breechloading artillery yet – smooth bores will still work. You can also consider Crimea War for 1850’s era uniforms.
I would look at Ed M’s Wargames Meanderings for further inspiration if Dave Tuck’s article does not convince you.
I wanted as, with many of my projects, a low cost option. 1/72 plastics used to be low cost. Now they are no longer so cheap. Yet you can still pick up around 50 figures for £10. The key issue is sculpting quality, figure poses and paintability. You have to love the sculpts, I have grown to like their roughness in an age of 3D marketed perfection. To get the repetitous poses you may want you have to buy multiple boxes. My advice then is that if multiple poses is a problem go with 25/28mm sector metals. Finally paintability – the internet provides an astonishing window into the art of those who wash, prime and then successfully paint bendy plastics. My favorite site for inspiration is Pauls Bods – he can even make venerable airfix ranges look compelling. Also Philotep is worth a look. And you can always look at weather like Crimea, being winter wars there is a greatcoats crossover which can hide a multitude of things. Tumbling Dice Miniatures do ranges of 1/72 sculpts which are excellent – cast in pewter. I prefer the figures in summer gear with greatcoats packed away and blankets rolled. So Crimea ranges might also help here for those who want correct season clothing. Also Jacklex relaunched a few years ago in 20mm.
I opted for 20/25mm and have accepted a complete mash up of ranges both plastic and metal and the inevitable conversions.
20/25mm or 1/72 is small enough to hide the imperfections at 3 feet yet not so small that you can’t enjoy each figure in its own right. The scale remains my perfect compromise for the “table top” game.
WW1 Austrians repainted to 1850’s Danish in transition (Irregular Miniatures Metals)
Hat – Prussians from Zulu War British and ACW mash ups while WW1 Germans just get a repaint to become German Confederation troops. Nassau troops become well Nassauers for 1848 and offer also another take on Danish Bell Shako infantry.
Strelets – 1877 Russian dragoons become Danish Sharpshooters, 1806 Prussian Hussars become 1848 Prussian Hussars with a repaint
Airfix – WW1 British flat caps join ACW frock coats from strelets/hat to become Danish Riflemen in 1848
My latest addition is B&B Miniatures SH Rebel Dragoons and SH Rebel Artillery (in Prussian gear)
All this 20/25mm focus spun out of my Italian Wars of Independence 1848/1859 project (Italian wars of independence) when again I baulked at 28mm metal costs as the project was only meant to be a minor detour…….
Danish Line Infantry 1849 (Irregular Metals from their Colonial Range)
Alas the sheer variety of infantry types has overun my imagination and SHQ remains a questionable (sorry again) project with slow yet very enjoyable progress! Most units and figures are stuck on the paint table because I keep being distracted by mechanised warfare, medievals, Sci-Fi and yes even some FPW french figures daliance – Emhar – You can’t keep a good kepi down.
Which brings me back to WSS125 again and the 100YW. I have succumbed to yet more diversity in my painting – digging out my various unpainted medieval figures. My aim had always been Italy for this period, but it seems alighting on the battle of Shrewsbury 1403 while reading a biography of Henry IV caused me to re-examine an english force.
Who can avoid Hotspur…..thin end of a new wedge?
It remains to be seen what progress I make. And of course the next butterfly moment armed with a chance magazine purchase is probably just round the corner………