wargaming is everything from gaming on the table top with dice, painting figures, reading history, collecting figures, scenery and rules through to geography, politics, art, crafts and imaginative writing……..
What are 28mm figures good for? Well if your a 1/72 figure follower then they are fantastic to paint!
Or rather in my case to experiment with. Recently Wargames Illustrated ran a contrast paints article while Wargames Soldiers and Strategy dealt with slap chop.
I have been edging towards these products simply because I bought a load on impulse. This is normal behaviour for an Erratic: A solution looking for a problem.
The problem has been I could not bring myself to use them in anger on my 1/72, 20-25mm figures without knowing their possibilities for me including my failures. Clearly they have been a great success for others.
And then there was the Wargames Illustrated article on “what a cowboy”, next minute I dug out some Dixon and Blue Moon figures from the dim and distant past, gathering dust in the great figure vault.
And then “ping” what if I experimented with these new paints and methods (new for me) on these figures?
They were definitely bought at Triples in Sheffield but around 2011!!! I think that means they were on the back burner……..
Anyway this is as far as I got and maybe I might not get much further – back on the painting table……
Big turf out and a surprising number of figures – they were already based and undercoated white. I sloshed cheap burnt sienna over them….I realised some were prohibition era gangsters while I also found a couple of freebies – Rasputin and Karl Marx. I primed these black. I then did some slap chop white dusting – at least I used a stolen make up brush on the gangsters……it worked quite nicely. Need to buy some.And then I simply ignored all the video and magazine advice I had gathered recently and got paint on the figures! Which was very pleasing. Note the appalling slap chop white work on Mr red hats arm – never mind.
Well this Tangent may develop or simply become another Icarus episode in the world of the wargaming erratic.
The Second battle using my “Buildings Blast” set up saw a mid 19th century action with Austrians and Piedmontese in play. It was a solo play this time.
I used the rules published by John Curry and the “history of wargaming project” with some adaption for solo play.
Using Neil Thomas grading of troops I adjusted the firing and melee rules.
I also used the Roster system unaltered. Infantry got 4 circles and a cross while Artillery got just 2 circles in this game. Essentially in the basic game a hit meant a unit (= 1 base) was destroyed. Roster rules gave units/bases lives in the form of circles and crosses on the roster which you ticked off as they were lost.
The Scenario was that the Austrians were retreating and the force here was ordered to hold the bridge in the town. The crossing was one of only a few that allowed artillery and logistics easy crossing of the river. The Piedmontese advancing from the north west had orders to seize the bridge as quickly as possible.
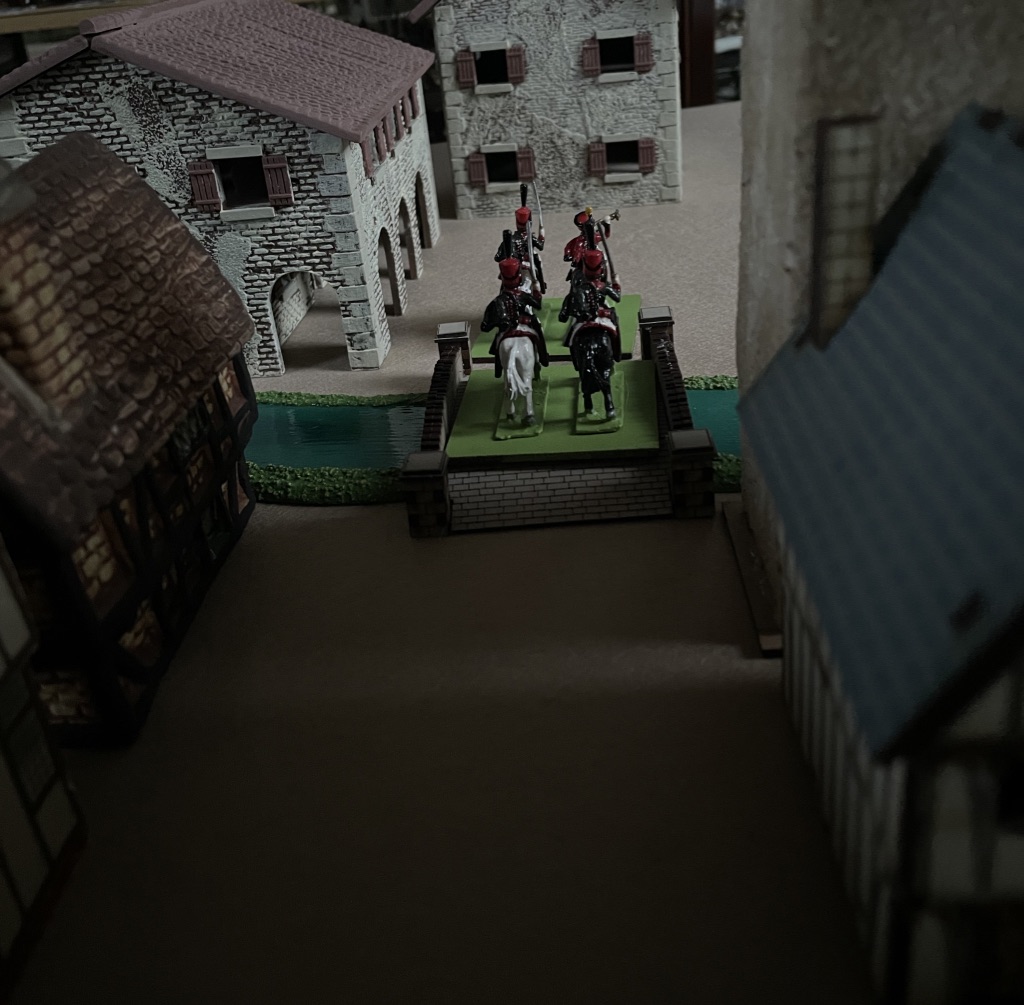
Forces were randomly assigned using playing card allocations along with a portion of blank entriesUnits deployed in contact and units were recognised as such at about 6 inches – the card only turned on a 2-6 D6. Here the right hand Piedmontese were certain nothing was in front of them – a heart was a dummy card while the left hand unit was not so sure so hesitated (on a d1) with no card turn. The right hand units poured forward towards the “old millhouse” spotting some real Austrian defendersThe lefthand Piedmontese units were suddenly exposed to Austrian infantry fire from a slightly sunken roadon the east side of the main road two piedmontese artillery batteries dropped into action again to be surprised by enemy troops in a slightly sunken and walled road. These were riflemen and on good form – one battery was quickly silencedHowever infantry units (white coated British Legion 1860) quickly drove them awayfierce fire was exchanged between the Bersaglieri and Austrians in the sunken road while Garibaldeans stormed the defended houses at the entrance to the townOn the east side 1859 Piedmontese infantry stormed the defended housesElsewhere Piedmontese forces had pushed on meeting little resistance (= dummy cards) to their front. A lone Austrian Artillery battery on the west side of town faces artillery and some more Bersaglieri Stubborn resistance at the Old Millhouse Finally the sunken road defenders are driven offAnd the west side Austrian defenders give up rather too quicklyexchange of fire results in another Austrian lossEven as west side Austrian defenders gather but………The Piedmontese quickly move towards their target – the river crossing. Another Artillery Battery blocks their wayOn the west side the Austrian defenders put up a good defence and with support nearby………The defended houses at the north end of town finally are overrunThe mill house and its defenders are abandoned by the Austrians who can retreatAustrian artillerists put up a stern defenceCrunch time at the town square as the Austrians are hemmed inThe Bersaglieri try to rush the ArtilleryThe Town centre defence collapses The Bersaglieri inexplicably turned tail on the west side while Lancers arrive to their rear. The British Legion finish off the town centre defenders on the left pictureThe Artillery of Piedmont watch as the last Austrian defenders in the town square are defeatedThe defended westside town square buildings are assaultedin a last desparate throw Austrian Hussars ride up the main street to halt the Piedmontese tide.The Hussars beat off the Lancers but to their rear the Artillerists are finally beaten while the East side is alive with Piedmontese. Everywhere Austrian defenders have melted away into the fields or across the bridge.The Hussars beat a retreat across the bridge bringing to an end the defence of the bridgePiedmontese Lancers cautiously follow.
The defended buildings were randomly determined and contained one unit each – no other benefits were given the building defenders. So they simply were a delaying factor assisting the mobile defenders fighting outside.
The scenario I played used a 25 step countdown and 1xd6 reduction per turn. The Austrians had to retire at countdown 16 from the edge of town, 7 – the town square and at 0 abandon the north river bank. Victory to Piedmont required they took the bridge before the countdown reached 0.
The game turns 1 to 3 were spent on the edge of town, then turns 4, 5 and 6 fighting over the town square. Turn 7 forced the Austrians back to the north bank but here ended the action as the Austrians actually ran out of defenders.
So the victorious Piedmontese captured the bridge intact and within the timescale set. There were no Austrian Engineers with a lit fuse to spoil their day! Anyway the Austrians would be back soon enough they thought…. Do I hear a Radetzky March in the distance?
For a very old ruleset Joe Morschauser’s rules played easy as I guess you would expect. With the tweaks to aid solo play they actually played very well.
I had bought the rule book for the Grid rules both the originals and Bob Cordery’s modernised version – Bob co edited the book with John Curry.
So this was a pleasant surprise to find a very playable set of “measurement based” rules into the bargain.
A constant theme of my interest in art is the variety of techniques on show.
My Weekend Open Studios visits prompted me to dig out some wooden offcuts I had minded to fashion into buildings.
The idea for “woodtown” was to provide my grid gaming with appropriately sized buildings. And they would be in keeping with the abstract nature of grid boards. In terms of the art they are definitely inclined towards Paul Nash. Ferens Art Gallery can be found in Kingston Upon Hull and an interesting painting by Paul Nash can be seen there.
Paul Nash – East Coast Portsome old bits of 2×1 with 45 degree cuts to create the roofline – at various heights to emphasise the randomness of old italian hill towns. The wood grain helps deflect thoughts that these are just bits of wood.The two clusters – the rough wood finish works on the red roof while the uneven whitewash fits the style
They make their first contribution in my recent Neil Thomas 1864 Minigame. Ironic that the game did not use grids…………
Having played out Neil Thomas’s minigame scenario I was left wondering if the unlikely Danish victory was just that.
In the first battle with this scenario the Austrians attacked straight up the road that was to be cleared yet they simply ran out of time.
This second battle was again run exactly as per the basic scenario suggestion by Neil Thomas.
same board size
same terrain
same units
units deployed at the start in the same way as the first battle except as below
At least the Danish Artillery put in an appearance.
The Austrian units arrived at the same point on the road but moved differently.
The Hussars charged up the road as before……..
The Hussars take a critical 4 hits from musketry and fail the required morale test – losing 2 bases at a stroke while the Austrian Artillery can’t seem to get the range right.The Danish Artillery push up the roadThe Elite Jaegar Infantry square up to the Danish Infantry (1866 style on the left and 1850 on the right!) Or Irregular Metals versus Hat Plastics – both are welcome in 20-25mm scaleThe 1866 dark blue caps drew their first melee with the Elite Jaegar (forcing their retreat) so had to advance in column to regain position in their own turn, meanwhile the artillery deploy. The 1850 Sky Blue caps decide to advance having suffered little damage from the austrian artilleryMove 5 and the 1866 Dark Blue caps have been driven off while a devastating artillery barrage has all but destroyed the 1850 sky blue caps. The Danish artillery made little impression on the remaining Elite Jaegar. Things are going wrong for the Danish With low morale to start with the Danish artillery fleeThe 1848 Danish Redcoats square up to the next assault by the Austrian Infantry. The Austrian Artillery fire blanks again but the 1850 Sky blue caps can only watch the austrian infantry charge past – they cannot attack unless they have more bases than the defender whereas the Austrians in this scenario get to attack anything anytime for the loss of their firing line capability. In the bottom right the Austrian skirmishers have sneaked round through the wood.Move 7 and the Austrians have been pummelled. Both Austrian Infantry columns have been shot away by the Danish defenders. The Austrian Artillery are still firing blanks while the Austrian Skirmishers are getting some hits on the Danish rear. Another assault and the 1848 Red coats have gone while the last danish infantry unit is taking hits from the skirmishers on their flankFinally the Austrian artillery are getting going – they blast away the last danish infantry alongside the skirmishers and remaining Austrain Infantry unit.Move 10 arrives and the Austrians have achieved their objective – time for some Radetsky Marching music………
A close run to the end but this time the expected outcome.
The Skirmishers had more effect by circling the eastern flank of the Danish. The dice throwing favoured the Austrians at critical moments – triggering morale collapse amongst the danish. As the danes were mainly levy this was to be expected and again its was more a case of their saving morale throws that meant the action went to 9 of the 10 permitted moves.
Published by Chatham Publishing in association with the National Maritime Museum this hard back book of 250 plus pages takes a highly selective trip through the Royal Naval presence in land war.
13 chapters – 3 about the Napoleonic era, 4 from mid 19th Century then 3 concerning the period 1896 – 1919 . Finally two from World War Two and one from 1999.
My interest was caught by two chapters. One about the 1840 Syrian campaign and then one about the 1855 action at Sweaborg in the Baltic. The Chapter on Walcheren 1944 then popped up.
£2 paid so worth a look.
A well produced well illustrated hardback complete with relevant mapsOne theme is the technology used in land actions by the Royal Navy – image National Maritime Museum
Each chapter covers a specific event so this is not a history as such.
Also there is a limited bibliography – but clear use of archive documents instead.
And the episodes provide some political context as well. Not least why the Navy did not have this or that when set a task. Also you get some perspective in government “interference”.
In a way this book has served two purposes.
providing insight on land oriented coastal naval actions.
giving ideas about potential for “counterfactual” events – something that interests me for my mid 19th century wargaming.
The book has a decent selection of images most of which are new to me.
But none quite like this one from my copy of a Times Illustrated commemoration of the coronation of King Edward VII in August 1902.
Neil Thomas offered this battle as an example of a small action using his mini battle setting. His rules assumed a 2’x 2′ or 600mm square. So thats board game sized.
His rules say you do not need to rebase. Always a positive these days.
I have a mixture of units – a result of my lock down era painting activity tending to paint what I fancied than worrying about actual armies!
The action is straightforward – the Danes are retreating and use a bottleneck on the key route north towards Jutland. The Danish rearguard are buying time for their main forces to retreat to their last defence line in Schlieswig – the Duppel fortifications.
suggested set up from book – copyright Neil Thomas.
Their opponent was the geographic “Empire” effectively still the Holy Roman Empire but now really the German Confederation post Waterloo with Austrian and Prussian interference/support.
In this case the Austrians were attacking the rearguard.
The Danish Rearguard
Infantry Unit A
Infantry Unit B
Infantry Unit C
Infantry Unit D
Artillery Battery E
The Artillery was Bronze Rifled while the Infantry were all Levy in loose order armed with rifled muskets.
The Danish troops are all deployed in the bottleneck.
The Austrians Attack starting at the river line comprise
9th Hussars – Average
Artillery – 2 batteries both with bronze rifled cannon
Their main forces arrive from move 1 on the main road
Jaeger Infantry unit – elite, rifled musket, loose order
Skirmishers – elite, rifled musket
On moves 2 & 3 the following units arrive via the same southern road access
Infantry Unit 6 – move 2 – average, rifled musket, loose order
Infantry Unit 7 – move 3 – average, rifled musket, loose order
Infantry Unit 8 – move 3 – average, rifled musket, loose order
Battle Narrative
With the objective to clear all danish forces from the road (at least 12cm from the road) essentially the Austrians simply went through the Front Door.
They had 10 moves to do it in with a win lose outcome and no draw.
Special Rules as suggested by Neil Thomas were used
Colonel Muller personal leadership of the Danes means any one unit at the start of any turn can be elite.
The Danish Artillery were quite ineffectual so get half the nortmal values in defence and attack
The Austrians fresh from rough handling by the French in 1859 adopt bayonet charges in preference to distance firefights. They stay in column the whole game and can charge without restriction (no unit base quantity advantage required)
Some shots of the action
Danish defence face the Austrian advance guard
The stream has no effect on movement except Artillery must use the bridge. The town can be accessed only by Infantry. The lake is impassable to all troops while infantry can move through the wood.
The Austrian battery drops into action as the 9th Hussars begin their fateful attack
The Danish front line are in line and not moving, supported by more mobile Column units behind. If infantry want to move in Neil Thomas’ rules they must be in column.
The 9th Hussars much reduced by musket fire charge home. The Austrian Skirmishers have made little impact but the Artillery have seriously depleted the Danish infantry to their front.The Danish front line has been blown away by the Austrian Artillery and the Elite Jaeger unit
Note in this game I chose not to field the woeful Danish Artillery ( i.e. I forgot to place them on the board!)
The second line of Danish infantry eventually destroy the Elite JaegerBut at the cost of another Danish unit when more Austrians charge homeIts the end of move 10 and the final Danish defence was about to be overrun by the Austrians
An Austrian victory seemed to confirm Neil Thomas’ view that history repeats itself with his suggested set up. In his notes he offers several options to up the defence capability of the Danes.
In this case a very narrow Danish Victory suggests a well thought out scenario by Neil Thomas. Generally I have found Neil Thomas scenarios are fun to play because they tend to lead to a lot of action and no quick outcomes. So although asymmetrical in set up they seem to be well balanced games.
Footnote:
The Figures are Irregular Miniatures and Hat for the Danish
In this picture top right clockwise – 1848 Danish Infantry, 1849 Danish Infantry then 1864 Danish and finally some rogue 1860 Piedmontese.The Austrians are top left clockwise Hat Grenzers – being Skirmishers then Minifigs (1970’s) French Hussars posing as the 9th, Waterloo1815 1859 Austrian Artillery and finally the elite Jaeger are WW1 Belgians painted as Neapolitan 1859 Cracciatori Light Infantry
Elsewhere in the photographs the regular Austrian Infantry on show are Waterloo1815 1859 Austrians in their white coats – in 1864 it was bitter winter weather so soldiers actually fought in their greatcoats.
Neil Thomas offers the mini game as a quick affair and it certainly was. Lots of enjoyment from a two foot square, scenery, dice and some figures.
If you strip it down making a car or a piece of art is the same thing. I am stretching a point here regarding quantity.
It is a creative process that ends in something tangible which may also be useful. And “use” can result in different things.
The piece of art that is still in use 200 years later because its action is to be seen. Or that car which was mercilessly driven in all weathers every day with every component exercised till its early demise on a scrap heap a few years later.
Wargamers are often gamers but as opposed to say Board gamers they are often model makers and nearly always painters.
And some Wargamers are collectors as well.
Add to this that some wargamers are what one would call artists – their work is exemplary, out of the ordinary, admired and copied.
And you can visit thousands of sites on the net to learn how they did this or that.
In a world that has rapidly replaced the physical world with the online world (both are real but different), it is interesting to meet real humans, who are artists and be able to connect their creations with their working area, their tools and discuss their processes right there – one to one.
No rewind – you have to listen and concentrate. It is an experience.
So York Open Studios offers you a hundred artists and makers to chose from. A useful booklet shows you where each artist/maker is located and a thumbnail picture and a few words provide the introduction.
My experience is that I select on image – it is disconcerting. I force myself to read the useful words – collage, etching, printing, digital, sculpture, carving…..
This time we wanted to walk between sites within a specific time frame – we chose an area with many locations and it meant we visited some locations where the brochure image was not compelling and the words uncertain.
At least one artist whose work I like had used an unfamiliar image and I could never remember their name. it was a surprise to find them in my list of maybe/so so sites to visit in the area we had chosen.
And the lesson about “reinforcing what you like means you might miss out” continued as I found my less preferred visits yielded very interesting discussions on process – how, why, what, where, when etc.
What is overwhelming?
Individuality – they may use fairly common materials, and even processes yet what they add is crucial. That is the most important ingredient
Commitment – despite the throngs of people in kitchens, conservatories, the garden shed, part of a living room – these people must spend a lot of time on their own to achieve what they do.
Enjoyment – to open your “studio/space” to strangers and be cross examined (politely of course) on how you did that or why did you do this – is an act of bravery – most of all I think it reflects their enjoyment of their work and the pleasure it gives them.
In a way wargame shows are those open studios when artists and makers show their work on the wargames table – the difference tending to be that you don’t buy (except at the nearest trader), you just look and maybe discuss. You might go home and copy their work – inspired by their enthusiasm – which includes the game as well – rules, scenery and figures.
Then there are the traders – many of whom are still small businesses in effect our hobbies most obvious artists and makers.
There is also a place for all those useful internet sources*.
And there is the irreplaceable act of human contact discussing a shared interest.
So whether it is a local arts and crafts show or that wargames show – “go see” – I am betting that seeing what others do will inspire you to paint more, make more and be more creative.
*That includes the American Railroad Modeller preoccupied with homemade Italian Cypress Trees which I might need one day!
Ok Cavalry has not been my top list item for mid 19th century forces. They don’t figure much in the record and are derided for ineffective battle action as well as being the scout forces that seemed to be missing in action as armies stumbled into each other.
Having said all that they still had colourful uniforms! At the end is an item about the obvious error…….
These figures date to my try a “few of many” period so no vast regiments but squadrons and patrols.
And of course composite cavalry units did seem the order of the day at times.
In this case I have opposing forces on show as well!
Central Italian League 1860 – Cavalry Regiment “Guide”*
*I have previously posted about the Warrior Napoleonic Hussars posing as Guides for the Central Italian League.
The Piedmont Cavalry are Waterloo1815 French Line Lancers.
The Uhlans are by Lucky Toys
The Austrian Dragoons are Hat Austrian Napoleonic Dragoons
I have used a range of grasses here over my standard 3 colour (burnt sienna base + ochre dry brush+ yellow/white highlights) painted budgie grit.
The Piedmont Cavalry are flocked with Woodland Scenics fine turf
The Austrian Dragoons are flocked with Woodland Scenics fine turf with Gamers Grass Dense Beige 6mm wild tufts
The Austrian Uhlans are flocked with Woodland Scenics fine turf with Gamers Grass Beige 2mm tufts
The Guides also sport Gamers Grass Dense Beige 6mm wild tufts
Which do you prefer?
A – Hussars in the brushwood?
B – Piedmontese on the thin turf?
C – The Uhlans in the small tufts?
D – The Dragoons in turf and brushwood?
Out of interest the painted base looks right when viewed on the games table but not in close up.
Warrior v Waterloo1815 v LuckyToys v Hat figures compared when painted and based
Flock references above and Grasses below
This ends a small flurry of completions for my mid 19th century armies.
The Error
My Piedmontese Cavalry have a helmet “comb” where there should not be one. “No comb” was the mid century fashion for Dragoons and Cuirassiers. Yet I could not bring myself to cut them off as they make this figure…………………..
Now the Danish are up against the Prussians yet their uniforms will not save them from defeat and the loss of Holstein and a great chunk of Schlieswig.
Had Britain taken more notice of the Schlieswig Holstein Question consequences, maybe 80 subsequent years of Teutonic misery across Europe might have been avoided.
Back to the figures – its a paint job with the caps being cut down at the front. To match my typically 24 mm 1/72 figures I based these with a washer beneath them as Irregular sell them as 20mm and use thin base metal. Some of the figures sport a black greatcoat.
I bought some Austrian WW1 infantry from Irregular Miniatures – I thought they might work for mid 19th century forces. The peaked cap was my interest. The lower leg bindings were not desired and the baggy trousers equally did not look promising. Also the front peaks were a bit obvious.
I put them aside way back in 2020.
And then just before Xmas 2022 I had another look and decided they might work as fill in for my mid 19th century Danish tests.
In this case I had a go at painting away the errors. The only mods were to slice off the hat top and add a sliver of tapered plastic. One original test with a tall “wood” mod cap can also be seen!
Here are some 1850 infantry fresh from defeating their German adversaries.
At the start of the war the Infantry sported Red tunics and Bell Shakoes. My previous post for such a unit is here.